Photoshop offers a powerful suite of tools for image manipulation, and understanding how to precisely control selections and paths is fundamental to achieving professional results. While creating intricate selections with tools like the Pen tool is a core skill, knowing how to deselect elements - whether it's an entire selection, a segment of a path, or an active layer - is equally crucial. This guide delves into the various methods for deselecting in Photoshop, offering clarity for both novice and experienced users.
The Fundamentals of Deselection
At its heart, deselecting in Photoshop means removing the active selection outline, often referred to as "marching ants." This outline signifies the area Photoshop is currently focused on for editing. When you've finished working within a selected area, or if you've made a mistake, deselecting ensures that subsequent actions do not inadvertently affect the wrong parts of your image.
The most universally recognized and fastest method for deselecting any active selection is through a simple keyboard shortcut:
- Windows: Press
Ctrl + D - Mac: Press
Command + D
This shortcut instantly clears the selection marquee. It’s a good habit to develop, tapping this shortcut after completing edits on a selection to reset your workspace.
Beyond the shortcut, Photoshop provides menu-driven and contextual options for deselecting:
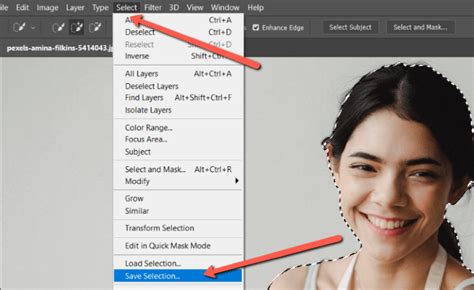
- Select Menu: Navigate to
Select > Deselectin the main menu bar. This achieves the same outcome as the keyboard shortcut. - Contextual Menu: Within the selected area, right-click (or
Control + clickon a Mac). A context menu will appear, offering a "Deselect" option.
For certain selection tools, like the Lasso or Marquee tools, you can also deselect by simply clicking or dragging outside the current selection boundary. This action effectively cancels the old selection and, in many cases, initiates a new, empty selection.
Tool-Specific Deselection Techniques
While the primary deselect methods are universal, some tools and workflows have specific nuances for deselecting.
Lasso and Marquee Tools
As mentioned, with Lasso or Marquee tools active, clicking or dragging outside the existing selection will deselect it. This is a direct and intuitive way to cancel a selection made with these tools. If you have an active selection, using a marquee or lasso tool and clicking/dragging outside the current selection will clear it.
Magic Wand and Quick Selection Tools
When using the Magic Wand or Quick Selection tools, clicking anywhere outside the current selection with either of these tools active will typically start a new selection, thereby ending the old one. For instance, one guide explains for the Magic Wand: “hold down the Alt (Windows) or Option (Mac) key and click on the area you want to deselect.” This effectively “unselects” that portion, allowing for precise refinement.
The Pen Tool and Paths
The Pen tool is renowned for its precision in creating vector paths, which can then be converted into selections. Deselecting paths operates slightly differently from pixel-based selections.
- Ending Path Editing: After completing a path with the Pen tool, if you want to stop editing that specific path and return to a neutral state, you can press
Esc. This exits the path editing mode. - Deselecting a Created Path: To clear a path entirely, you have several options:
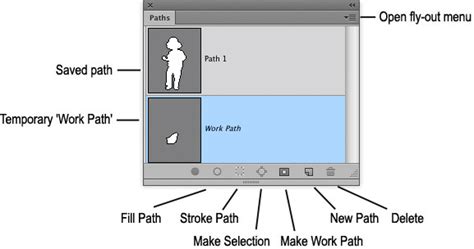
- Paths Panel: In the Paths panel, click on the "blank page" icon at the bottom. This creates a new, empty path and effectively removes the current one.
- Shift-Clicking: Community tips suggest
Shift-clickingthe path name in the Paths panel will deselect it. - Escape Key: While in path edit mode (with a path tool active), pressing
Esccan also deselect the path. - Options Bar: For the Pen tool, if you want to stop editing a path, you can click the "deselect path" button (it looks like a dotted square) in the options bar.
A common workflow with the Pen tool involves creating a path and then converting it into a selection. After converting a path to a selection (using Command + Return on Mac or Control + Enter on Windows), you can then deselect this newly formed selection using the standard Ctrl + D or Command + D shortcut.
For those seeking to refine paths rather than deselect entirely, the Command (Mac) or Control (Win) key acts as a temporary toggle to the Direct Selection Tool. Holding this key while clicking away from any path element deselects the last path, allowing you to then switch back to the Pen tool by releasing the modifier key. This is particularly useful when Esc doesn't stop the next anchor point from being added to the last path.
Create selection from multiple paths using pen tool in photoshop latest versions | H GraphicsPro
Refining Selections: Subtracting from Selections
Sometimes, you don't want to deselect an entire area but rather remove a specific portion from an existing selection. This is where the "subtract from selection" functionality comes into play.
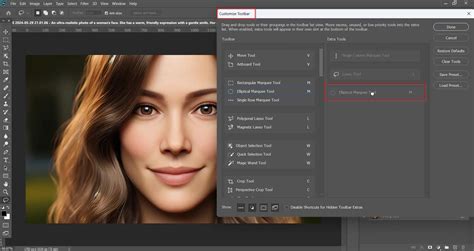
- Alt/Option Key: While a selection is active, hold down
Alt(Windows) orOption(Mac). You'll typically see a minus sign appear next to your cursor. With this modifier key held down, you can then click and drag over the part of the selection you wish to remove. This effectively carves out unwanted areas. - Subtract Icon in Options Bar: For most selection tools (Lasso, Marquee, etc.), the options bar displays icons representing different selection modes: New Selection, Add to Selection, Subtract from Selection, and Intersect with Selection. Clicking the "Subtract from Selection" icon (often depicted as overlapping squares with a minus sign) changes the tool's behavior so that subsequent selections will remove areas from the existing selection.
Quick Mask Mode for Precision
Quick Mask mode offers a visual and intuitive way to refine selections.
- Enter Quick Mask: Press the
Qkey. Your selection will appear as a translucent red overlay. Areas not selected will be fully red. - Paint to Refine: Using a paintbrush tool, paint with black on the red overlay to remove areas from the selection, or paint with white to add areas back into the selection.
- Exit Quick Mask: Press
Qagain. The red overlay will disappear, and your selection will be updated. You can then deselect usingCtrl + DorCommand + D.
Layers and Masks: Different Types of Deselection
It's important to distinguish between deselecting pixel-based selections and managing active layers or masks.
Deselecting Layers
In the Layers panel, Photoshop typically allows only one layer to be active at a time. To deselect an active layer (so no layer is highlighted):
- Click Empty Area: Click on an empty space within the Layers panel, usually below all the listed layers. This will remove the highlight from the currently active layer.
- Ctrl/Command-Click: You can also
Ctrl + click(Windows) orCommand + click(Mac) on a selected layer to deselect it.
Deselecting Masks
When you create a mask (either pixel-based or vector), it's not a "selection" in the marching ants sense. To "deselect" mask editing:
- Click Layer Thumbnail: Simply click back on the layer thumbnail or any other layer in the Layers panel.
- Quick Mask/Escape: If a mask overlay (red or gray) is currently displayed, pressing
Q(to exit Quick Mask mode) orEsccan also deselect the mask editing context.
Avoiding Common Pitfalls
A crucial aspect of efficient Photoshop work is understanding what happens when you forget to deselect. If you have an active selection and then begin drawing a new shape, painting, or applying a filter, that action might only affect the previously selected area, leading to unexpected results and confusion. It is therefore good practice to deselect when you're finished with a particular selection.
If you find yourself asking, "Why isn’t Ctrl+D (Cmd+D) working?", consider these points:
- No Active Selection: Ensure there is actually an active selection (marching ants) present. If nothing is selected,
Ctrl + Dwill have no effect. - Tool in Special Mode: If a specific tool, such as the Type tool or Pen tool, is in a special editing mode, you may need to exit that mode first (often by pressing
EnterorEsc) beforeCtrl + Dwill function as expected for general deselection.
Advanced Path Manipulation
The Pen tool offers sophisticated control over paths, and understanding its related tools is key to mastering path deselection and manipulation.
Path Selection and Direct Selection Tools
- Path Selection Tool (A): Use this tool to select an entire path.
- Direct Selection Tool (A): Use this tool to select and manipulate individual segments of a path, such as anchor points and direction lines. Clicking on a selected anchor point with the Direct Selection tool will select that point and deselect others. Holding
Shiftwhile clicking on a selected anchor point allows you to remove it from the selection.
Selecting Multiple Paths and Anchor Points
- Multiple Paths: With the Path Selection tool,
Shift-clickor drag a marquee to select multiple paths simultaneously. - Anchor Points: Click on an anchor point to select it. If anchor points are not visible, clicking on their approximate location will select them.
Shift-clickor drag with the Direct Selection tool to select multiple anchor points.
Transforming Paths
With a path selected, you can access Edit > Free Transform Path. While in Free Transform mode, the Link icon in the Options bar controls the aspect ratio constraint, and this setting is persistent. You can rotate paths by positioning the cursor outside the transformation handles until it becomes a double-headed arrow, then drag. The Reference Point can also be adjusted to define the center of transformations.
Duplicating Paths
To duplicate a path, use the Option-drag (Mac) or Alt-drag (Win) shortcut in the image area.
Repositioning Anchor Points While Drawing
When drawing with the Pen tool, if you need to reposition an anchor point immediately after clicking to set it, holding the Spacebar allows you to drag that point. If you have already released the mouse button, holding Command (Mac) or Control (Win) temporarily toggles the Pen Tool to the Direct Selection tool, enabling you to reposition anchor points or direction lines.
Converting Anchor Points
The Convert Point Tool (accessible by holding Option on Mac or Alt on Windows while the Pen tool is active) allows you to convert a smooth anchor point to a corner point by clicking on it, or convert a corner point to a smooth, curved point by clicking and dragging.
Photoshop offers a diverse array of methods for deselecting, catering to various workflows and tool usages. Whether you're quickly clearing a pixel selection with Ctrl+D, meticulously refining a path with the Pen tool’s modifiers, or managing active layers, understanding these techniques ensures greater control and efficiency in your image editing process. Mastering these seemingly small details can significantly enhance your overall productivity and the quality of your final output.