Gradients are a powerful artistic tool, capable of infusing depth, texture, and a dynamic visual appeal into your digital artwork. A color gradient, at its core, represents a seamless transition or blend from one hue to another. Procreate, while not featuring a dedicated "gradient tool" in the conventional sense, offers several intuitive and effective methods for creating these captivating color blends. This tutorial will delve into various techniques for crafting gradients in Procreate, including how to fill shapes with them and how to creatively recolor existing gradients.
To follow along with the examples provided, you will need the default Soft Brush found within Procreate, a PNG image file (such as those available from The Huge SVG Bundle), and stamp brushes from sets like the 32 Mystic Procreate Stamps. For those new to Procreate brush installation, a helpful tutorial on how to install Procreate brushes is readily available.
Creating Gradients with Gaussian Blur: The Foundation of Smooth Transitions
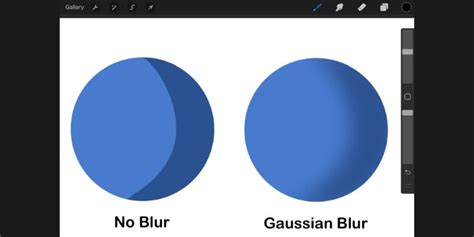
The Gaussian Blur effect is an indispensable tool for achieving smooth, blurred transitions, making it an ideal method for creating gradients. This powerful feature can be applied to entire layers or selectively to areas you touch with your stylus. For the purpose of this tutorial, we will focus on applying Gaussian blur to whole layers.
Step-by-Step Gaussian Blur Gradient Creation
Fill Layer With Color: Begin by opening your Procreate color palette and selecting your desired starting color. Fill the entire active layer with this chosen hue. The visual aid in step 2 will offer a clearer perspective on this initial step.
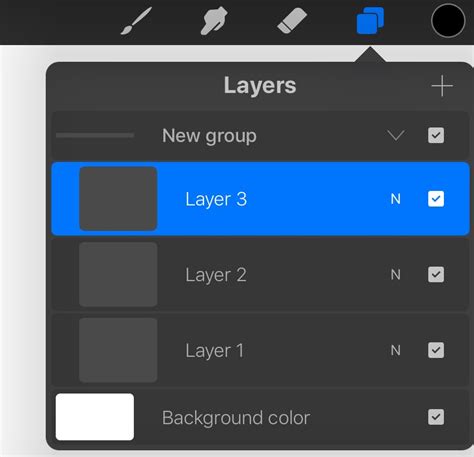
Fill New Layer With Another Color: Next, create a new layer positioned above your initial colored layer. Select a second color from the palette and fill approximately half of this new layer with it.
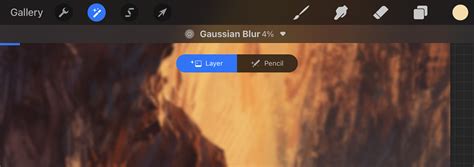
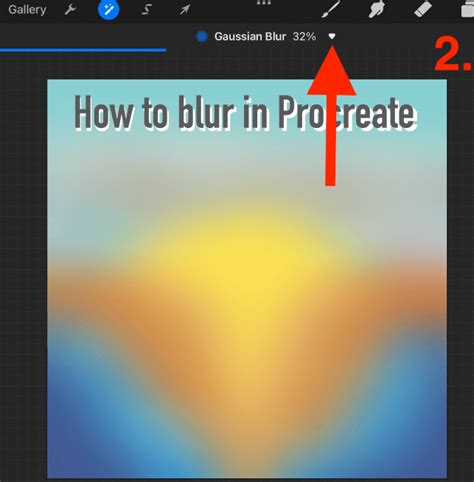
Activate Gaussian Blur: Locate and tap the Adjustments button, typically found in the top menu bar. From the presented options, select Gaussian Blur, and then choose the "Layer" option to apply the blur effect across the entire layer.
Adjust Gaussian Blur: Control the intensity of the blur by sliding your finger or stylus left or right across the screen. This action will modify the smoothness of the transition between colors.
Form a Single Gradient Layer: To consolidate your gradient, merge the two layers into a single entity. This is achieved by pinching the layers together with two fingers in the Layers panel.
This Gaussian blur method is remarkably versatile and can be applied to create gradients across various shapes, not just linear elements.
Multi-Color Gradients with Gaussian Blur
The Gaussian blur technique is not limited to just two colors. You can incorporate as many colors as your artistic vision dictates. The crucial step is to ensure that all the colors intended for the gradient are present on a single layer before applying the Gaussian blur effect.

Circular Gradients with Gaussian Blur
The Gaussian blur method is equally effective for generating circular or radial gradients, demonstrating its adaptability for different gradient styles on solid color shapes.
Crafting Gradients with the Soft Brush: Organic and Flowing Transitions
While the Gaussian blur method excels at precise blending, using the Soft Brush offers a more organic approach, allowing gradients to follow the natural curves and strokes of your drawing. This method might be less precise for achieving perfectly straight gradient lines but is excellent for creating flowing, hand-drawn effects.
Step-by-Step Soft Brush Gradient Creation
Set Up Base Color Layer: Start by selecting your base color and filling a layer with it. Then, choose your second color. Navigate to the Brush Library, select the Soft Brush from the Airbrushing category, and set its size to be relatively large.
Draw Gradient With Brush: Zoom out on your canvas to make it more manageable. Beginning with your stylus off the canvas, slowly draw across the canvas to create the gradient effect. You can seamlessly add more colors by repeating this process with different hues.
Refine Gradient with Gaussian Blur or Smudge Tool: If the blending isn't to your satisfaction, you can further refine the gradient by applying a small amount of Gaussian blur to the layer or by utilizing the Smudge tool. Remember to merge your layers into a single gradient layer once you are content with the result.
Utilizing the Selection Tool's Feather Option for Soft Edges
The Feather option within Procreate's Selection tool is designed to create soft, blurry edges, and it can also be ingeniously employed to construct gradients.
Step-by-Step Feathered Selection Gradient Creation
Fill Layer With Color: Select your primary color and fill a layer with it. Then, choose your secondary color.
Activate Selection: Tap the Selection button, usually located in the top menu.
Enable Color Fill: In the Selection toolbar at the bottom of the screen, tap "Color Fill" to activate it. This will allow you to fill your selection directly.
Draw Selection: Choose a Selection mode (e.g., Freehand) and draw the desired shape for your gradient. If using Freehand mode, tap the grey circle node once you have completed your selection. The image below illustrates steps 1 through 4.

Enable Feathering: Proceed to tap "Feather" and adjust the slider to determine the desired softness or blurriness of the edge. Once satisfied, tap the Selection button again to confirm and apply the changes.
Recalibrating Colors: The Gradient Map Feature
For those instances where the existing gradient colors don't quite hit the mark, Procreate's Gradient Map feature offers a powerful solution for recoloring. This feature is not only capable of transforming gradients but can also be applied to entire artworks. The Gradient Map intelligently analyzes the tonal range of your image, considering highlights, shadows, and midtones, to apply the new color scheme.
Step-by-Step Gradient Map Recoloring
Enable Gradient Map: Access the Adjustments menu, tap "Gradient Map," and then select "Layer" to apply it to the current layer.

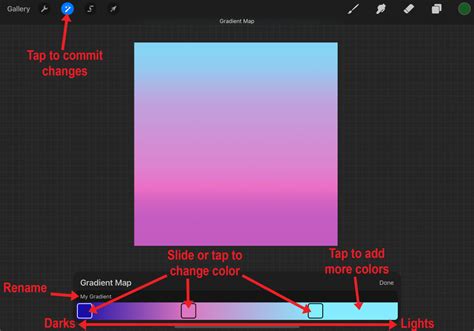
Gradient Library Overview: Within the Gradient Library, you have the flexibility to choose from a selection of pre-set gradient palettes or to craft your own unique combinations. To modify an existing palette, tap and hold it to reveal options for duplication or deletion. Tapping a palette or the "+" icon will open the detailed Gradient Map interface.
Gradient Map Interface Explained: In this interface, you can rename your gradient palette, alter the colors in the existing boxes, reposition these color stops along the gradient bar, or add new colors. The left side of the gradient bar influences the darker areas of your artwork, while the right side affects the lighter areas. To remove a color stop, simply tap and hold it until a delete option appears. Adjust and slide the color stops to achieve your desired color transition. Once you have finalized your adjustments, tap the Adjustments button to commit the changes.
The Gradient Map offers a sophisticated way to reimagine the color identity of your gradients and raster artwork.
Advanced Gradient Techniques and Considerations
Procreate's flexibility allows for more nuanced gradient creation beyond the fundamental methods. Exploring options like Perspective Blur and Motion Blur can introduce unique dimensional qualities to your gradients.
Advanced Blurring Techniques
Perspective Blur: This tool introduces a blur that emanates from a central point, creating a sense of depth and perspective. You can manipulate the position of the central disc and the direction of the blur. Notably, Perspective Blur also includes a "Pencil" option, enabling localized application of the effect.
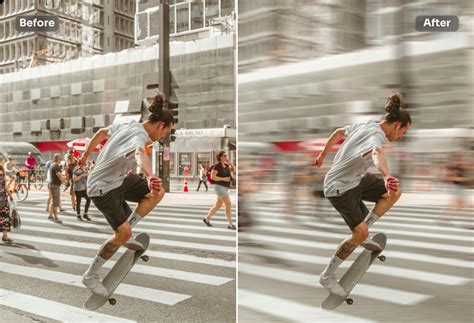
Motion Blur: Unlike the static nature of Gaussian blur, Motion Blur allows for the creation of directional blurs, simulating movement. You can control the intensity of the blur and its direction (horizontal, vertical, diagonal, or any custom path). Similar to other blur tools, Motion Blur offers "Layer" and "Pencil" application modes. The "Pencil" mode, activated by tapping the white triangle near the percentage, lets you paint the blur effect precisely where you desire.
Filling Shapes with Gradients
Once you have created a gradient, you might want to fill specific shapes with it. This can be achieved by using the Selection tool to define your shape, then applying the gradient. For instance, to fill an ellipse with a radial gradient:
- Create your radial gradient on a separate layer.
- Activate the Ellipse selection tool.
- Draw your ellipse.
- With the top layer containing the gradient active, open the Gaussian Blur effect.
- Apply a full blur by swiping from the left side of your screen to the right.
- Alternatively, you can copy your gradient layer and paste it into a selection made within another shape.
Repeating Gradients
To create repeating gradient patterns, you can generate a single gradient, then duplicate its layer multiple times. Using the Transform tool with "Freeform" or "Uniform" options, along with snapping enabled, you can precisely position these duplicated gradients to form a seamless pattern.
The Brilliance of Manual Gradient Creation in Procreate
It's worth noting that while Procreate doesn't possess a one-click gradient tool, this absence highlights the platform's design philosophy, emphasizing manual control and creative problem-solving. The ability to manually construct gradients using tools like Gaussian Blur and the Soft Brush demonstrates the power and flexibility inherent in Procreate's feature set. Often, features that might seem missing are rendered unnecessary by the elegant workarounds available, encouraging a deeper understanding and mastery of the existing tools.
How To Create Smooth Gradients in Procreate (3 EASY METHODS) | Procreate Tutorial
The process of creating gradients in Procreate, though requiring a few more steps than in some other applications, is remarkably efficient and yields professional results. By mastering these techniques, artists can imbue their work with stunning color transitions and a heightened sense of visual sophistication.
For those looking to further enhance their Procreate workflow, exploring curated asset bundles such as smoke and dust brushes can offer unique textures and effects that complement gradient work beautifully.
Understanding how to effectively use Procreate's diverse tools, including those for creating and manipulating gradients, is key to unlocking the full potential of this powerful digital art application.