Pixel art, with its distinctive blocky aesthetic, evokes a powerful sense of nostalgia, harkening back to the golden age of video games. The visual styles of iconic platforms like the Atari 2600, Nintendo Entertainment System, and Sega Genesis have not only influenced millions of creative minds but continue to inspire new generations of digital artists. This art form, born out of necessity in the early days of computing when hardware limitations dictated low resolutions, has evolved into a deliberate artistic choice, celebrated for its unique charm and the meticulous attention it demands. While once a requirement, pixel art now thrives as a distinct style, capable of evoking deep emotional connections through its retro digital art appeal.
Understanding the Fundamentals of Pixel Art
At its core, pixel art is an art form that uses distinct, discrete color elements-pixels-to create images. Pixels are the fundamental building blocks of digital images, tiny squares of a single color. In most digital images, like JPG, PNG, and GIF files, these pixels blend seamlessly to form a cohesive picture. Pixelation occurs when these individual pixels become visible to the naked eye, rather than being perceived as a smooth, blended whole. This effect can happen accidentally, for instance, when an image is resized to dimensions far exceeding its original resolution, leading to a blurry and undesirable outcome. However, pixel art embraces and intentionally utilizes this characteristic, transforming visible pixels into a deliberate aesthetic choice.
The essence of pixel art lies in its resemblance to early computer and video game imagery. The artists of the 1970s and 1980s, working with limited hardware, had to innovate and distill images down to their most essential components, making the individual pixels an unavoidable and defining feature. This necessity gave rise to an entire genre of art. Even in the more detailed 16-bit era of the 1990s, the spirit of pixel art-the careful arrangement of individual color units-remained. This art form is not dissimilar to other artistic techniques that rely on the arrangement of small, distinct units to form a larger picture, such as cross-stitch, pointillism, or the Ben Day process.
To embark on creating pixel art, several key considerations come into play:
- Resolution Emulation: Decide which era of graphics you wish to emulate. Are you aiming for the stark simplicity of 8-bit graphics, or the slightly more detailed look of 16-bit imagery?
- Pixel Size Determination: This relates directly to the resolution and the overall canvas size.
- Color Palette Selection: Limiting your color palette is often a hallmark of pixel art, especially when emulating older systems.
- Artistic Intent: Pixel art isn't merely art made of pixels; it's art that specifically evokes the visual language of early digital media.
Setting Up Adobe Photoshop for Pixel Art Creation
While Adobe Photoshop is a powerful and versatile tool for a wide range of graphic design tasks, it doesn't possess a dedicated "Pixel Art Mode." This can be a point of confusion for newcomers, leading them to search for specific settings. The key to unlocking Photoshop's pixel art capabilities lies in adjusting its fundamental image interpolation and grid settings. The goal is to ensure that when you draw, each mark is a single, hard-edged pixel, and that when you scale your artwork, it maintains this crisp, blocky appearance rather than becoming blurred.
Step 1: Creating a New Document
The foundation of any pixel art project is a new document created with the right dimensions. For pixel art, especially when aiming for a retro feel or a specific sprite size, it's crucial to start with a very small canvas.
- Navigate to File > New.
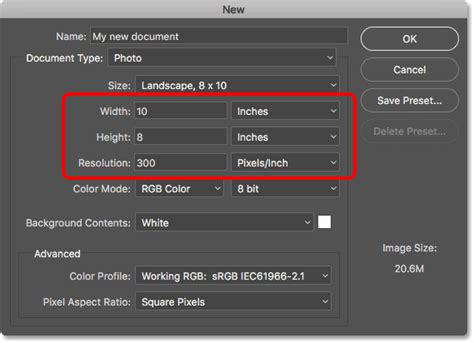
- In the "New Document" dialog box, set the Width and Height to very small values. Common starting points for pixel art sprites might be 16x16, 32x32, or 64x64 pixels. For larger scenes, you might go up to 256x256 or 512x512, but always begin with a resolution where individual pixels are clearly discernible without excessive zooming.
- Set the Resolution to 72 PPI. This is the standard pixel density for web use and is appropriate for pixel art.
- Ensure the Color Mode is set to RGB Color.
- Click Create.
Step 2: Adjusting Photoshop's Preferences
The default settings in Photoshop are designed for photographic manipulation and smooth gradients, which are the antithesis of crisp pixel art. Two critical preference adjustments are necessary: Image Interpolation and Grid settings.
Image Interpolation: Preserving Hard Edges
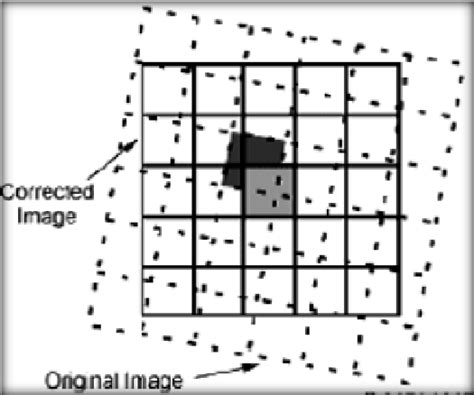
Image interpolation is how Photoshop calculates pixel values when resizing or transforming images. The default settings, such as Bicubic or Bilinear interpolation, are designed to create smooth transitions and can result in a blurry, undesirable effect when scaling pixel art. You need to instruct Photoshop to use an interpolation method that preserves hard edges.
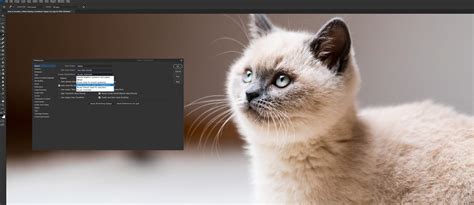
- Go to Edit > Preferences > General (on Windows) or Photoshop > Preferences > General (on macOS).
- In the "General" tab, locate the Image Interpolation setting.
- From the dropdown menu, select Nearest Neighbor (preserve hard edges). This setting ensures that when Photoshop resizes or transforms your image, it duplicates existing pixels rather than blending them, maintaining the sharp, blocky look of pixel art.
- Click OK to save the changes.
Grid Settings: Visualizing Individual Pixels
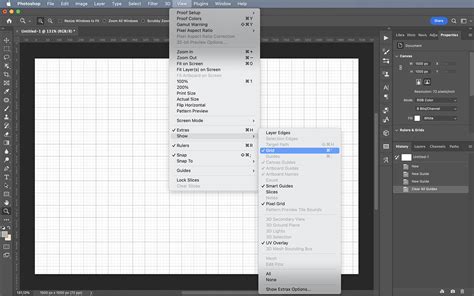
A grid is an invaluable tool for positioning and aligning elements precisely in pixel art. To make the grid truly useful for pixel art, it needs to be configured to display each individual pixel as a distinct unit.
- While still in the Preferences dialog box, navigate to Guides, Grid & Slices.
- Under the Grid section:
- Set Gridline Every to 1.
- Change the dropdown unit to Pixels.
- Set Subdivisions to 1.
- Click OK.
With these settings applied, your grid lines will now precisely delineate each pixel on your canvas, providing an accurate visual guide for placing your colored squares.
Step 3: Configuring the Drawing Tools
Once your document and preferences are set up, you need to ensure your drawing tools behave as expected for pixel art.
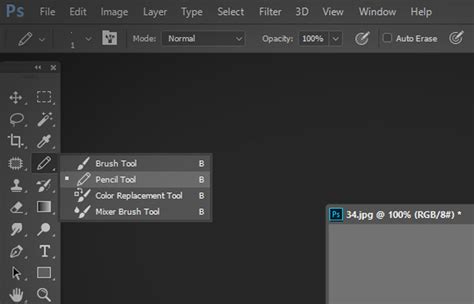
- Select the Pencil Tool from the toolbar. The Pencil Tool is crucial because, unlike the Brush Tool, it draws hard-edged lines and creates single-pixel marks when set to a size of 1 pixel.
- In the Options bar at the top of the screen, set the Pencil Tool's Size to 1 px.
- Ensure that Anti-aliasing is unchecked for the Pencil Tool. Anti-aliasing smooths edges, which is precisely what you want to avoid in pixel art.
The Pixel Art Creation Process in Photoshop
With Photoshop configured for pixel art, the actual creation process becomes remarkably straightforward, yet demands meticulous attention to detail.
Step 1: Drawing with Precision
Armed with the Pencil Tool set to 1 pixel and a grid that highlights each pixel, you can now begin to draw.
- Select the Pencil Tool (B).
- Ensure the Size is set to 1 px in the Options bar.
- Choose your desired Foreground Color.
- Click directly on the canvas to place a single pixel of your chosen color.
- Continue to place pixels, building your image one square at a time. The grid will serve as your guide, ensuring that each placement is deliberate and aligned.

This method requires a high degree of focus, as every single pixel contributes to the final image. Unlike traditional painting where broad strokes can be used, pixel art demands the careful placement of each unit.
Step 2: Utilizing Sprites and References
Inspiration for pixel art often comes from existing retro games. Studying the pixelated characters and environments from classics like Final Fantasy, Super Mario World, Kirby, Pokémon, or Pac-Man can be incredibly enlightening. Recreating these classic designs, or using them as a basis for your own work, is a common and effective learning method. Artists like Emi Monserrate suggest that direct references from real life don't always translate as effectively to pixel art as they do in other digital art disciplines. Instead, focusing on the "pixel path" of existing artists can be more beneficial.
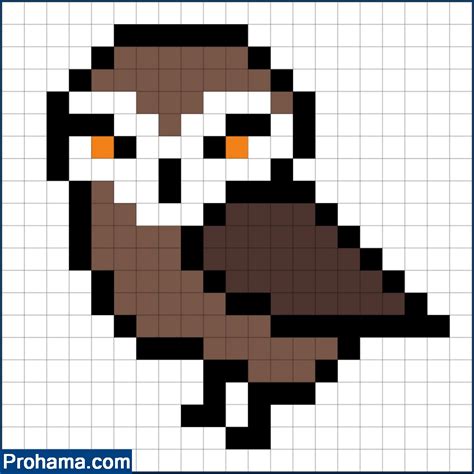
Consider the example of a simple owl. While it might seem basic, constructing even a rudimentary shape requires careful pixel placement to define its form, eyes, and beak. This process reinforces the fundamental principles of pixel art.
Step 3: Optional Step - Resizing Your Pixel Art
Once you have completed your pixel art at its native low resolution, you might want to display it at a larger size, perhaps for a game asset or a larger piece of art. This is where the Image Interpolation setting you configured earlier becomes vital.
- Go to Image > Image Size.
- In the "Image Size" dialog box, you can change the Width and Height to larger dimensions. For example, you might scale a 16x16 pixel image to 1024x1024 pixels.
- Crucially, ensure that the Resample option is checked, and that the interpolation method selected in the dropdown is Nearest Neighbor (preserve hard edges). This ensures that the scaling process duplicates pixels, maintaining the crisp, jagged edges characteristic of pixel art. If you were to use Bicubic interpolation here, your scaled artwork would become blurry and lose its pixelated charm.
- Click OK.
When exported as a PNG or GIF file, your upscaled pixel art will retain its sharp, distinct pixel appearance, even at much larger dimensions.

Beyond the Basics: Advanced Techniques and Considerations
While the core setup and drawing process are fundamental, there are other aspects to consider for more advanced pixel art creation.
Selective Pixelation with Filters
Photoshop does offer filters that can intentionally pixelate an image, though these are generally used for different effects than direct pixel art creation. However, understanding them can offer insight.
- Mosaic Filter: The
Filter > Pixelate > Mosaicfilter redraws pixels as blocks of color. By adjusting the "Cell Size" slider, you can control the size of these blocks. This filter is useful for creating a general pixelated look or for specific artistic effects. - Smart Filters: To apply filters non-destructively, you can convert your layer to a Smart Object. Select your layer, then go to Filter > Convert for Smart Filters. This allows you to add, remove, adjust, or hide filters at any time without permanently altering the original pixels.
- Eraser Tool for Selective Effects: You can use the Eraser Tool to selectively remove areas of pixelation created by filters, or to refine specific parts of an image.
While these filters can create a "pixelated" look, they are not the primary method for creating intentional pixel art from scratch, which relies on the precise placement of individual pixels.
Understanding Image Formats
When saving your pixel art, the file format is important.
- PNG and GIF: These formats are lossless, meaning they do not degrade image quality when compressed. They are ideal for pixel art because they preserve the sharp edges and distinct colors without introducing artifacts.
- Avoid JPG: JPG files use lossy compression, which can introduce unwanted artifacts and blurriness, particularly around the hard edges of pixels. This is generally unsuitable for pixel art.
Exploring Other Software and Vector Pixel Art
While Photoshop is a capable tool, it's worth noting that other software is specifically designed for pixel art. Programs like Aseprite, Piskel, or GraphicsGale offer dedicated tools and workflows that can streamline the pixel art process.
Furthermore, it's possible to create "pixel art" in vector graphics programs like Adobe Illustrator. By using precise square shapes and snapping them to a grid, you can create vector-based pixel art. The advantage of this approach is that vector images are infinitely scalable without any loss of quality, meaning your pixel art can be resized to any dimension while maintaining its crispness. However, Photoshop-created pixel art is composed of actual pixels, and when scaled up without the correct interpolation, it can appear blurry. This can be a drawback if extreme scaling is required, but it also means that the "pixelated" look can be an inherent characteristic of the image itself at larger sizes.
The ONLY Pixel Art Guide You Need (Beginner to Advanced)
The Enduring Appeal of Pixel Art
The art style of pixel art, deeply intertwined with the visual language of early video games, continues to captivate audiences. The visual style of the Atari 2600, Nintendo Entertainment System, Sega Genesis, and early computer graphics has influenced-and continues to influence-millions of creative minds. Pixel art draws on that influence and nostalgia, offering a unique aesthetic that is both accessible and deeply rewarding to create.
Pixel art isn't just a throwback; it's a vibrant and evolving art form. Whether you're creating stand-alone pieces, animated sprites for games, or entire virtual worlds, pixel art offers a powerful way to evoke nostalgia and connect with audiences on a fundamental level. The demand for pixel art, while niche, is consistent, particularly within the video game industry. Participating in game jams, where developers, artists, writers, and designers collaborate on a tight deadline, can be an excellent way for aspiring pixel artists to integrate into larger creative teams and contribute to complex projects.
The days when pixel art was a technical necessity may be over, but its status as a deliberate and beloved artistic choice is firmly established. It calls for a high degree of attention to detail, rewarding the artist with a distinct visual style that is instantly recognizable and deeply resonant. The journey into pixel art, whether through the meticulous placement of single pixels in Photoshop or the exploration of specialized tools, is a pathway to a rich and enduring artistic discipline.