Procreate, a powerful digital art application, offers several intuitive methods for artists to achieve precise shapes, including the elusive perfect circle. Whether you're a beginner seeking foundational skills or an experienced digital painter looking to refine your workflow, understanding how to draw a perfect circle in Procreate is an essential technique. This guide will walk you through the primary tools and settings available, ensuring you can effortlessly create flawless circles for any artistic endeavor.
The QuickShape Tool: Your Gateway to Geometric Perfection
At the heart of Procreate's shape-drawing capabilities lies the QuickShape tool. This intelligent feature automates the process of transforming freehand strokes into perfect geometric forms.
Activating and Utilizing QuickShape
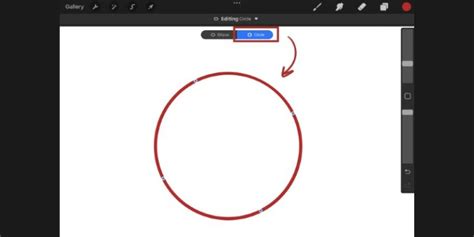
The journey to a perfect circle begins with a simple, imperfect stroke. Select any Procreate brush you prefer and draw an oval on your canvas. The key to activating QuickShape is to keep your pencil held on the canvas after completing the stroke. Don't lift your stylus immediately. After a brief moment, you will notice "Edit Shape" appearing automatically at the top of your screen. This signifies that QuickShape has recognized your drawing and is ready for refinement.
Once "Edit Shape" is engaged, a notification bar will present you with various options tailored to your initial shape. For a freehand oval, these options will typically include "Perfect" or "Ellipse," allowing you to snap your drawing into a precise geometric form. Tapping on the desired option will instantly convert your rough sketch into a geometrically accurate shape.
Fine-Tuning with Transform Nodes
After your shape has been perfected by the QuickShape tool, you enter "Edit Shape mode." In this mode, transform nodes will appear on your circular shape. These nodes are your control points, offering precise manipulation of the circle's form. You can drag a node to adjust any part of your circular shape in Procreate. This allows for subtle modifications, ensuring your circle is exactly as you envision it. When you are satisfied with the adjustments, simply tap anywhere on the canvas outside of the circle to exit Edit Shape mode.
Enhancing QuickShape Control Through Gesture Controls
For an even more refined and efficient experience with the QuickShape tool, Procreate offers customization options within its Gesture Controls. To access these settings, navigate to Actions > Prefs > Gesture Controls > QuickShape.
Within this menu, you can enable specific settings to streamline your workflow. Turning on the first and last settings is particularly beneficial. With these enabled, when you draw a shape and tap on the square button (which typically brings up transform options), the "Edit Shape" option will appear for the last drawn shape. This means that after drawing your circle, a quick tap on the transform square will immediately bring up the "Edit Shape" interface, allowing for swift adjustments without needing to hold your pencil down. This is especially useful when you're working with multiple layers and need to quickly refine a shape without disturbing other elements on your canvas.
Integrating Circles into Your Artwork Workflow
Beyond simply creating a perfect circle, understanding how to integrate this technique into a broader artistic workflow is crucial. This involves thoughtful layer management and the use of Procreate's brush and color capabilities.
Layer Management for Precision
When embarking on a new artwork in Procreate, a structured approach to layers can significantly enhance your creative process. Begin by creating a background layer and filling it with a desired color. For instance, filling background layer 1 with a light cream color provides a neutral base.
Next, establish a sketch layer. On layer 2, you can create a rough sketch of your artwork using a sketch pencil or ink brush. Many artists prefer a brush like the "Solid Ink 1" from the "Pro Painters Procreate Brushset" for its clean lines and opacity.
The magic happens when you insert new layers strategically. To create a perfect circle as a distinct element, create a new Procreate layer between the background layer and the sketch layer. With the same smooth solid ink brush and a chosen color, such as dark blue, you can then utilize the QuickShape tool to draw your perfect circle.
For more complex compositions, you might need multiple perfect circles. In such cases, create three layers between the Dark Background Layer and the Sketch Layer. Rename the layers to keep your project organized. With the same brush used in the previous step, you can then create perfect circles using the QuickShape tool on each of these designated layers. This ensures each circle can be independently manipulated, colored, or modified without affecting other parts of your artwork.
Advanced Techniques: Clipping Masks and Reference Layers
To add depth and detail to your perfect circles, Procreate’s clipping masks and reference layers offer powerful functionalities.
Clipping Masks: A clipping mask allows you to confine the brush strokes on one layer to the shape of the layer below it. To illustrate, create a new layer and clip it to Base 1. If "Base 1" contains your perfect circle, any drawing on the clipped layer will only appear within the boundaries of that circle. This is incredibly useful for filling shapes with textures, gradients, or intricate patterns without the risk of drawing outside the lines. For example, with an orange color selected, you could create an ellipse or add smaller circles within the main circle on this clipped layer, and they would remain perfectly contained.
Reference Layers: The concept of a reference layer allows you to use a layer as a guide for other elements on different layers. If you have a specific shape or element that you want to align other parts of your artwork to, designating that layer as a reference is key. Make the Base 2 layer a reference layer. Then, create another layer on top of Base 2. Now, when you use tools like the transform tool or even draw freehand, Procreate can intelligently snap or align elements to the referenced layer. For example, if you were to offset the Fill layer to the right, you could use Base 2 as a visual guide to ensure that offset is precise and consistent.
The Art of the Ellipse
While the focus has been on perfect circles, it's worth noting that the QuickShape tool also excels at creating perfect ellipses. As demonstrated in the advanced layering section, by drawing an oval and engaging QuickShape, you can refine it into a precise ellipse. This is achieved by selecting the "Ellipse" option in the "Edit Shape" menu. The same principles of transform nodes apply, allowing you to adjust the curvature and dimensions of your ellipse with remarkable accuracy. This versatility means Procreate can cater to all your circular and elliptical shape needs, from simple outlines to complex geometric designs.
Beyond the Basics: Creative Applications of Perfect Circles
The ability to draw perfect circles in Procreate is not merely an exercise in geometric precision; it's a foundational skill that unlocks a vast array of creative possibilities.
Geometric Art and Patterns
Perfect circles are the building blocks of much geometric art. Artists can use them to create intricate mandalas, tessellations, and abstract patterns. By layering, duplicating, and transforming circles, you can generate complex and visually striking designs. The ability to precisely control the size, placement, and color of each circle ensures a professional and polished outcome.
Character Design and Iconography
In character design, perfect circles are often used for eyes, wheels, or decorative elements. For icon design, they provide a clean, recognizable, and scalable shape that is easily understood across various platforms. The QuickShape tool makes it effortless to generate these consistent elements, saving valuable time and ensuring visual harmony within a set of icons or character designs.
UI/UX Design Elements
For user interface and user experience designers working in Procreate, perfect circles are indispensable for buttons, avatars, progress indicators, and other interactive elements. The crispness and accuracy provided by the QuickShape tool are crucial for creating professional and user-friendly digital interfaces.
Illustration and Backgrounds
Even in more organic illustration styles, perfect circles can serve as effective elements. They can be used to represent planets, bubbles, spotlights, or as stylized decorative motifs. When used for backgrounds, a series of perfectly rendered circles can create a sense of depth, rhythm, and visual interest.
Thematic Applications
Consider the thematic applications: a perfect circle can represent the moon, a sun, a target, a button, or even a portal. The inherent simplicity and universality of the circle make it a powerful symbol in visual storytelling. The ease with which Procreate allows you to create these forms means you can rapidly iterate on ideas that rely on this fundamental shape.
Conclusion of Your Procreate Circle Journey
Congratulations! You have now gained a comprehensive understanding of how to draw a perfect circle in Procreate. By mastering the QuickShape tool, leveraging its advanced settings, and integrating it thoughtfully into your layer management workflow, you are well-equipped to create precise and aesthetically pleasing circular elements in your digital art. Remember that Procreate offers a wealth of tools and features, and this fundamental skill is just the beginning of what you can achieve. Embrace the power of perfect shapes and continue to explore the boundless creative possibilities within Procreate.