Photoshop is a powerful tool for image manipulation, and one of its most common and impactful applications is the ability to isolate a subject from its original background and place it onto a new one. This process, often referred to as "cutting out" or "selection," opens up a world of creative possibilities, allowing you to transport your subjects to any environment imaginable, from exotic locales to fantastical settings. This tutorial will guide you through the essential techniques to achieve professional-looking results when editing backgrounds in Photoshop, ensuring your composites are seamless and believable.
The Importance of a Simple Background for Isolation
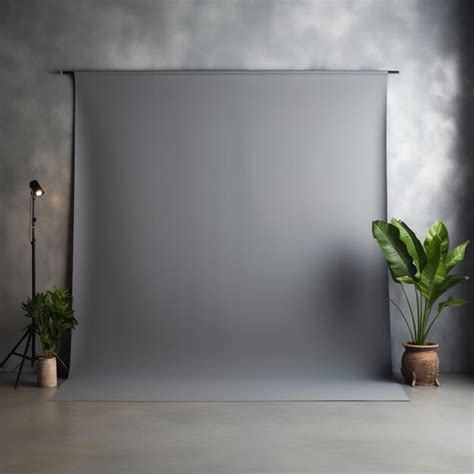
When you anticipate the need to cut out a photo, starting with a simple background is a strategic advantage. For instance, if you've shot a model, Callan, against a seamless background made of gray Savage paper, you've already set yourself up for success. A plain, uncluttered background minimizes distractions and makes the selection process significantly easier and more precise. This is because the tools in Photoshop are designed to differentiate between distinct areas of color and tone. The less complex the background, the clearer the distinction between your subject and its surroundings, leading to cleaner edges and a more convincing final image. While creative backgrounds can be visually striking, for the specific task of background replacement, simplicity is key.
Utilizing Photoshop's Selection Tools for Precision
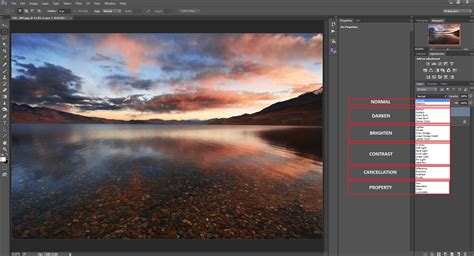
At the heart of background editing lies the art of selection. Photoshop offers a variety of tools, each with its strengths, to help you precisely isolate your subject. One of the most efficient for this task is the Quick Selection tool. This intuitive tool works by painting a selection based on color and texture similarities.
To use the Quick Selection tool effectively, you'll typically start by clicking and dragging over your subject. Photoshop will intelligently try to detect the boundaries. If the tool selects too much or too little, you can easily refine it. To add to the selection, you can use a small brush and click on areas you want to include. Conversely, holding down the Alt (Windows) or Option (Mac) key while using the Quick Selection tool will allow you to subtract from the selection, removing unwanted areas. The goal is to meticulously select just the shape of the model or your primary subject, ensuring no background elements are accidentally included.
Another powerful tool for complex selections, especially those involving fine details like hair, is the Select and Mask workspace. Once you have an initial selection using Quick Selection or another tool, you can access Select and Mask by clicking the "Select and Mask…" button in the options bar or by going to Select > Select and Mask.... Within this workspace, you'll find advanced controls for refining edges. The Shift Edge slider, for instance, can be moved to the left to contract the selection slightly, helping to prevent halos of background color from appearing around your subject. You can also use the "Refine Edge Brush Tool" within this workspace to paint over areas like hair or fur, allowing Photoshop to intelligently differentiate between the subject and the background.
✔ Quick Selection Tool | Photoshop Tutorial | Artose
Refining Edges for a Natural Look
Once you have a satisfactory initial selection, the next crucial step is refining the edges. This is where the magic happens, transforming a crude cut-out into a natural-looking integration. After using the Quick Selection tool and potentially refining it in the Select and Mask workspace, you'll want to ensure the edges are clean and free from jagged lines or unwanted background remnants.
Within the Select and Mask workspace, after making your adjustments with tools like Shift Edge, you'll need to decide how you want to output your selection. For background replacement, it's generally best to choose Output To Selection and then apply a layer mask.
To apply a layer mask:
- Ensure your subject layer is selected in the Layers panel.
- Click on the Add Layer Mask icon at the bottom of the Layers panel (it looks like a rectangle with a circle inside).
A layer mask essentially hides parts of a layer without deleting them permanently. White areas on the mask reveal the layer's content, while black areas hide it. This non-destructive method allows you to go back and make further refinements to the mask at any time. You can paint with black or white on the mask itself to fine-tune the edges, cleaning up any imperfections that might have been missed during the initial selection.
Seamless Compositing: Matching Lighting and Color
Simply dropping your selected subject onto a new background is only the first part of the process. To create a believable composite, you must ensure that the lighting and color of your subject match the new environment. This is where the art of compositing truly comes into play.
Matching Lighting:
One effective technique for matching lighting is to analyze the dominant light source in your new background and then replicate it on your subject. A method to achieve this is to duplicate the New Background layer, move it above the model layer, and then apply Filter > Blur > Average. This will fill the duplicated background layer with a solid color that represents the average hue and luminosity of the background.
Next, set the Blend Mode of this averaged color layer to Soft Light. This blend mode allows the color to interact with the underlying layer (your subject) in a way that can simulate ambient light. You can then reduce the Opacity setting of this layer until the lighting on your subject feels more integrated with the new background. This process helps to subtly shift the tones of your subject to better reflect the illumination of the new scene.
Applying Color Casts:
Beyond general lighting, specific color casts can significantly enhance realism. Many natural or artificial light sources impart a subtle color tint to their surroundings. To achieve this, you can use adjustment layers.
For example, Larson applied a dark blue Solid Color adjustment layer to give each of the layers below it a finishing color cast. To do this:
- Go to
Layer > New Fill Layer > Solid Color.... - Choose a color that reflects the dominant hue of your new background (e.g., a slightly warm tone if the background is sunny, or a cool tone if it's overcast).
- Place this Solid Color adjustment layer at the top of your layer stack.
- Set its Blend Mode to something appropriate, such as
Soft Light,Overlay, orColor, and then adjust itsOpacityto subtly tint your entire composite. This helps to unify the image and make the subject feel like it truly belongs in the new environment.
Exploring New Backgrounds and Creative Possibilities
With the fundamental techniques of selection, masking, and color/lighting matching mastered, you unlock the ability to place your subjects virtually anywhere. You don’t need a travel budget to find new backgrounds for your photos. Erica Larson, an Associate Creative Director on the Adobe Studio team, dreams up inspired designs every day, transforming subjects against blank walls into lush gardens or fantastical vistas.
The process begins with hiding the plain gray wall or whatever the original background might be, and then using Photoshop's powerful tools to transport your subjects. With a new background, you can take your photos’ subjects anywhere in the world, or even out of this world, limited only by your imagination. This opens up immense creative potential for photographers, graphic designers, and digital artists alike, allowing for storytelling and artistic expression that transcends the constraints of physical location.
Advanced Techniques and Further Learning
While the core process of background editing in Photoshop has been outlined, there are always more advanced techniques to explore. For instance, understanding how to handle challenging selections like transparent objects or very fine, wispy hair requires practice and familiarity with tools like the Color Range selection and advanced masking techniques.
Furthermore, integrating subjects into new backgrounds often involves more than just color and light matching. You might need to consider perspective, focal length, and even the direction of shadows to ensure absolute realism. For those looking to deepen their understanding, exploring tutorials on advanced compositing, color grading, and atmospheric effects can further elevate your Photoshop skills.
For example, if you're interested in specific stylistic effects, you might find tutorials on how to make a lomography toy camera effect in Photoshop or how to shoot and process aerial panoramas using Photoshop and Macphun plugins to be illuminating. These specialized tutorials demonstrate the versatility of Photoshop in achieving a wide array of visual outcomes.
The journey of mastering background editing in Photoshop is an ongoing one. By consistently practicing these techniques and exploring new tools and workflows, you can significantly enhance the impact and professionalism of your images, creating truly compelling visual narratives. Remember, the goal is to make the viewer believe that the subject has always been in its new environment, a testament to your skill in seamlessly blending two distinct visual realities.