Adobe Lightroom is a powerful and indispensable tool for photographers, offering a robust suite of functions for organizing, processing, and exporting images. While its capabilities can seem daunting at first glance, understanding its core principles can transform your workflow. This guide is designed to demystify Lightroom, particularly focusing on Lightroom 6 (also known as Lightroom CC in its perpetual license form), and provide a clear path for beginners to gain a medium- to high-level understanding of its most critical concepts. Whether you're new to digital photography or an experienced professional, this tutorial will equip you with the knowledge to leverage Lightroom effectively.
It's important to note that this article specifically addresses Lightroom 6 and its perpetual license counterpart, often referred to as Lightroom Classic in its subscription-based evolution. For a deeper understanding of the distinctions, you may wish to consult resources comparing Lightroom Classic versus Lightroom. To navigate this extensive guide efficiently, consider using your browser's search function (Control+F on Windows, Command+F on Mac) to locate specific terms or topics.
Introducing Lightroom Classic: The Photographer's Digital Darkroom
At its heart, Lightroom Classic is a sophisticated software solution designed to streamline the entire post-production process for photographers. It excels in three primary areas: organizing your vast photo library, meticulously post-processing your images to achieve your desired aesthetic, and efficiently exporting them for various platforms and uses.
The software's architecture ensures that your original image files remain untouched, providing a safe and non-destructive editing environment. This fundamental principle is what sets Lightroom apart from many other image editing applications and is a cornerstone of its appeal to professionals.
Why Lightroom is Unique: The Power of Non-Destructive Editing
One of the most significant aspects that distinguishes Lightroom from other editing software, such as Photoshop, is its approach to image manipulation. When you make an adjustment in Lightroom, whether it's altering brightness, contrast, or color, this change is not applied directly to the original file. Instead, these modifications are stored separately within a catalog file.
This means that if you were to open an image edited in Lightroom in another application, it would appear as it did before any Lightroom adjustments were made. This might seem counterintuitive at first, but it's a deliberate design choice that offers substantial benefits. The primary advantage is non-destructive editing. Your original image data is preserved, safeguarding against accidental permanent alterations. This contrasts sharply with software like Photoshop, where certain edits, like cropping and saving, can permanently alter the original file unless specific precautions are taken.

The key to seeing your Lightroom edits outside of the application lies in the export process. When you export an image, Lightroom renders a new file that incorporates all the adjustments you've made. This exported file is a derivative, leaving your original untouched and available for further manipulation or reprocessing at any time. This fundamental characteristic makes Lightroom an exceptionally safe and flexible environment for photographers.
Demystifying the Lightroom Catalog: The Brain of Your Library
The term "catalog" is central to understanding Lightroom. The Lightroom catalog is essentially a database that keeps track of all the information related to your photos. This includes not only the edits you've made but also metadata, keywords, ratings, collections, and the location of your image files on your computer.
When you import photos into Lightroom, you are essentially telling the catalog where to find them and creating entries for them within the database. Every adjustment, every rating, every keyword you apply is recorded in this single catalog file. This is why the catalog is so crucial: losing or corrupting your catalog file means losing all the organizational and editing work you've done, even though your original images remain safe.
It is therefore paramount to store your catalog file in a secure location and to implement a robust backup strategy for it. While Lightroom itself doesn't automatically back up your catalog, it does offer options to prompt you to back it up regularly. For advanced users, managing multiple catalogs or synchronizing a single catalog across multiple computers can become complex. However, for beginners, focusing on a single, well-managed catalog is the recommended approach.
Importing Photos into Lightroom: Bringing Your Images into the Fold
The journey of managing your photos in Lightroom begins with importing them. Unlike some other software, photos on your computer or memory card do not automatically appear in Lightroom. You must explicitly import them into your catalog.
The Import Dialogue is the gateway to bringing your images into Lightroom. This dialog box is a powerful tool that allows you to not only add photos to your catalog but also to apply initial metadata, choose develop presets, and organize them into collections right from the start.
When you click the "Import" button, you'll be presented with a series of options. On the left side, you'll see the source of your photos (e.g., your camera, memory card, or specific folders on your computer). On the right, you'll find options for file handling, such as copying photos to a new location, moving them, or adding them as they are. You can also select a destination folder and apply develop presets or metadata templates during the import process.
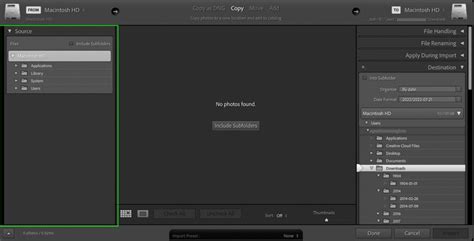
Understanding the import process is fundamental to establishing an organized workflow. Taking the time to configure your import settings correctly can save significant time and effort later on.
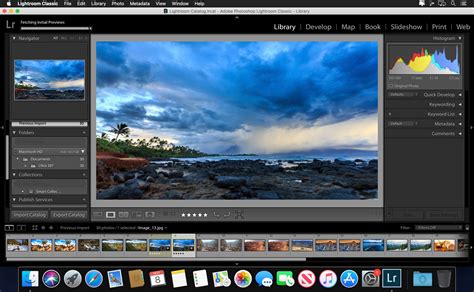
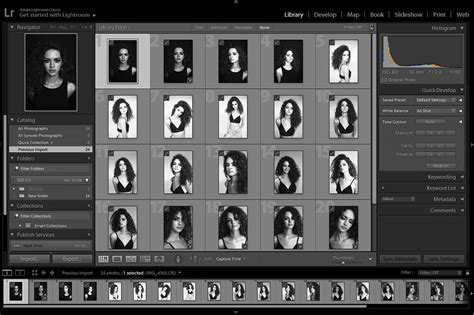
Explaining the Layout of Lightroom’s Library and Develop Modules
Lightroom's interface is divided into several distinct modules, each dedicated to a specific aspect of the photographic workflow. For beginners, the two most important modules are the Library Module and the Develop Module.
The Library Module: Organizing Your Visual Assets
The Library Module is your command center for importing, organizing, and managing your photo collection. Upon entering this module, you'll typically see several key areas:
- Catalog Panel (Left): This panel displays your catalog hierarchy, including folders on your hard drive, collections you've created, and smart collections.
- Folders Panel (Left, below Catalog): This lists the physical folders on your computer where your photos are stored.
- Preview Area (Center): This is where your selected photos are displayed. In the Library Module, it can show a grid of thumbnails or a single larger preview.
- Filmstrip (Bottom): This strip shows a row of thumbnails of the photos in your current view, allowing for quick selection and comparison.
- Metadata and Keywords Panels (Right): Here, you can view and edit metadata (information about the photo, like camera settings and copyright) and assign keywords for easier searching.
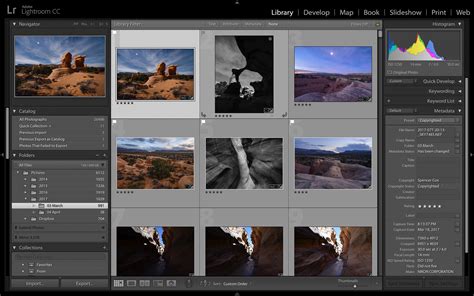
The Library Module is where you'll spend a significant amount of time sorting, culling, and preparing your images before diving into detailed editing.
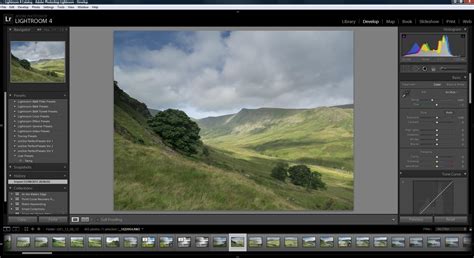
The Develop Module: Bringing Your Photos to Life
The Develop Module is where the magic of post-processing happens. This module is dedicated to adjusting the tonal, color, and detail aspects of your images. Key components include:
- Histogram (Top Center): This graph visually represents the tonal distribution of your image, from pure black to pure white.
- Basic Panel (Right): This is the most frequently used panel, containing sliders for fundamental adjustments like White Balance, Exposure, Contrast, Highlights, Shadows, Whites, Blacks, and Vibrance/Saturation.
- Tone Curve Panel (Right, below Basic): Offers more precise control over the tonal range of your image.
- HSL/Color Panel (Right): Allows for fine-tuning of Hue, Saturation, and Luminance for individual color ranges.
- Detail Panel (Right): Contains sliders for Sharpening and Noise Reduction.
- Lens Corrections Panel (Right): Enables you to correct for lens distortion, chromatic aberration, and add vignettes.
- Local Adjustments Tools (Top Right): These include the Graduated Filter, Radial Filter, and Adjustment Brush, which allow you to apply edits to specific areas of your photo.
- Filmstrip (Bottom): Similar to the Library Module, this shows thumbnails of images, allowing you to switch between photos for editing.
The Develop Module offers a comprehensive array of tools to refine your images, from subtle enhancements to dramatic transformations.
How to Organize Your Photos in Lightroom: Building a System
Effective photo organization is crucial for managing a growing library. Lightroom provides several powerful tools to help you keep your images in order:
- Folders: As mentioned, Lightroom uses your computer's folder structure. Maintaining a logical folder system (e.g., by year, event, or client) is the foundation of organization.
- Collections: These are virtual groupings of photos. A single photo can be part of multiple collections without being duplicated on your hard drive. This is incredibly useful for creating themed groups, such as "Best of 2023," "Client XYZ Projects," or "Landscape Favorites."
- Smart Collections: These are dynamic collections that automatically populate based on predefined criteria. For example, a smart collection could gather all photos from a specific date range, rated with five stars, or containing a particular keyword.
- Keywords: Assigning keywords to your photos allows for powerful searching and filtering. Be consistent with your keyword usage.
- Ratings and Flags: Use star ratings (1-5) and flags (Pick, Rejected, Unflagged) to quickly sort and cull your images. Flags are particularly useful for marking photos to keep or delete.
- Color Labels: Assign color labels to photos for visual organization, color-coding them by project status, or for quick identification.
How To Organize Your Lightroom Catalog Using Folders, Collections, Keywords And Labels
By combining these organizational tools, you can create a highly efficient system that makes finding any photo in your library a breeze.
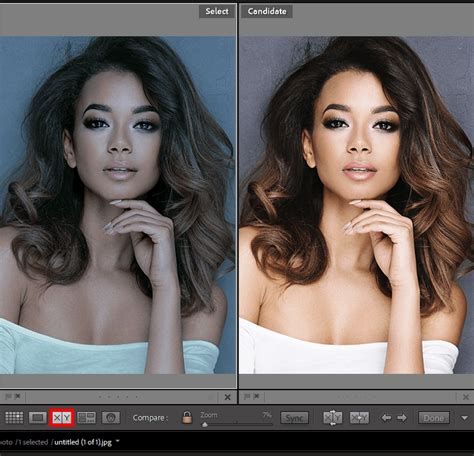
How to Post-Process Your Photos in Lightroom: Essential Editing Techniques
Post-processing is where you refine your images to match your creative vision. Lightroom's Develop Module is packed with tools to achieve this. Here are some fundamental techniques:
White Balance Correction
Incorrect white balance can cast an unnatural color tint on your photos. You can adjust this using the White Balance selector tool, choosing a neutral gray or white area in your image, or by manually adjusting the Temperature and Tint sliders. For RAW files, this adjustment is entirely non-destructive.
Exposure and Tone Adjustments
The Basic Panel is your starting point for tonal adjustments.
- Exposure: Controls the overall brightness of the image.
- Contrast: Adjusts the difference between the light and dark areas.
- Highlights and Shadows: These sliders are crucial for recovering detail in the brightest and darkest parts of your image, respectively. Holding the ALT (or Option on Mac) key while adjusting the Whites and Blacks sliders will reveal clipping (areas that are pure white or pure black).
- Whites and Blacks: These sliders set the absolute white and black points of your image, defining the dynamic range.
Color Adjustments
- Vibrance and Saturation: Vibrance intelligently boosts muted colors, while Saturation boosts all colors equally. Use them judiciously to avoid an overprocessed look.
- HSL/Color Panel: This panel allows for precise adjustments to the Hue, Saturation, and Luminance of specific color ranges (e.g., making blues richer or greens more vibrant).
Detail Enhancements
- Sharpening: Apply sharpening to enhance edge detail. Be careful not to over-sharpen, which can create artifacts. Use the masking slider (holding ALT/Option) to see where sharpening is being applied.
- Noise Reduction: If your image suffers from digital noise (graininess), use the Noise Reduction sliders in the Detail panel to minimize it. There are sliders for Luminance (grain) and Color noise.
Lens Corrections
Lightroom can automatically correct for common lens distortions, chromatic aberration (color fringing), and vignetting. In the Lens Corrections panel, enable "Remove Chromatic Aberration" and "Enable Profile Corrections." Lightroom will attempt to identify your lens and apply the appropriate corrections.
Local Adjustments
For targeted edits, the Graduated Filter, Radial Filter, and Adjustment Brush are invaluable. These tools allow you to apply any of Lightroom's editing sliders to specific areas of your image, such as darkening a sky with a graduated filter or brightening a subject's face with the adjustment brush.
How to Export Your Photos from Lightroom: Sharing Your Work
Once your photos are perfected, the next step is to export them. The Export Dialogue box (accessed by CMD/CTRL+SHIFT+E) is where you define the characteristics of your final image files.
Key export settings include:
- Export Location: Choose where to save your exported files.
- File Naming: Set up a consistent naming convention for your exported images.
- File Settings: Select the file format (JPEG, TIFF, DNG, etc.), quality, and color space (sRGB for web, Adobe RGB or ProPhoto RGB for print).
- Image Sizing: Specify the pixel dimensions (width and height) or resolution. This is crucial for controlling file size and suitability for different platforms.
- Output Sharpening: Apply sharpening tailored to the intended output medium (e.g., screen or matte paper).
- Metadata: Choose whether to include copyright information, camera settings, or other metadata.
- Watermarking: Add a custom watermark to protect your images.
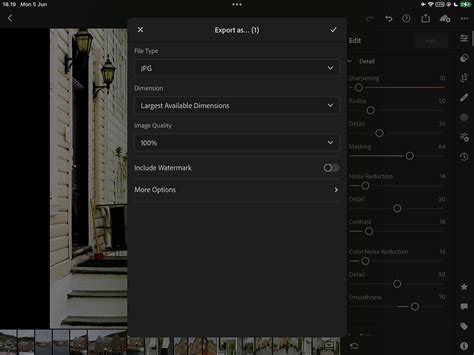
Lightroom's ability to batch export multiple images with consistent settings is a significant time-saver.
Backing Up Your Catalog: Protecting Your Work
As emphasized earlier, your Lightroom catalog is the central hub of your workflow. A robust backup strategy for your catalog is non-negotiable.
Lightroom will periodically prompt you to back up your catalog. It's advisable to accept this prompt and choose a location for your backup that is separate from your main catalog file (e.g., an external hard drive or cloud storage).
Beyond catalog backups, you must also have a system for backing up your actual photo files. This typically involves:
- Copying: Regularly copying your photos from memory cards to your computer or an external drive. Importing into Lightroom can facilitate this.
- Cloning: Creating exact duplicates of your photo libraries on separate drives. Software like Carbon Copy Cloner can automate this process.
- Cloud Storage: Utilizing cloud backup services for an offsite copy of your precious images.
How To Organize Your Lightroom Catalog Using Folders, Collections, Keywords And Labels
A comprehensive backup strategy ensures that your photographic work is protected against hardware failure, accidental deletion, or data corruption.
Lightroom 6 Specific Enhancements: What's New and Improved
Lightroom 6, released as a perpetual license, brought several notable enhancements over its predecessors, building upon the already robust feature set. While the subscription-based Lightroom Classic continues to evolve, understanding the improvements in Lightroom 6 provides valuable context.
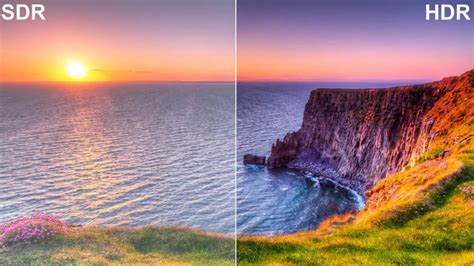
HDR and Panorama Merging
Lightroom 6 introduced the ability to create High Dynamic Range (HDR) images and panoramas directly within the software, eliminating the need to export to Photoshop for these processes.
- HDR Merging: This feature allows you to combine multiple exposures of the same scene (taken with different exposure settings) into a single image with a much wider dynamic range, capturing detail in both the brightest highlights and deepest shadows. You can choose to process the resulting DNG file like any other RAW image, offering extensive editing flexibility.
- Panorama Merging: This tool enables you to stitch together multiple overlapping photos to create a single, wide panoramic image. Lightroom offers various projection types and an auto-crop feature to refine the final panorama.
Facial Recognition
A significant organizational upgrade in Lightroom 6 was the introduction of facial recognition technology. The software can scan your library to identify and group faces. You can then name these individuals, and Lightroom will use this information to help you organize and find photos of specific people. While it may require initial sorting and correction of "false positives," it's a powerful tool for managing portraits and group shots.
Performance Improvements
Lightroom 6 also saw performance enhancements, including improved GPU support. This translates to a smoother, faster workflow, particularly when using tools like the Adjustment Brush or when processing complex edits. For users with touch-enabled devices like the Microsoft Surface Pro, Lightroom 6 introduced touch capabilities, making interaction more intuitive.
Filter Brushes and Local Adjustments Enhancements
Filter brushes, which allow you to paint adjustments like gradients or radial filters onto specific areas, were refined. This provides more granular control over local adjustments, enabling more sophisticated selective editing.
Other Notable Features in Lightroom 6
- Enhanced Video Slideshows: The ability to create more advanced video slideshows with multiple audio tracks and Ken Burns effect (panning and zooming) was added.
- HTML5 Web Galleries: The software moved away from Flash-based galleries to HTML5, offering more modern and accessible web sharing options.
- Lightroom Mobile Syncing: Collections could be synced with Lightroom mobile, allowing for seamless editing and organization across desktop and mobile devices.
- Painter Tool: This tool streamlined the application of metadata, keywords, and other information across multiple images.
- Pet Eye Correction: A specialized red-eye correction tool for animal photos.
The introduction of these features in Lightroom 6 demonstrated Adobe's commitment to evolving the software to meet the demands of modern photographers, even within the framework of a perpetual license.
By understanding these core concepts and features, photographers can harness the full potential of Adobe Photoshop Lightroom 6, transforming their workflow from a daunting task into an enjoyable and creative process.