Photoshop is an indispensable and powerful tool for image manipulation and creation. At its heart lies the revolutionary concept of layers, a feature that elevates Photoshop's capabilities, enabling users to perform intricate, non-destructive edits. Essentially, a layer can be understood as an individual image or element stacked upon another, collectively forming a complete, composite image. This fundamental principle of layers empowers users to edit and refine different aspects of an image independently, without permanently altering the original pixel data.
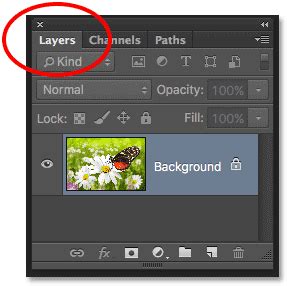
When any image is opened or a new document is created in Photoshop, it is initiated with a default "Background" layer. This layer is typically locked, serving as a protective barrier against unintended modifications. Thus, it can be said that working in Photoshop is intrinsically about working with layers. The ability to perform non-destructive editing is a direct consequence of this layered architecture. Imagine wanting to add a brushstroke to an existing image. Instead of directly applying the brush to the original image, which would be a destructive action, Photoshop allows you to create a new, separate layer. On this new layer, you can apply your brushstrokes. This new layer can be toggled on or off at will, and the brushwork can be easily removed simply by deleting that specific layer, leaving the original image entirely untouched.

Understanding the Core Layer Types in Photoshop
Photoshop offers a diverse array of layer types, each serving a distinct purpose in the creative workflow. Understanding these types is crucial for efficient and effective image editing.
Image Layers
Image layers are the workhorses for incorporating photographs and other visual assets into your Photoshop document. They function as digital equivalents of clear acetate sheets, allowing you to place and manipulate various image components independently. You can create an unlimited number of image layers, accommodating complex compositions and intricate designs. When you import an image into Photoshop, it often begins as a single layer within the Layers panel.
Fill Layers
Fill layers are used to introduce solid colors, gradients, or patterns to your Photoshop document. These layers are inherently non-destructive and can be easily edited, duplicated, deleted, or merged with other layers. They also include an associated mask, offering further control over their application. Fill layers can be blended with other layers using various blending modes, allowing for sophisticated visual effects.
Adjustment Layers
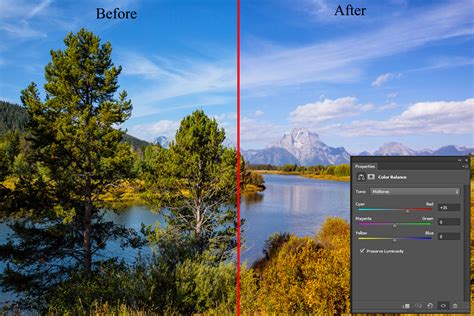
Adjustment layers are a cornerstone of non-destructive editing. They are specifically designed to apply color and tonal corrections to your image without permanently altering the underlying pixels. This means you can revisit and modify these adjustments at any time without degrading the image quality. Adjustment layers affect all the layers beneath them. If you wish to apply an adjustment to a single layer, you can "clip" the adjustment layer to the layer below it.
Some of the key adjustment layers available include:
- Brightness and Contrast: For simple adjustments to the overall lightness/darkness and the difference between light and dark areas.
- Levels: This tool allows for precise control over the tonal range and color balance by adjusting the intensity of shadows, mid-tones, and highlights.
- Curves: A more advanced tool than Levels, Curves offers granular control over specific tonal ranges, enabling highly nuanced adjustments to shadows, mid-tones, and highlights, and can be applied to individual color channels for precise color correction.
- Exposure: Used to correct the overall exposure of an image, with sliders for highlights, mid-tones (offset), and shadows (gamma).
- Vibrance: Intelligently adjusts the intensity of muted colors, enhancing saturation without over-saturating already vibrant areas.
- Hue/Saturation: Allows for global changes to the color (hue), intensity (saturation), and lightness of an image, or specific color ranges.
- Color Balance: Frequently used for color correction, enabling you to shift the overall color mixture towards warmer or cooler tones, or specific color casts.
- Black & White: Converts a color image to grayscale, offering control over how specific color ranges are converted to shades of gray, allowing for creative monochrome conversions.
- Photo Filter: Mimics the effect of physical camera filters, allowing you to warm up or cool down the image's color temperature.
- Channel Mixer: A powerful tool for creating black and white images or for performing creative color remapping.
- Color Lookup: Applies pre-defined color grading presets (LUTs) for quick stylistic changes.
- Invert: Creates a photographic negative of the image.
- Posterize: Reduces the number of tonal levels in an image, creating a posterized effect.
- Threshold: Converts an image to pure black and white, with a slider to control the cutoff point.
- Gradient Map: Maps colors from a gradient to the tonal values of the image.
Smart Objects
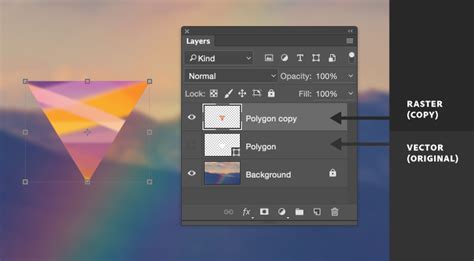
Smart Objects are layers that contain raster or vector image data from raster or vector images. They are essentially containers that preserve the original image data. When you transform a Smart Object (scale, rotate, distort), the original data is not degraded. This allows for unlimited transformations without loss of quality. You can also apply filters non-destructively to Smart Objects, with the filters appearing as "Smart Filters" that can be edited or removed at any time.
Shape Layers
Shape layers are created using Photoshop's vector drawing tools. These layers contain mathematically defined paths rather than pixels, meaning they can be scaled infinitely without any loss of quality. Shape layers are ideal for creating logos, icons, illustrations, and other graphic elements that require sharp, scalable lines. You can easily edit the path, fill, and stroke of a shape layer at any time.
Type Layers
Type layers are used to add text to your Photoshop document. Text created on a type layer remains fully editable. You can change the font, size, color, and other text properties at any time without compromising image quality. This makes type layers essential for any design work involving text.
Navigating the Layers Panel: Essential Tools and Functions
The Layers panel is the central hub for managing all the layers within your Photoshop document. It provides a comprehensive overview of your composition and offers a suite of tools to control each layer's behavior.
Layer Visibility
Each layer in the panel has an eye icon next to its name. Clicking this icon toggles the visibility of the layer, allowing you to hide or show specific elements of your composition. This is invaluable for isolating and focusing on particular areas or for comparing different editing stages.
Layer Order and Stacking
Layers are stacked in a specific order, and this order dictates how they interact and appear on the canvas. The topmost layer will appear above all layers below it. You can rearrange layers by simply clicking and dragging them up or down within the Layers panel. Understanding this stacking order is crucial, as moving a layer down in the stack might cause it to be obscured by layers above it.
Blending Modes
Above the layer stack, you'll find the Blending Modes dropdown menu. This feature offers a vast array of options (currently 27) that determine how a layer's pixels interact with the pixels of the layers below it. Experimenting with blending modes can lead to dramatic and creative effects, fundamentally altering the appearance of your composite image without touching the original pixels of any layer. Blending modes are typically categorized into groups like Normal, Darken, Lighten, Contrast, Comparative, and Color.
Blending Modes - Photoshop for Beginners | Lesson 5
Opacity and Fill
The Opacity slider controls the overall transparency of a selected layer. A layer with 100% opacity is fully opaque, while a layer with 0% opacity is completely transparent. The Fill slider, while similar, behaves slightly differently for certain layer types and effects.
Layer Locking Options
The Layers panel provides several locking mechanisms to prevent unintended changes:
- Lock Transparent Pixels: Prevents editing in the transparent areas of a layer, allowing work only on opaque areas.
- Lock Image Pixels: Prevents editing of the pixel content of a layer, allowing only changes to transparency or position.
- Lock Position: Fixes the layer's position on the canvas, preventing it from being moved.
- Lock Artboard: Applicable when working with artboards, this lock prevents changes to the layer within the context of the artboard.
- Lock All: A comprehensive lock that disables all editing capabilities for the layer.
Layer Styles
Layer styles are pre-defined effects that can be applied to layers to add depth and visual interest. Common styles include drop shadows, inner shadows, bevels and embosses, strokes, and satin effects. These styles are non-destructive and can be easily modified or removed.
Layer Masks
Layer masks are a fundamental tool for non-destructive editing. They allow you to selectively reveal or hide parts of a layer without permanently deleting any pixels. A mask is essentially a grayscale image where white reveals the layer's content, black conceals it, and shades of gray create semi-transparency. You can paint on a layer mask using brushes, gradients, or selections.
Creating and Managing Layers
- Creating a New Layer: Click the "Create a New Layer" icon at the bottom of the Layers panel.
- Duplicating a Layer: Right-click on a layer and select "Duplicate Layer," or drag the layer onto the "Create a New Layer" icon.
- Deleting a Layer: Select the layer you wish to delete and click the trash can icon at the bottom of the Layers panel, or drag the layer into it.
- Grouping Layers: Select multiple layers and press
Ctrl+G(Windows) orCmd+G(Mac) to group them into a folder. This is essential for organizing complex projects.
The Power of Non-Destructive Editing
The concept of layers is intrinsically linked to non-destructive editing. This approach ensures that your original image data remains intact throughout the editing process. By working on separate layers, you gain the flexibility to make changes, experiment with different effects, and revert to earlier states without fear of permanently damaging your source material. This is particularly important when saving your work, as saving in a layered format like Photoshop's native .PSD file preserves all your layers and their associated edits, allowing you to return and make further modifications at any future time. Flattening an image combines all layers into a single layer, making it suitable for sharing or web use but losing the editability of individual components.
The introduction of layers to Photoshop in version 3 in 1994 was a pivotal moment in digital imaging. It transformed Photoshop from a powerful image editor into an indispensable tool for graphic designers, photographers, and digital artists alike. The ability to work with independent elements, control their interactions through blending modes, and apply adjustments non-destructively has become the bedrock of modern digital image creation and manipulation. Understanding and mastering Photoshop's layers is not just about learning a feature; it's about unlocking the full potential of one of the most influential software applications ever created.
tags: #layers #definition #photoshop