Procreate, a powerful digital art application for iPad and iPhone, offers robust animation capabilities that allow artists to bring their creations to life. Once an animation is complete within Procreate, the next crucial step is exporting it for use in various platforms and projects. This guide delves into the various methods and considerations for exporting animations from Procreate, ensuring that your animated artwork can be shared and utilized effectively across different applications and digital spaces.
Accessing the Export Menu in Procreate
The journey to exporting your animation begins within the Procreate interface. Regardless of whether you are using Procreate on an iPad or the more streamlined Procreate Pocket on an iPhone, the initial steps are consistent. At the top left of the Procreate interface, you will find a wrench icon. This icon represents the Actions button, which serves as the gateway to a multitude of Procreate's features, including its comprehensive sharing and export options. Tapping this button reveals a menu with various categories, and for animation exports, the focus is on the Share Layers section.
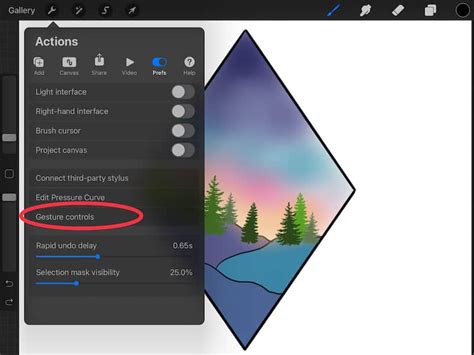
Within the Share menu, under the "Share Layers" section, Procreate offers several formats specifically designed for exporting animations. Each of these formats leverages your artwork's layers in distinct ways, influencing the final output and its compatibility with different platforms. Understanding these formats is key to achieving the desired result for your animated projects.
Understanding Animation Export Formats
Procreate provides a range of export formats, each with its own advantages and use cases. The primary distinction often lies between formats that prioritize visual fidelity and file size, and those that offer specific features like transparency or looping behavior.
Animated PNG (APNG)
Animated PNGs are a popular choice for exporting animations from Procreate due to their ability to preserve higher visual quality compared to animated GIFs. When exporting as an Animated PNG, you are presented with a crucial choice: Max Resolution or Web Ready.
- Max Resolution: Opting for Max Resolution will result in a higher quality animation with a larger file size. This is ideal for situations where visual fidelity is paramount and file size is less of a concern, such as for archival purposes or high-definition playback.
- Web Ready: Conversely, the Web Ready option provides a lower quality animation with a smaller file size. This is particularly useful for web-based applications, social media, or any scenario where efficient loading times and reduced bandwidth consumption are important.
Regardless of the resolution choice, you can also fine-tune the playback speed of your animation using the Frames per second (FPS) slider. Adjusting this slider allows you to control how quickly the frames of your animation transition, impacting the overall pace and feel of the movement.
Animated GIF
Animated GIFs have long been a staple of internet animation, known for their ability to loop endlessly. Procreate offers the option to export animations in this format. Similar to Animated PNGs, you can choose between Max Resolution (better quality, larger file size) and Web Ready (lower quality, smaller file size). The FPS slider is also available to control the animation's speed.
However, it's important to be aware of certain limitations when exporting as a GIF, especially when using textured brushes or backgrounds. As one user noted, "Procreate Gifs don’t handle texture well background or no background. Luckily we can solve this problem simply by exporting it as an animated MP4." This suggests that for animations with intricate textures or solid backgrounds, an MP4 export might yield a superior result.
Animated MP4
Animated MP4s offer functionality similar to animated GIFs and PNGs, providing another versatile option for exporting your Procreate animations. A key characteristic of MP4s is their use of JPEG encoding for each frame. This encoding method means that MP4 files cannot have transparent backgrounds. If transparency is a requirement for your animation, you will need to consider other formats.
As with other formats, you can choose between Max Resolution (better quality, larger file size) and Web Ready (lower quality, smaller file size). The Frames per second slider also allows for customization of the animation's speed. An important distinction between MP4s and GIFs is their playback behavior: MP4s function as standard videos and do not autoplay or loop by default, requiring manual initiation to view, much like a video recorded on a smartphone.
Dreams 2: Animation Creation (Part 2) | Ghibli-Inspired Looping Background | Procreate Tutorial
Animated HEVC
Animated HEVC (High Efficiency Video Coding) files offer similar functionality to animated MP4s. The significant advantage of HEVC, however, is its capability to support transparent backgrounds. This makes it a powerful option when you need a high-quality animated element that can be composited over other visuals without a solid background.
As with other formats, the choice between Max Resolution (better quality, larger file size) and Web Ready (lower quality, smaller file size) is available, allowing you to balance quality with file size. The FPS slider also provides control over the animation's playback speed.
Handling Textured Brushes and Backgrounds
A common challenge encountered when exporting animations from Procreate, particularly as GIFs, is the potential degradation of textured brushes and backgrounds. The compression algorithms used in some formats can struggle to accurately render the fine details of textures, leading to a "messed up" appearance.
One effective workaround for this issue is to export the animation as an Animated MP4. If your animation utilizes textured brushes and has a background, exporting it as an MP4 can preserve the visual integrity of these elements much better than a GIF.
For animations that require a transparent background and use textured brushes, a creative solution involves a technique that can be termed "Sticker Mode." This involves drawing an outline around the illustration using a non-textured brush and then filling it in with color. While not ideal and requiring extra steps, this method can help Procreate render the animation more accurately when transparency is needed. Alternatively, if the texture is not essential, redrawing elements with non-textured brushes can also resolve the issue.
Procreate Dreams: Advanced Export Options
For users of Procreate Dreams, the animation export process offers more advanced control. Procreate Dreams movies are saved in the native .drm format. These files are stored locally on your iPad within the Files app, providing a centralized location for managing your projects.
When you are satisfied with your animation in Procreate Dreams, you can tap Export to initiate the saving process. The video will be saved to your selected location within the Files app. Procreate Dreams also provides more granular control over the quality of your movie exports, allowing for a more tailored output.
To share your Procreate Dreams movie between devices or with others, you can simply share the .drm file itself. Additionally, you have the option to export a new .drm file, which can sometimes help reduce the overall file size.
Exporting Layers as Individual Files or PDFs
Beyond animated formats, Procreate also allows you to export your layers in other useful ways. You can choose to share your layers as bulk-exported individual images or as multi-page PDF documents. This is particularly useful if you need to extract individual frames for further editing in other software, or if you want to create a sequential art piece.
To export layers as individual PNG files, navigate to Modify > Actions > Share > Share Layers > PNG Files. Each PNG file will be automatically named based on your artwork's name, followed by a sequential number. For instance, if your artwork is titled "Masterpiece," your PNG files will be named "Masterpiece-1," "Masterpiece-2," and so on.
If you prefer a document format, you can choose to export your layers as a PDF. Go to Modify > Actions > Share > Share Layers > PDF, and then select from quality options such as Good, Better, or Best.
Integrating Procreate Animations into Other Workflows
The ability to export animations from Procreate opens up a world of possibilities for integrating your artwork into various digital workflows.
Importing into Adobe After Effects
For those working with professional motion graphics and visual effects software, Procreate animations can be seamlessly imported into Adobe After Effects. The process involves careful preparation and export from Procreate. When exporting assets intended for After Effects, it is crucial to label your layers clearly. Before exporting, organize your files into dedicated folders.
When importing into After Effects, if you are bringing in an animation sequence, ensure that the 'PNG Sequence' option is ticked. This ensures that After Effects interprets the series of PNG files as a single animation. After importing, you can rename your assets for better organization within After Effects and adjust composition settings to match your animation's duration. The final step involves exporting your completed project from After Effects using its standard export process.
Converting MP4 to GIF
While Procreate offers direct GIF export, there are instances where you might export an animation as an MP4 (especially to preserve textures) and then wish to convert it into a looping GIF. Tools like Adobe Express provide a free and straightforward way to achieve this. By uploading your MP4 file to Adobe Express, you can easily convert it into a GIF format, suitable for platforms that primarily use GIFs. This process is simple and often does not require an Adobe account.
Using GIFs in Notion and Instagram
The animated creations from Procreate can add a dynamic flair to various digital platforms. For instance, in Notion, you can customize page icons with GIFs. To do this, go to "Add icon" on your page, select the custom tab, and drag and drop your GIF file. For optimal results in Notion, it's recommended to keep GIFs relatively simple and around 280px x 280px.
For wider reach, Instagram users can leverage Giphy to make their animations accessible. By uploading at least five GIFs to Giphy and applying for a creator account, your animations can appear as searchable animated stickers within Instagram Stories. While you can upload stickers without a creator account, they won't be included in the Instagram search functionality.
Conclusion
Exporting animations from Procreate is a multifaceted process with various options tailored to different needs. Whether you are aiming for high-quality visuals with Animated PNGs, seeking the classic looping behavior of GIFs, or requiring the transparency support of HEVC, Procreate provides the tools to achieve your goals. Understanding the nuances of each export format, particularly concerning textured brushes and backgrounds, will empower you to produce polished animations ready for integration into any digital project. From advanced controls in Procreate Dreams to seamless workflows with other creative software, mastering Procreate's animation export capabilities unlocks the full potential of your animated artwork.