Lightroom and Lightroom Classic stand as powerful tools for photographers, transforming RAW files and other images into polished masterpieces. A crucial step in this creative workflow is the export process, where edited images are prepared for sharing, printing, or archival. This guide delves into the intricacies of exporting photos from Lightroom, covering various versions and options to ensure your final images meet your quality expectations and intended use.
Understanding the Export Process in Lightroom
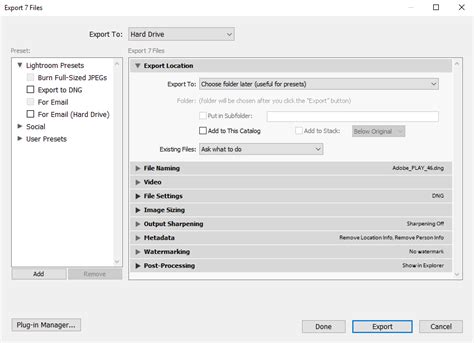
In Lightroom Classic, the concept of "saving" a photo is fundamentally different from traditional file saving. Instead, you export your photos. This process generates new files that encapsulate all the adjustments made in the Develop module, along with any other modifications to the photo's XMP metadata. This export function grants you granular control over various aspects of the output file, including its filename, color space, pixel dimensions, and resolution.
Lightroom, particularly the cloud-based version, and its mobile counterparts, offer streamlined export and sharing functionalities. These versions allow for quick sharing to social media or direct export. For Lightroom Classic, the export dialog box is accessed via File > Export or by clicking the Export button in the Library module. The dialog box clearly indicates the number of photos slated for export.
Exporting for Different Platforms and Purposes
The purpose of your exported image is a critical factor in determining the optimal export settings. Are you preparing photos for the web, for high-quality prints, or for archival storage? Lightroom provides the flexibility to cater to these diverse needs.
For Web Use: When exporting for the web, file size is often a primary concern, alongside visual quality. JPEG is a common format due to its efficient compression. However, it's important to understand that JPEG employs lossy compression. This means that some image data is discarded to reduce file size, which can lead to a degradation of quality, especially with repeated saving and re-sharing. This is why many JPGs online can lose quality over time. For web exports, selecting an appropriate quality setting (e.g., 65-80) and the sRGB color space is generally recommended.
For Print: For printing, preserving image quality is paramount. TIFF (Tagged Image File Format) is often considered a "golden standard" for print. TIFF uses lossless compression, ensuring that no image data is lost, thus maintaining the highest possible quality. While TIFF files are significantly larger than JPEGs, they are ideal for archival purposes and for further editing in programs like Photoshop. When exporting TIFFs for print, you can select specific color spaces like Adobe RGB or ProPhoto RGB, which offer a wider gamut of colors than sRGB, leading to more accurate color reproduction in print.
For Archival: For long-term storage where maximum fidelity is required, exporting in the original format or as a TIFF is advisable. These formats retain the most image data without degradation.
Key Export Settings and Their Significance
When you export photos from Lightroom, a dialog box or a panel appears, offering a range of customizable settings. Understanding these options is crucial for achieving the desired results.
File Settings
This panel allows you to choose the file format for your exported photos. Common options include:
- JPEG: Ideal for web use and general sharing due to its smaller file sizes. You can adjust the quality from 0 to 100.
- TIFF: Best for print and archival purposes, offering lossless compression and high quality.
- PSD/PSB: Photoshop Document formats, suitable for further editing in Photoshop, especially when layers are preserved.
- PNG: Supports transparency, making it useful for graphics and web elements that need to be overlaid on other content.
- DNG: Adobe's Digital Negative format, which can embed metadata and develop settings, acting as a universal RAW format.
- Original: This option essentially creates a copy of your original file, with your Develop module adjustments embedded in the XMP metadata, but without applying those adjustments to the exported file itself.
Within the File Settings, you'll also select the Color Space. As mentioned earlier, sRGB is standard for web, while Adobe RGB and ProPhoto RGB are preferred for print and professional workflows due to their wider color gamuts.
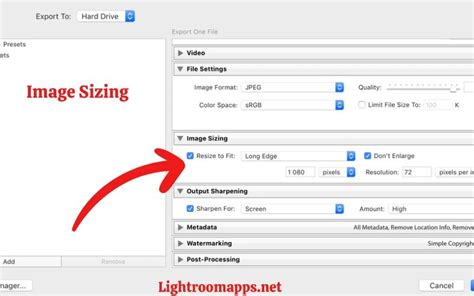
Image Sizing
The Image Sizing panel controls the dimensions and resolution of your exported photos.
- Resize to Fit: This is a crucial setting. You can specify dimensions for the long edge or short edge of the photo in pixels, inches, or centimeters. Lightroom will maintain the original aspect ratio of your photo.
- Small (2048 px): A common preset that limits the longest dimension of the exported JPG to 2048 pixels. This is often sufficient for web display and social media.
- Custom: Allows you to input specific pixel values for the long edge, ensuring your photos meet particular size requirements.
- Resolution: For print, a resolution of 300 pixels per inch (ppi) is typically recommended. For web, resolution is less critical as pixel dimensions are the primary factor.
Watermarking
Lightroom offers robust options for adding watermarks to protect your images or brand them. You can choose to add:
- Text Watermark: Customize the text, font, size, color, opacity, and position. You can also rotate the text.
- Graphic Watermark: Upload a PNG or JPG file (like a logo) to use as a watermark. You can adjust its size, opacity, and placement.
The watermark settings can be customized, and you can choose to place the watermark on or near any corner of your photo by tapping the dot anchor.
Output Sharpening
This setting applies sharpening to your exported image, tailored to the intended output medium. You can choose from "Screen" (for web display) or "Print" (with options for paper type). The level of sharpening (Low, Standard, High) can also be adjusted.
Metadata
You can choose to include or exclude metadata when exporting. Options include:
- All Metadata: Includes all EXIF and IPTC data.
- Copyright Only: Includes only copyright information.
- None: Strips all metadata.
Content Credentials
A newer feature, Content Credentials, allows you to attach verifiable information about how an image was created and modified. This is particularly relevant for combating misinformation and promoting transparency in digital media. Currently, this option is primarily available when exporting JPG files.
HDR Output and Gain Maps
Lightroom supports exporting High Dynamic Range (HDR) images. For formats like AVIF and JXL, you can toggle an "HDR Output" switch to include HDR data. Gain Map technology is a sophisticated method for displaying HDR images consistently across different devices. It combines SDR and HDR renditions within a single file, dynamically interpolating between them based on the display's capabilities. The image file stores a base rendition (SDR or HDR) along with the Gain Map and associated metadata.
EI 2023 Plenary 2: Embedded Gain Maps for Adaptive Display of High Dynamic Range Images
Lightroom Mobile Export and Sharing
Lightroom Mobile provides a convenient way to export and share photos directly from your smartphone or tablet.
- Quick Share: From the menu that appears, select the desired share option. You can share directly to platforms like Instagram. If HDR is enabled, the app will include HDR information in an AVIF file when sharing to Instagram.
- Export As: For more advanced control, tap "Export As." Here, you can choose the file format (Original, JPG, AVIF, JXL, TIF, DNG), resolution, and other settings similar to the desktop version.
- Create Edit Replay: Lightroom Mobile allows you to quickly create short videos of your editing process and share these "replay" videos with others.
When sharing directly from Lightroom Mobile, you can often add a border before sharing. The settings for exporting or sharing can be accessed by tapping the "Settings" toggle icon beside "Share" or "Save copy to device."
Troubleshooting Export Issues
Occasionally, the export process might fail. Lightroom provides a mechanism to retry saving your photos. Common reasons for export failures include:
- No Internet Connection: Ensure your device is connected to the internet, especially if you are exporting to cloud services or if certain features rely on an online connection.
- Not Enough Storage: Free up some storage space on your device's gallery or internal storage.
Collaborative Sharing and Group Albums
Lightroom facilitates collaborative workflows through its sharing features.
- Group Albums: You can create group albums to share images with friends and family. This allows for shared editing and contribution. You can share an existing album or multiple photos not part of any album. A web link can be generated for easy sharing, and invitees can be granted permissions to view, contribute, or even edit photos. Multiple people can make edits to a single photo, with different versions tracked in the "Auto" tab of the Versions panel.
- Invite & Get a Link: This option allows you to share your image with fellow photographers for viewing and editing. You can configure export settings like Content Credentials, watermarks, and metadata within these sharing options.
When setting up a shared album, you can control various aspects:
- Title and Author: Display or hide the album name and author.
- Theme: Choose the arrangement of photos.
- Allow Access Requests: Enable or disable requests for access.
- Show Location Data: Allow others to view location information.
- Allow Comments and Likes: Enable or disable viewer interaction.
Exporting Presets and Previous Settings
To streamline your workflow, Lightroom Classic allows you to save and export custom export presets. You can select one or more export presets in the Export dialog box, and even choose a parent folder for all your presets.
Furthermore, Lightroom offers the convenience of exporting with previous settings. In Lightroom Classic, this can be done by choosing File > Export with Previous or by using the shortcut Command+E (macOS) or Control+E (Windows). Lightroom also remembers your last used export settings across sessions.
Advanced Considerations for Quality
For optimal export quality, several factors should be considered:
- Work with RAW Photos: Editing RAW files provides the most flexibility and data for achieving high-quality results.
- Calibrate Your Monitor: An accurately calibrated monitor ensures that the colors you see in Lightroom are representative of how they will appear on other devices or in print.
- Understand Your Output: Always consider the intended use of your image. Exporting for a large-format print will require different settings than exporting for a social media post.
TIFF vs. JPEG: A Deeper Dive
The fundamental difference between TIFF and JPEG lies in their compression methods:
- JPEG: Uses lossy compression. This results in smaller file sizes, making them easier to store and share online. However, each save operation can potentially degrade the image quality.
- TIFF: Uses lossless compression. This preserves all image data, resulting in higher quality but significantly larger file sizes. TIFFs are ideal for archival and professional print workflows.
Color Spaces: sRGB, Adobe RGB, and ProPhoto RGB
The choice of color space significantly impacts the range of colors that can be reproduced:
- sRGB: The most common color space, defined for the web. It has a limited color gamut.
- Adobe RGB: Offers a wider gamut than sRGB, making it a good choice for print.
- ProPhoto RGB: Possesses the widest gamut, encompassing nearly all colors visible to the human eye. It's often used for professional photography and provides maximum flexibility for future editing or printing. However, it requires careful management to ensure accurate display on devices that don't support such a wide gamut.
Lightroom Mobile, similar to Lightroom Classic, allows for the selection of Bit Depth and Color Space for TIFF exports. In fact, Lightroom Mobile has been noted for offering LZW compression at 16 bits, a feature that has been removed from other versions.
By understanding these export options and considerations, photographers can confidently prepare their images from Lightroom for any intended purpose, ensuring both quality and compatibility.