The digital art landscape has been revolutionized by applications like Procreate, offering artists unprecedented freedom and flexibility on their iPads. However, a common point of frustration for many users, particularly those accustomed to desktop software, is the seemingly restrictive layer limit within Procreate. Unlike Photoshop, where layer counts can extend into the thousands, Procreate imposes a more tangible boundary. This article delves into the intricacies of Procreate's layer limits, explaining why they exist, how they are determined, and, crucially, how artists can effectively navigate and overcome these limitations to maintain a fluid and productive workflow.
The Nature of Procreate's Layer Limits
Unlike the virtually limitless layers available in applications like Photoshop, Procreate imposes a considerable limit on how many layers can be created within a single artwork. This limit is not a fixed number but rather a dynamic value influenced by several key factors, primarily the specifications of the iPad itself and the dimensions of the canvas being used. Early encounters with this limitation can be particularly jarring for artists transitioning from desktop environments where layer counts are rarely a primary concern. In Photoshop, while Adobe states users can create up to 8000 layers, memory constraints can significantly lower this practical limit. Procreate, designed for the mobile computing environment of an iPad, operates under different constraints.
The core reason behind Procreate's layer limitation lies in the management of your iPad's Random Access Memory (RAM). When you create a new layer in Procreate, the application stores all associated data in your iPad's memory. This data includes not only the visual information of the layer, such as colors and brush strokes, but also its properties like blending modes and opacity. The more layers you have, the more memory is consumed. To ensure the app runs smoothly and to prevent the iPad from slowing down or crashing, Procreate must manage its access to the device's RAM. This means that Procreate will never have full access to your iPad's total RAM; a portion is always reserved for the operating system and other background tasks.
The amount of RAM that Procreate can access is directly tied to the iPadOS version installed on your device. Fortunately, recent updates to iPadOS, including iPadOS 16, 17, and 18, have significantly increased the amount of RAM available to Procreate. Therefore, if your iPad is capable of running these newer operating systems, you are likely to benefit from a much higher layer count. Naturally, the more RAM your iPad possesses, the greater the number of layers Procreate can accommodate. iPads with higher RAM capacities, such as those with 16GB found in the latest iPad Pro models (M4/M5, M2/M1), offer the best potential for a high layer count.
Factors Influencing the Layer Limit
The layer limit in Procreate is not a static figure but is dynamically calculated based on the interplay between your iPad's hardware and the characteristics of your artwork's canvas. Understanding these influencing factors is crucial for anticipating and managing the layer count.
Canvas Size and Resolution
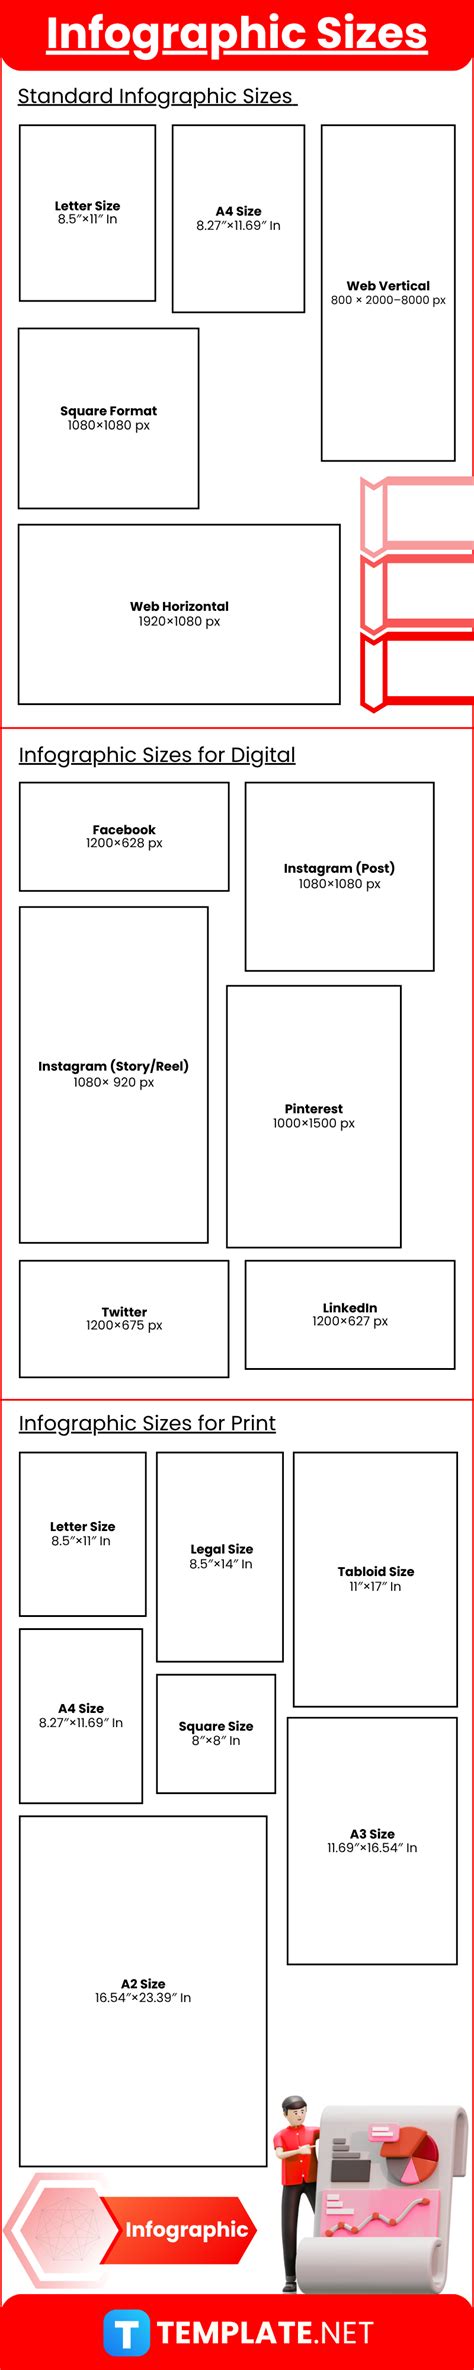
Perhaps the most significant determinant of the layer limit is the size and resolution of your canvas. As the user notes, "the bigger your canvas size, the fewer Procreate layers you will have available." This is because larger canvases require more memory to store their pixel data. When you create art for digital consumption, such as for social media or digital downloads, working with a higher pixel dimension directly reduces the number of layers you can utilize.
Similarly, when creating art intended for print, both the dimensions of the canvas (measured in inches, centimeters, or millimeters) and the Dots Per Inch (DPI) setting play a role. A higher DPI setting for print will also consume more memory, thus lowering the available layer count. For instance, a custom canvas of 12x12 inches at a high resolution, such as 300-350 DPI, which is preferred for decent-sized prints, will naturally have fewer available layers compared to a smaller, lower-resolution canvas. This is why the layer limit for the exact same file can differ significantly between an iPad Pro 2020 and an older iPad Air 2014; the hardware capabilities and the way Procreate interacts with them are distinct.
iPad Model and RAM
As previously mentioned, the specific iPad model you are using directly impacts the layer limit. Older iPad models, with less RAM, are inherently at a disadvantage. If you are in the market for a new or used iPad, investing in a model with as much RAM as your budget allows will directly translate to a higher layer capacity within Procreate. This is a practical consideration for artists who frequently work with complex, multi-layered projects. The difference can be substantial; for example, an artist might have significantly fewer layers available on an older iPad Pro 10.5″ compared to a newer iPad Pro 12.9″.
iPadOS Version
The operating system running on your iPad also plays a vital role. Newer versions of iPadOS, particularly iPadOS 16 and above, have been optimized to allocate more RAM to applications like Procreate. This means that even on older hardware, updating to the latest compatible iPadOS version can unlock a higher layer limit.
How to Check Your Available Layers
It’s essential to be aware of how many layers you have available in your current Procreate artwork. Procreate provides a straightforward way to check this information:
- Tap the “wrench” icon (Actions menu) to open the settings.
- Navigate to the “Canvas” tab.
- Within the Canvas menu, locate and tap on “Canvas information.”
- In the “Canvas info” screen, tap on the “Layers” menu item.
- On the right-hand side, you will see the “Maximum layers” available for your current canvas and iPad combination.
How to Increase your Layer Limit in Procreate
This information is crucial for understanding your current working capacity and for making informed decisions about your workflow.
Strategies for Overcoming Layer Limit Frustrations
While the layer limit can seem restrictive, it also encourages a more deliberate and efficient approach to digital art creation. Fortunately, several effective strategies can help you work around these limitations without compromising your artistic vision.
Progressive Merging of Layers
One of the most common and effective techniques is to progressively merge layers as you work. This method helps keep your artwork organized, especially if your initial layering approach tends to become quite messy. By merging related layers, you reduce the overall layer count, freeing up space for new layers. For example, if you have multiple layers contributing to a character's clothing, you might merge them into a single "Clothing" layer once you are satisfied with their combined appearance.
However, it's crucial to exercise caution when merging. Merging is a destructive process, meaning you will lose access to the individual layers once they are combined. This can be problematic if you rely heavily on different layer modes (e.g., Multiply, Screen, Overlay) to achieve specific visual effects. When layers with distinct blending modes are merged, these effects may not always translate as expected, potentially altering the final appearance of your artwork. Therefore, it's advisable to merge only when you are confident that the individual layer's attributes are no longer critical or when you have achieved the desired effect through the combination.
The user's experience highlights this: "I always merge my layers, to keep my artwork relatively well-organized (because my original layers are way too messy, ahem, more than I would like to admit). However, you should be cautious when working like this because when you have different layer modes, things do not always work when you merge layers. Also keep in mind that merging is a destructive process, you won’t have access to the individual layers any more."
Exporting and Re-importing Artwork
A non-destructive yet potentially more labor-intensive method involves exporting your artwork as a photo and then importing that photo into a new Procreate artwork. This effectively "bakes" your existing layers into a single image, freeing up layer capacity in the new canvas. You can then continue working on top of this imported image, adding new layers as needed. The advantage here is that the original file remains intact and accessible, preserving all your meticulously organized layers.
The drawback, as noted by the user, is the added effort: "The process is not destructive to the old layers, however it can be annoying since it requires more work on your part. If you need to make alterations, you need to go back to the old file, export again, load again etc." Despite this, for complex projects where preserving the original layer structure is paramount, this method offers a reliable solution.
Strategic Grouping of Layers
Similar to merging, strategically grouping layers can also help manage the layer count. You can group related layers together into folders, which can make your Layers panel more organized. While grouping itself doesn't reduce the total number of layers in terms of memory usage, it can make managing them more efficient. In some workflows, you might duplicate a file and then merge appropriate layers within specific groups. This can reduce the overall layer count while still allowing you to access individual elements within those groups if needed. Be mindful, however, that grouping can sometimes deactivate layer effects that were dependent on specific layer modes in the original, un-grouped file.
Shrinking the Canvas (with Caution)
A more unconventional approach, which the user admits to finding artistically questionable, is to shrink the canvas size. If pixel size is not a primary concern for your project, reducing the canvas dimensions will inherently lower the memory footprint and thus increase the available layer limit. This can be done through Procreate's "Crop & Resize" feature within the Canvas menu. However, this is a destructive process that can lead to pixelation and a reduction in the overall quality of your artwork, especially if you intend to print it or display it at larger sizes. The user wisely cautions: "I think the technique of working with the smallest canvas size possible is a technique suitable for more advanced artists. Decreasing your canvas size is a valid technique, but personally, I don’t recommend it because it can pixelate your artwork." This method is best reserved for specific situations where maximum resolution is not a requirement.
Integrating Photoshop into Your Workflow
For artists working on extremely large-scale projects, such as huge posters where Procreate might not be able to handle even a single layer, integrating Photoshop into the workflow can be an indispensable solution. The process involves starting the initial stages of your artwork in Procreate, then transferring the file to Photoshop. Once in Photoshop, you can leverage its greater processing power and significantly higher layer capacity to scale up the artwork and continue working without the same layer constraints. While this might not be an ideal solution for everyone, as it requires access to and familiarity with Photoshop, it is a guaranteed method to overcome Procreate's limitations for monumental projects.
The Purpose Behind the Limit
While the layer limit in Procreate can undoubtedly be a source of frustration, it's important to understand that it serves a purpose. The makers of Procreate, constrained by the hardware limitations of mobile devices, had to ensure the app remains stable and performant for all users, regardless of their iPad model. By setting a limit on the number of layers, Procreate encourages artists to make more conscious and deliberate artistic choices. This can lead to a more refined workflow, forcing artists to think critically about their layering strategy and to optimize their process. As the user wisely puts it: "So, while it may seem restrictive at first, I think the layer limit in Procreate actually serves a purpose." It’s a challenge that, when embraced, can enhance creativity rather than stifle it.
Future Considerations and Updates
The landscape of digital art tools is constantly evolving, and Procreate is no exception. As iPad hardware continues to improve, and as iPadOS versions are updated, it is plausible that future updates to Procreate may increase the layer limits. The developers are committed to providing the best possible user experience, and this includes adapting to advancements in mobile technology. Artists who invest in newer iPads with more RAM and keep their operating systems updated are best positioned to benefit from these potential future enhancements.
Ultimately, while the layer limit in Procreate is a real boundary, it is not an insurmountable obstacle. By understanding the factors that influence it and by employing smart workflow strategies, artists can continue to create complex and detailed artwork without being unduly hindered. The key lies in adaptability, thoughtful planning, and a willingness to explore different techniques to maximize the creative potential of the Procreate platform.