In today’s digital era, the use of scalable vector graphics (SVG) has become increasingly popular. SVG files offer numerous benefits, such as scalability, small file sizes, and the ability to retain image quality at any size. While Adobe Photoshop is primarily known for its raster-based image editing capabilities, it also provides a convenient way to export files as SVG. This guide will delve into the process, offering insights and best practices for exporting your designs as SVG from Photoshop.
Understanding SVG and Its Advantages
Before we get into the technical stuff, let’s talk about what SVG is, why it's awesome, and why it is highly regarded in the digital design community. Scalable Vector Graphics (SVG) is an XML-based file format that allows for the creation of two-dimensional vector graphics. Unlike raster images such as JPEG or PNG, SVG files define images with mathematical equations, ensuring that they can be scaled without loss of quality. For example, SVGs play a crucial role if you want to create a scalable logo design.
One of the primary advantages of SVG files is their scalability. This means that whether you need to display an image on a tiny mobile screen or a large billboard, SVGs will adapt seamlessly without pixelation. Additionally, SVG files typically have smaller file sizes compared to raster files, making them ideal for web-based applications where loading speed is crucial. Moreover, SVGs allow for interactive elements such as animations and interactivity, making them highly versatile for modern web design.
Photoshop Export as SVG: A Step-by-Step Guide
Now that we have established the importance of SVG files, let us explore the step-by-step process of exporting files as SVG in Adobe Photoshop. Follow these instructions for how to export files as SVG in Photoshop and how to export pictures as SVG in Photoshop.
Step 1: Prepare Your Document
Start by opening your picture in Photoshop. You can start a new project or use one you already have. Just make sure your picture is made of lines and shapes that we can change, specifically, vector shapes created using Photoshop's Pen and Shape tools. It's important to note that Photoshop can only export a proper SVG from native Photoshop vectors. Vectors that have been placed or pasted as a Vector Smart Object cannot be properly exported as SVG. This means that for effective SVG export, you should avoid importing external vector files as Smart Objects if your intention is to export them as SVG directly from Photoshop. Instead, recreate or trace them using Photoshop's native vector tools.
Step 2: Tidy Up Your Layers
To make sure your SVG turns out great, tidy up your picture. Put all the parts in the right order and give them names. This organization is crucial for the export process and for the web developer who will be using the SVG. If your picture has text, it's best practice to convert it into shapes by right-clicking on the text layer and selecting "Convert to Shape." This ensures that the text renders correctly across different platforms and browsers, as not all systems may have the same fonts installed.
Step 3: Select the Elements for Export
Choose the parts of your picture that you want to turn into an SVG. If you want the whole picture, ensure all relevant vector layers are selected. You can pick more than one thing by holding down the Shift key while clicking them in the Layers panel. This selection process allows for granular control over what gets exported into your SVG file.
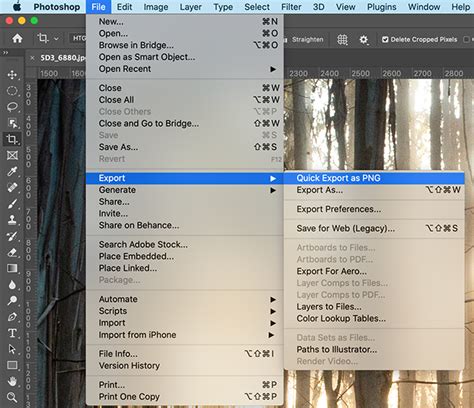
Step 4: Initiate the Export Process
Now, it’s time to save your picture as an SVG. Go to "File" in the top menu bar, then navigate to "Export," and pick "Export As." A dialog window will pop up, presenting various export options.
Step 5: Configure SVG Export Settings
In the "Export As" window, find the "Format" dropdown menu and select "SVG." Before you click the "Export" button, there are several important settings to consider to ensure optimal results:
- SVG Type: For most applications, "SVG 1.1" is the recommended option as it is widely supported.
- Size: This is a critical setting for web development. SVG files can be scaled up or down to be any size within a webpage, and the quality will always be great. However, it's beneficial for the SVG to initially start at the desired size when the web developer incorporates it into the webpage. This avoids the extra step of coding a specific size. If you want your SVG to scale dynamically with the screen size, leave the width and height boxes empty. If you have a specific initial dimension in mind, you can input values here. For instance, in the Properties panel (Window > Properties), you might notice the Width is 229 px for a particular artwork. Setting this initial size can be helpful for web developers.
- Text: If your design contains text that you haven't converted to shapes, you might see an option related to text handling. Choosing "Convert to Outlines" (if available within this specific export dialog for SVG) ensures that text is rendered as vector shapes, guaranteeing consistent appearance across all viewing environments. If you've already converted text to shapes in Step 2, this option might be less relevant.
- Images: If your Photoshop document includes raster images that you intend to embed within the SVG, select "Embed." This ensures that the raster elements are packaged within the SVG file itself.
- Compression: For clarity and ease of editing the SVG code, choosing "None" for compression is often preferred. While compression can reduce file size, it can make the SVG code harder to read and modify.
- Extras: This option may include settings for metadata or other additional details. You might not need these for standard web use, so consider deselecting them to keep the file as lean as possible.
Step 6: Save Your SVG
Once you’re satisfied with all the settings, click the "Export" button. You’ll be prompted to choose a location to save your SVG file and to provide a name for it. Photoshop will then save your vector artwork in the SVG format.
Pro Tips for Enhanced SVG Export
Great job! You’ve successfully learned the fundamental process of SVG export from Photoshop. Now, let's explore some advanced tips and considerations to make your SVGs even better and ensure they integrate seamlessly into web projects.
Optimize for Web Performance
- Get the Right Size: Before you start, think about how big you want your picture to be. Make your artboard (the canvas or working area your picture is on) the right size for that intended display dimension. This initial sizing can significantly impact how the SVG is implemented in a webpage.
- Trim the Fat: For advanced users, you can open the exported SVG file in a code editor or a vector editing program like Adobe Illustrator. Look at the SVG code and remove any unnecessary elements, attributes, or metadata. This process, often referred to as "cleaning" or "optimizing" the SVG, can significantly reduce file size and improve loading times.
Maintain Design Integrity
- Turn Photos into Art (When Necessary): If you’re starting with a raster image (a photograph) and need to create an SVG, Photoshop itself isn't the ideal tool for converting complex photos into clean vector shapes. In such cases, you would typically use a program like Adobe Illustrator to trace or redraw the image into vector paths before exporting as an SVG. Photoshop is best suited for exporting native Photoshop vector shapes.
- Keep Things Organized: As mentioned earlier, ensure your layers are neat and have good, descriptive names. This organization isn't just for your benefit; it makes working with the SVG code much easier for developers.
- Let It Change Size: If you want your SVG to adapt fluidly to different screen sizes and resolutions, avoid setting a fixed width and height during the export process. This allows the SVG to be responsive.
Verification and Further Exploration
- Check Your SVG: After you make your SVG, open it in a web browser (like Chrome, Firefox, or Safari) or a dedicated SVG editing program. Make sure it reflects your design preferences accurately and renders as expected. This step is crucial for catching any unexpected issues.
- Explore Illustrator for Complex Vectors: While Photoshop can export SVGs from its native vector shapes, Adobe Illustrator is the industry-standard tool for creating and manipulating vector graphics. For complex logos, illustrations, or intricate vector designs intended for web use, it's often more efficient to create them directly in Illustrator and then export them as SVG from there. For instance, if you have an iTastify logo in Photoshop that was placed as a Vector Smart Object, you would typically need to open it in Illustrator (which should launch automatically if it's a linked Smart Object) to properly manage and export it as an SVG.
Can You Export SVG in Photoshop? 2025 Step-by-Step Tutorial
Consider Third-Party Tools
- Try Plugins: The ecosystem of design tools is vast, and there are often third-party plugins available for Photoshop that can enhance or simplify the SVG export process. Look for reputable plugins that offer advanced features or streamline specific workflows if you find yourself frequently exporting SVGs.
A Note on Photoshop Updates and Workflows
This exercise, excerpted from past web design training materials, is compatible with Photoshop updates through 2020. It's worth noting that design workflows evolve. While Photoshop offers SVG export capabilities, for dedicated web and UX/UI design, tools like Figma are now often taught as primary platforms due to their collaborative features and vector-centric nature. However, understanding how to leverage Photoshop's SVG export remains valuable for designers working with existing Photoshop assets. If you accidentally saved changes in Illustrator after opening a Smart Object, be aware that the logo might shrink in Photoshop. This highlights the importance of understanding how linked assets behave across different applications.