Achieving a visually cohesive and expansive background in Photoshop often requires more than just a simple crop. Whether you're aiming to dramatically widen a scene, subtly enhance the existing environment, or overcome compositional limitations, extending a background while maintaining realism and quality is a common challenge. This tutorial delves into various techniques, from foundational manual methods to leveraging advanced tools, ensuring your extended backgrounds are indistinguishable from the original capture. We will explore how to meticulously match textures, manage lighting, and ensure non-destructive editing practices for optimal results.
The Foundation: Sourcing and Preparing Your Extension Material
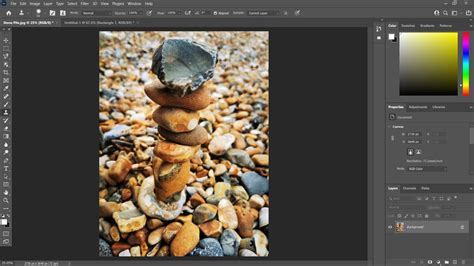
When the original image's background needs significant expansion, the first and most crucial step is to find suitable source material. The goal is to locate an image of a similar subject matter - in this case, pebbles or gravel - that closely matches the texture, color, and lighting of the original background. This similarity is paramount for a believable extension.
The process begins by importing your chosen "gravel" image as a new layer above your original background. To facilitate precise alignment, this new layer should be temporarily set to a lower opacity, perhaps around 50%. This semi-transparency allows you to clearly see the original background beneath it. You then meticulously position the new layer so that its edge aligns perfectly with the edge of the original background you intend to extend. Crucially, ensure there's a slight overlap between the original and the new layer. This overlap is essential for a smooth transition and will be vital in the blending process. Once the alignment is satisfactory, the opacity of the new layer is returned to 100%.
Mastering the Blend: Techniques for Seamless Transitions
The apparent challenge of extending backgrounds, particularly with textured elements like pebbles, lies in creating a seamless transition that avoids visible seams or jarring differences. Several strategies can be employed to achieve this.
One effective method, as suggested by experienced users, involves a strategic use of blurring. After merging the original background layer with the newly added extension layer, duplicate this merged layer. Apply a "Lens Blur" filter to this top duplicate layer. A lens blur mimics the optical characteristics of a camera lens, creating a naturalistic softening of focus that can effectively mask the join between the original and extended areas. The degree of blur should be carefully controlled to match the depth of field of the original image. Areas further from the focal point should exhibit more blur, naturally helping to conceal the edit.
However, one must be mindful of potential issues such as shadows. If the original image contains distinct shadows that are not replicated or are misaligned in the extended area, the edit can become apparent. Careful observation and, if necessary, manual manipulation of shadow elements are required.
The Importance of File Formats: RAW vs. JPEG in Editing
The discussion around background extension often touches upon the fundamental differences between shooting in RAW and JPEG formats. For photographers who prioritize flexibility and quality in their post-processing, shooting in RAW is the preferred method. A RAW file captures a much wider range of tonal and color information compared to a JPEG. This abundance of data is crucial for non-destructive editing and allows for more extensive adjustments without introducing artifacts.
A JPEG, on the other hand, is an "output" format. It has already undergone some in-camera processing and has a reduced tonal range. Attempting significant edits, such as extensive background extension, on a JPEG can lead to visible artifacts - essentially, undesirable visual anomalies like banding, posterization, or a loss of detail.
For those who shoot in RAW, the recommended workflow is to save the primary, fully edited version of the image as a layered TIFF file. This format preserves all layers and editing information, allowing for future revisions. Only when a specific output is needed, such as for web use or printing, should JPEGs be generated from this master TIFF. This approach ensures that the editing process remains non-destructive, a principle often referred to as "good Photoshop hygiene."

Leveraging Modern Tools: AI for Canvas Extension
Recent advancements in photo editing software have introduced powerful AI-driven tools that can significantly simplify and enhance background extension. Tools like "AI Generative Fill" or "AI Generative Crop" (as found in some standalone software like ON1 Photo RAW) are designed to intelligently analyze an image and generate new content to fill expanded canvas areas.
These tools are particularly adept at extending backgrounds with bokeh or out-of-focus elements. By analyzing the existing background's characteristics, the AI can generate plausible textures and color variations that blend seamlessly. While these AI tools are impressive, it's important to note that their effectiveness can sometimes vary. They may require multiple attempts or some manual refinement to achieve the desired result, especially in complex scenarios.
Extend Backdrop in Photoshop Using AI Generative Fill and Generative Expand
Navigating Transform Tool Behavior in Newer Photoshop Versions
A common point of confusion for Photoshop users, especially after updates, relates to the behavior of the Transform tool when trying to extend a selection. Historically, selecting an area and then using the Transform tool to scale it allowed for independent stretching of sides. However, in more recent versions of Photoshop CC, the Transform tool defaults to maintaining aspect ratio, meaning it scales proportionally in all directions.
If you find that your selection is extending in all directions when you intend to pull only from one side, the solution lies in a simple modifier key. To override the automatic aspect ratio lock and allow for free transformation - enabling you to stretch or scale from a single point or side - you must hold down the Shift key while using the Transform tool. This action effectively unlocks the proportional scaling, giving you precise control over the extension along the desired axis.
Advanced Techniques for Complex Backgrounds
Beyond the fundamental methods, extending complex backgrounds, such as those with intricate patterns, repeating elements, or detailed textures, may require a more nuanced approach.
Content-Aware Fill: An Intelligent Approach
Photoshop's "Content-Aware Fill" is an advanced feature that analyzes the surrounding pixels of a selected area and intelligently generates new content to fill it. When extending a background, you can select the empty space you wish to fill and then apply Content-Aware Fill. This tool is particularly effective when the area to be filled has a relatively consistent texture or pattern that can be sampled from the adjacent pixels.
To use Content-Aware Fill for background extension:
- Create a selection of the area you want to extend into. This can be done using the Marquee tool or Lasso tool.
- Go to
Edit > Content-Aware Fill. - In the Content-Aware Fill workspace, Photoshop will show a preview of the generated fill. You can use the brush tool on the left to paint over areas of the original image that you don't want Photoshop to sample from, helping to guide the fill.
- Adjust the settings in the right-hand panel for outputting the fill to a new layer or the current layer.
- Click "OK."
This method can be highly effective for extending areas with less defined textures, such as sky, grass, or even some types of fabric.
Cloning and Healing: Precision Control
For areas where AI or Content-Aware Fill might struggle, or where absolute precision is required, the Clone Stamp Tool and Healing Brush Tool remain invaluable.
- Clone Stamp Tool: This tool allows you to sample pixels from one area of an image and paint them onto another. When extending a background, you would sample from an area of the existing background that matches the texture and lighting you want to replicate in the extended section. This offers complete control but can be time-consuming.
- Healing Brush Tool: Similar to the Clone Stamp, but it also blends the sampled texture and color with the destination area, often resulting in a smoother, more natural blend. It's excellent for repairing imperfections or subtly blending edges.
When using these tools for background extension, it's often beneficial to work on a new, empty layer above your background. This allows for non-destructive editing, so you can easily refine or remove the cloned/healed areas without affecting the original image. You would repeatedly sample from areas of the existing background that are similar to the area you are trying to fill and paint them into the extended space. The key is to constantly re-sample and vary the source points to avoid creating repetitive patterns.
Patch Tool: A Hybrid Approach
The Patch Tool offers a blend of cloning and selection-based editing. You can select an area of the background you want to replace or extend, and then drag that selection to an area you want to sample from. Photoshop will then attempt to blend the sampled area into the selected region. This can be a quick way to fill in larger areas with a similar texture.
Preserving Image Quality: A Non-Destructive Workflow
Regardless of the specific techniques employed, maintaining image quality and ensuring a non-destructive workflow are paramount. This means making edits in a way that allows for future adjustments or reversals without degrading the original image data.
- Work on Duplicate Layers: Always perform significant edits on duplicate layers. This way, if an edit doesn't turn out as expected, you can simply delete the layer and start again without affecting the original.
- Smart Objects: Convert your background layer (or relevant parts of it) into a Smart Object before applying filters like Lens Blur. Smart Filters applied to Smart Objects are non-destructive, meaning you can go back and adjust their settings at any time.
- Save in High-Quality Formats: As mentioned earlier, saving your master working file as a layered TIFF or PSD is crucial. These formats preserve all your layers and editing information. Avoid flattening your image until you are absolutely certain that no further edits are needed.
- Output Sharpening: When preparing your final image for output (e.g., as a JPEG for web or print), apply output sharpening. This is a final, subtle sharpening pass that is specific to the intended output medium and size, enhancing detail without introducing artifacts. This is best done as one of the very last steps in your workflow.
By combining these techniques and adhering to sound editing principles, you can confidently extend any background in Photoshop, achieving results that are both expansive and aesthetically convincing. The key lies in careful observation, precise execution, and the intelligent use of Photoshop's diverse toolset.