Introduction to Seamless Background Removal
In the dynamic world of video editing, the ability to isolate subjects and replace backgrounds is a fundamental skill. Whether you're aiming for a professional studio look, creating compelling visual effects, or simply removing an unwanted solid backdrop, Premiere Pro offers a powerful and intuitive solution. This guide will walk you through the process of removing solid backgrounds, including black backgrounds, using Premiere Pro's built-in Ultra Key effect. This technique is invaluable for anyone looking to enhance their video projects without the need for complex external plugins or software.
Preparing Your Footage for Keying
The first crucial step in achieving a clean background removal is proper preparation of your video clip. The effectiveness of the Ultra Key effect is significantly enhanced when the footage is set up correctly from the outset.
1. Importing and Placing Your Clip:Begin by dragging your video clip into the Premiere Pro timeline. For most background replacement scenarios, it's advisable to place this clip on a higher video track, such as Video Track 2. This arrangement ensures that any new background elements you wish to introduce later can be placed on a lower track (e.g., Video Track 1), allowing them to be visible beneath your keyed subject. This layered approach is essential for seamlessly compositing your foreground subject onto a new background.
2. Understanding Ideal Footage:The Ultra Key effect is particularly effective when dealing with footage that has a solid, uniform background color. This includes traditional green screen or blue screen footage, but it also works exceptionally well for removing solid black, white, or any other single-color backdrop. The more distinct and consistent the background color is, the easier and cleaner the keying process will be. Avoid footage with complex, busy backgrounds or significant color variations within the background itself, as these can present challenges for the Ultra Key effect.
Applying the Ultra Key Effect
Once your footage is in place, the next step is to access and apply the Ultra Key effect, which is Premiere Pro's primary tool for chroma keying and background removal.
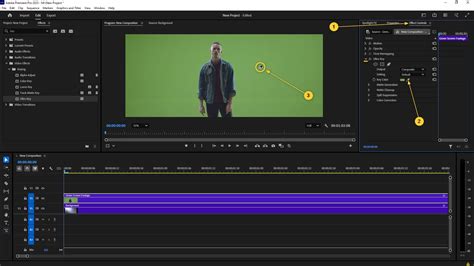
1. Locating the Effects Panel:Navigate to the "Effects" panel within Premiere Pro. This panel is typically found in one of the default workspace layouts, often grouped with the Project panel. If you cannot locate it, you can access it by going to "Window" > "Effects."
2. Searching for Ultra Key:Within the Effects panel, use the search bar to type "Ultra Key." As you type, Premiere Pro will filter the available effects, and "Ultra Key" will appear under the "Keying" category.
3. Applying the Effect to Your Clip:Once you have found the Ultra Key effect, you can apply it to your video clip in the timeline in one of two ways:
- Drag and Drop: Click and drag the "Ultra Key" effect from the Effects panel directly onto your video clip in the timeline.
- Double-Click: Select your video clip in the timeline and then double-click the "Ultra Key" effect in the Effects panel. This will also apply the effect to the selected clip.
Keying Out the Background with the Eyedropper Tool
With the Ultra Key effect applied, the core of the background removal process involves using the eyedropper tool to tell Premiere Pro which color to make transparent.
1. Accessing Effect Controls:After applying Ultra Key, you need to adjust its settings. Head over to the "Effect Controls" panel. This panel displays all the effects applied to the currently selected clip and their adjustable parameters. If the Effect Controls panel is not visible, go to "Window" > "Effect Controls."
2. Locating the Key Color Option:Within the Effect Controls panel, find the "Ultra Key" effect listed. Underneath its name, you will see various settings. Look for the "Key Color" option. Beside "Key Color," you'll find a set of tools, including an eyedropper icon.
3. Using the Eyedropper Tool:Click on the eyedropper tool. This action changes your cursor into a small eyedropper. Now, move your cursor over the video preview window. Carefully click directly on the color of the background you wish to remove. For a black background, you would click on the black area. Premiere Pro will analyze the color you've selected and attempt to make all pixels of that color (and similar shades) transparent.
Refining the Keyed Result
Often, a single click with the eyedropper won't yield a perfect result. The Ultra Key effect provides several refinement tools to clean up any remaining artifacts and ensure a professional-looking composite.
1. Understanding Matte Generation:Under the "Keying" section of the Ultra Key effect, you'll find "Matte Generation." This area is crucial for fine-tuning the transparency.
- Generate View: This dropdown menu allows you to see different representations of the key, such as "Alpha Channel," "Black and White Matte," or "Composite." Viewing the "Alpha Channel" or "Black and White Matte" is most helpful for identifying areas that are not fully transparent or are partially transparent when they shouldn't be.
- Clip Black and Clip White: These sliders help to define the pure black and pure white areas of your matte, essentially pushing semi-transparent pixels towards full transparency or opacity.
- Sensitivity: This slider controls how much of the keyed color Premiere Pro will remove. Increasing sensitivity will remove more of the background color, but be cautious as it can also start to affect the edges of your subject.
2. Utilizing Matte Cleanup:Once you have a decent matte, "Matte Cleanup" offers further adjustments to refine the edges.
- Soften: This slider blurs the edges of the keyed-out area, which can help to blend the subject more naturally with a new background, especially if the original edges were harsh.
- Edge Thin/Choke: "Edge Thin" (often referred to as choke) shrinks the edges of the subject, effectively removing any lingering background color that might be clinging to the edges.
- Edge Feather: This adds a soft, feathered edge to the subject, which can be useful for creating a softer transition.
- Shift Edge: This allows you to expand or contract the edges of the subject.
3. Addressing Spill Suppression:Spill is a common issue, especially with green screen footage, where the color of the screen "spills" onto the edges of the subject. While less common with black backgrounds, it can still occur if there's a reflection or color cast.
- Spill Suppression: This slider helps to reduce the color cast on the edges of your subject. You can adjust the amount of suppression to counteract the unwanted color. Premiere Pro's Ultra Key has an auto-spill suppression feature that often works well, but manual adjustment might be necessary for tricky shots.
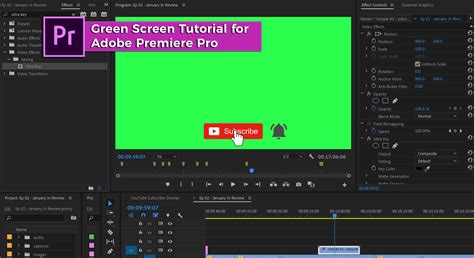
How To Fix BAD Green Screen in Premiere Pro? Advanced Chroma Key Tutorial
Adding a New Background
With the background successfully removed and your subject isolated, the final step is to composite your keyed clip with a new background.
1. Placing Your New Background:Drag your desired background element-whether it's a still image or another video clip-into your Premiere Pro timeline. Ensure it is placed on a video track positioned below your keyed clip (e.g., Video Track 1 if your keyed clip is on Video Track 2).
2. Adjusting and Compositing:Once the new background is in place, you can adjust its position, scale, and other properties using the "Effect Controls" panel to match your keyed subject. Premiere Pro will automatically composite the layers, displaying the new background through the transparent areas of your foreground clip. Experiment with different backgrounds to achieve the desired aesthetic for your project. The key is to ensure the lighting and perspective of your subject roughly match the new background for a believable composite.
The Power of Ultra Key: Efficiency and Versatility
The Ultra Key effect in Premiere Pro is a testament to the software's robust built-in capabilities. What might seem like a complex process is, in reality, streamlined and efficient once you understand the workflow.
1. Speed and Simplicity:The beauty of Ultra Key lies in its direct application. By leveraging the eyedropper tool and the subsequent refinement controls, you can achieve professional-looking results in a matter of minutes. This immediacy is invaluable for quick edits and projects with tight deadlines.
2. No External Dependencies:Crucially, Ultra Key is a native Premiere Pro effect. This means you don't need to purchase or install any third-party plugins or separate software to perform sophisticated background removals. This not only saves money but also avoids potential compatibility issues and simplifies your workflow by keeping everything within a single application.
3. Broad Applicability:While often associated with green screen, the Ultra Key effect's ability to key out any solid color makes it incredibly versatile. Removing a black background from product shots, isolating a presenter against a white backdrop, or even cleaning up footage with a consistent colored wall are all well within its capabilities. The principle remains the same: identify a distinct, uniform background color and use the eyedropper to remove it.
4. Learning Curve and Mastery:While the basic application of Ultra Key is straightforward, mastering its nuances can elevate your compositing skills. Understanding how "Matte Generation," "Matte Cleanup," and "Spill Suppression" interact allows for the correction of even the most challenging keying scenarios. Consistent practice with different types of footage will build your intuition and speed, enabling you to tackle background removal tasks with confidence and efficiency. You'll find that after performing this process a few times, you'll be able to remove backgrounds with remarkable speed and precision, making it a go-to tool in your editing arsenal.
tags: #remove #black #background #premiere #pro