In the realm of video production, high-quality audio is as crucial as stunning visuals. Unwanted background noise can significantly detract from a video's overall impact, diminishing its professional appeal. Fortunately, Final Cut Pro (FCP) offers a robust suite of tools designed to help editors effectively remove or, more accurately, reduce noise from audio, ensuring content sounds as polished as it looks. This guide delves into understanding common audio noise issues and provides a step-by-step approach to cleaning up your audio within Final Cut Pro, empowering you to maintain professional-grade sound quality.
Understanding Common Audio Noise Issues
Before diving into the solutions, it's essential to identify the types of noise that commonly plague audio recordings. Recognizing these issues will help you apply the most appropriate tools for remediation.
Background Hum
A pervasive low-frequency hum is often caused by electrical interference from power sources, air conditioning units, or other nearby equipment. This type of noise is typically consistent and can be a persistent nuisance.
Wind Noise
This is a prevalent issue, particularly for outdoor recordings. Wind rushing past microphones can create a low-frequency rumble or a high-frequency whooshing sound that can obscure dialogue and other desired audio elements.
Hiss or Static
Often a byproduct of low-quality recording equipment or excessive gain settings, hiss and static manifest as a constant, high-frequency shushing sound. This can make dialogue sound harsh and unprofessional.
Room Echo (Reverberation)
Unwanted reverberation, commonly known as echo or room tone, can make speech sound distant, muffled, or unclear. This is particularly noticeable in acoustically untreated spaces.
Learning how to enhance video sound quality by addressing these issues is crucial for producing professional-grade content. While Final Cut Pro provides excellent tools, it's important to remember that these are primarily "noise reduction" tools, not absolute "noise removal" tools. For an absolutely clean background, re-recording audio in a studio using Automated Dialogue Replacement (ADR) techniques is the most effective solution.
Step-by-Step Guide to Reducing Noise in Final Cut Pro
Final Cut Pro offers several layers of audio enhancement, from automatic analysis to manual fine-tuning. The key is to understand that audio enhancement in Final Cut Pro works on the component level, not the clip level. If your audio clip has more than one audio component (for example, a dual mono clip), you must select an individual component before proceeding with enhancements.
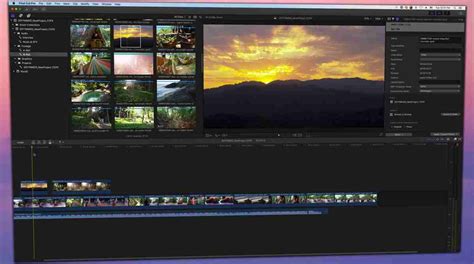
1. Import Your Video and Locate the Noisy Sections
Begin by importing your video into Final Cut Pro if you haven't already. Drag your video clip into the timeline and play through it to identify the specific sections containing unwanted noise. It's helpful to make a note of these segments so you can focus your efforts.
2. Select the Audio Clip in the Timeline
Click on the audio clip in the timeline that you wish to clean up. This action activates the clip and makes its associated audio tools accessible within Final Cut Pro's Inspector.
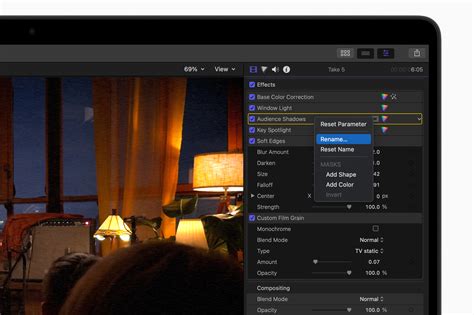
3. Open the Audio Inspector
With your audio clip selected, navigate to the "Inspector" panel, typically located on the right side of your screen. If the Inspector is not visible, you can reveal it by clicking the Inspector icon in the toolbar or by pressing the keyboard shortcut Command+4. Within the Inspector, switch to the audio tab, indicated by a small speaker icon.
4. Initial Audio Analysis and Enhancement
Final Cut Pro offers an initial "Analyze Audio" option during media import. This checkbox, found in the Media Import window, will analyze all imported audio. If the noise is severe, it will attempt to remove it from the clip automatically. Apple’s Help notes that when this import option is selected, only severe audio problems are corrected. If the clip contains moderate problems, these will appear in yellow next to "Audio Analysis" in the "Audio Enhancements" section of the Audio Inspector after the clip is imported.
To manually trigger an audio enhancement after import, with your audio clip or a video clip containing audio selected in the timeline, you can:
- Choose Modify > Enhance Audio (or press Option-Command-A).
- Click the Enhancements pop-up menu below the viewer and choose Enhance Audio.
- In the Audio inspector, click the Enhance Audio button next to "Audio Analysis" in the "Audio Enhancements" section.
A green checkmark next to an enhancement in the Audio Inspector indicates that the clip was analyzed and, if necessary, adjusted for that enhancement. A blue checkbox appears next to each enhancement that was turned on to apply a correction.
5. Enable and Use Noise Reduction
Final Cut Pro includes a built-in "Noise Reduction" feature designed to help reduce unwanted noise in your audio. In the Audio Inspector, find the "Audio Enhancements" section and toggle the "Noise Reduction" option to ON.
Once enabled, you can fine-tune the effect. Drag the "Amount" slider to find a setting where the noise is as quiet as possible while ensuring the voice still sounds full and rich. This is a critical step that requires careful listening.
6. Address Specific Noise Types: Hum Removal and EQ
Hum Removal
If your audio contains a consistent low-frequency hum, such as from electrical equipment, Final Cut Pro’s "Hum Removal" feature can be highly effective. This option is also located in the "Audio Enhancements" section. Click to enable it, and you will be presented with a choice between 50Hz and 60Hz. This selection corresponds to the frequency of the hum, which often aligns with the power supply frequency in different regions (50Hz in Europe, 60Hz in the United States). A slider is also available to fine-tune the effect.
Fine-Tune with Equalization (EQ)
While Noise Reduction and Hum Removal are powerful tools, sometimes more granular control is needed to achieve optimal audio quality. To access the EQ settings in Final Cut Pro, go to the Audio Inspector and click "EQ." You can choose from presets like "Voice Enhance" or manually adjust the frequency bands to target specific noise frequencies. This allows you to sculpt the sound to remove problematic frequencies without affecting the desired audio content.
7. Voice Isolation: Prioritizing Dialogue
Voice Isolation is a more recent and often more effective audio feature in Final Cut Pro for reducing background noise, especially when dialogue is present. As with other enhancements, select the component (channel) in the timeline, then navigate to the Audio Inspector > Voice Isolation. Drag the "Amount" slider to adjust the prioritization of human voices over other audio signals. It's generally advisable not to use both Voice Isolation and Noise Removal on the same channel, as Voice Isolation is newer and should be your primary option for noise reduction. If you find that turning on Voice Isolation for multiple audio components playing simultaneously results in garbled audio, try disabling it for one or more of those components.
8. Review Audio and Tweak Settings
After applying noise reduction, hum removal, EQ, and voice isolation, it is essential to listen critically to your audio. Play through your clip, ideally using good quality headphones, to assess whether the noise has been effectively reduced without compromising the overall sound quality. If you notice any areas where the noise remains too prominent or if the dialogue sounds unnatural, return to the Audio Inspector and make further adjustments. Don't hesitate to tweak the settings multiple times to achieve the best possible result. Remember, the goal is to reduce background noise rather than eliminate it entirely, as this often leads to a more natural sound.
9. Utilize Additional Audio Effects
Final Cut Pro offers a variety of audio effects that can further enhance your sound. For instance, the "Compressor" effect can even out volume levels, making quieter parts of your audio more audible without inadvertently amplifying background noise. To add effects, go to the "Effects" panel, search for the desired effect (e.g., Compressor), and drag it onto your audio clip in the timeline.
10. Consider Third-Party and AI Tools
For more complex noise issues or an additional layer of audio refinement, integrating advanced tools can be beneficial. Consider exploring third-party plugins or AI-driven solutions like Gling.ai. Gling.ai, for example, uses AI algorithms to identify and remove various types of noise while preserving the clarity and natural quality of the audio. You can easily incorporate such tools by exporting your audio from Final Cut Pro, processing it through the external tool, and then re-importing the cleaned audio back into FCP for final adjustments. This hybrid approach can help you achieve the highest audio quality, especially in challenging recording environments.

Troubleshooting Common Noise Reduction Issues
Even with powerful tools, you might encounter challenges when cleaning up audio.
Over-Processed Audio
If your audio begins to sound robotic, distorted, or unnaturally processed, you have likely applied too much noise reduction or other aggressive enhancements. In such cases, dial back the intensity of the applied effects or adjust the EQ settings to restore a more natural sound.
Residual Noise
Some noise might be too persistent or complex for simple built-in noise reduction to handle effectively. If you're facing persistent noise, try applying multiple layers of noise reduction with slightly different settings, or explore specialized third-party plugins designed for advanced noise removal. Breaking down the audio into smaller sections and applying tailored noise reduction to each can also be a viable strategy.
Balancing Noise Reduction with Audio Quality
Achieving the right balance between reducing noise and maintaining audio clarity is often the most delicate aspect of audio post-production. If you find yourself struggling to find this balance, consider experimenting with different combinations of tools and settings, and always prioritize the intelligibility and natural quality of the voice or primary audio source.
Video Noise Reduction in Final Cut Pro
Beyond audio, Final Cut Pro also addresses visual imperfections. Video noise is a common problem in clips shot in low-light conditions or with devices like smartphones or action cameras. This noise typically results from digital gain and appears as unwanted grain or artifacts in the video image.
You can remove video noise from standard video clips and 360° clips using the "Noise Reduction" clip effect.
Applying the Video Noise Reduction Effect
- Select the clip with video noise in the Final Cut Pro timeline.
- Position the playhead so the clip appears in the viewer.
- Click the Effects button in the top-right corner of the timeline (or press Command-5).
- In the Effects browser, select the Basics category under Video effects on the left, then select the Noise Reduction effect. For 360° clips, select the 360° category and then the 360° Noise Reduction effect.
- To quickly find the effect, type "noise reduction" in the Effects browser search field.
- You can apply the effect by dragging it to the timeline clip or by double-clicking its thumbnail.
The first time the effect is applied, Final Cut Pro analyzes the clip for noise. This analysis must complete before you can see the result. It's often recommended to add Noise Reduction as the first effect applied to a clip to ensure optimal processing.
Adjusting Video Noise Reduction
Once the effect is applied:
- Select the clip with the Noise Reduction effect in the timeline.
- Open the Inspector (Command-4).
- Adjust the Amount of noise reduction using the pop-up menu.
- Adjust Sharpness as needed.
You can examine the effect closely by setting the Zoom pop-up menu in the upper-right corner of the viewer to 100%.
By diligently applying these techniques and understanding the capabilities and limitations of Final Cut Pro's audio and video tools, you can significantly enhance the production value of your projects, ensuring your content captivates your audience with both stunning visuals and crystal-clear audio.