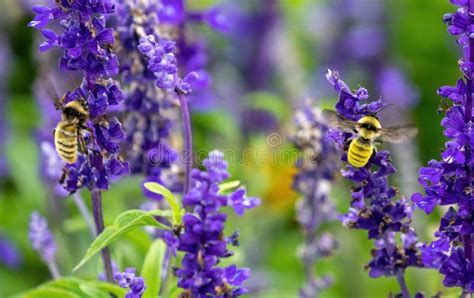
Struggling to achieve macro photos that are sharp from the insect's antennae to the delicate flower petals? Have you found yourself forced to use a wide aperture like f/5 due to low light, resulting in a frustratingly shallow depth of field? What if you could combine a series of photos, each with a narrow depth of field, to create a single image that is impeccably sharp throughout? Adobe Photoshop's powerful focus stacking feature offers precisely this capability, allowing you to merge multiple images with shallow depth of field into one, capturing every sharp detail from your entire set of shots.
The Art of Capturing Images for Focus Stacking
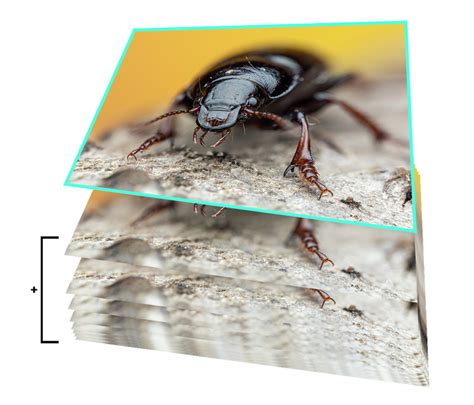
The foundational principle of successful focus stacking lies in how you capture your source images. Photoshop needs a specific kind of input to effectively blend your photos. One highly recommended technique involves setting your focus once and then, without altering the camera's position or refocussing, taking a series of shots while incrementally moving closer to or further away from your subject. The ultimate goal here is to ensure that every part of your subject is rendered sharply in at least one of the images you capture. If you feel you've moved too much between shots or accidentally refocused on a different area, don't hesitate to repeat the process. Patience and precision in this shooting phase are key to perfecting your set of photos.
For those who prefer a more relaxed approach, a "lazier" method involves remaining stationary and taking multiple photos, deliberately shifting the focus for each shot. While Photoshop can often combine images captured with this refocusing technique, there's a higher chance of encountering less-than-ideal results, particularly if any slight camera movement occurred between exposures. As will be demonstrated later, even experienced users can encounter imperfections in their stacked images.
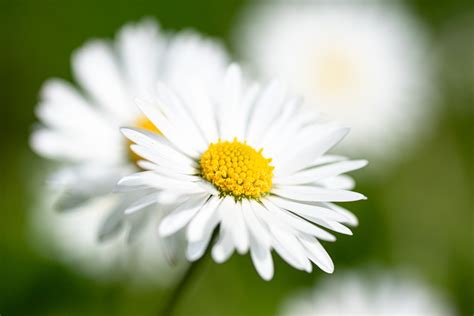
When starting out, it's advisable to select subjects that are stationary. A flower on a windless day is an excellent choice. Capturing insects, which are prone to movement, presents a significant challenge. It's difficult to instruct a live creature to remain still during the capture process. If you possess such a skill, please share it!
As mentioned, you have two primary approaches to capturing your images. If lighting conditions permit, opt for a larger f-number (smaller aperture) and take fewer shots. Conversely, if the light is insufficient, you'll need to shoot with a wider aperture, requiring a much larger volume of photos. The author has personally taken over twenty shots for a single stack, and it's not uncommon for others to use hundreds.
Advanced Capture Techniques (2022 Update)
For those seeking to refine their capture strategy, a more in-depth exploration of techniques for focus stacking is available. This advanced content, which delves into various methods for capturing optimal source images, is accessible to Patreon subscribers at the Macro Professional tier or higher.
The Photoshop Focus Stacking Workflow
Once you've assembled your collection of images, ready for the focus stacking process in Photoshop, follow these steps:
Open Adobe Photoshop: Launch the application.
Load Files into Stack: Navigate to
File->Scripts->Load files into Stack….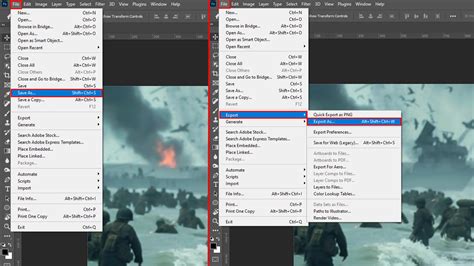
Consider File Types: It's important to note that you can utilize RAW files for focus stacking. However, for this to work seamlessly, you must have pre-prepared edits for each RAW file, ensuring a corresponding
.XMPsidecar file is present for each. Alternatively, you can edit your RAW files and export them as JPEGs, as the final output of a focus stack will be a JPEG image regardless.Automatic Alignment: Within the "Load Layers" dialogue box, check the
Attempt to Automatically Align Source Imagesoption and then clickOK.Image Loading and Alignment: Photoshop will now import all your selected photos, creating a separate layer for each, and will attempt to automatically align them. This process can take some time, depending on the processing power of your computer.
Layer Selection: Once Photoshop has finished its work, select all the layers in the Layers panel. The easiest way to do this is to click on the first layer, then hold down the
Shiftkey and click on the last layer.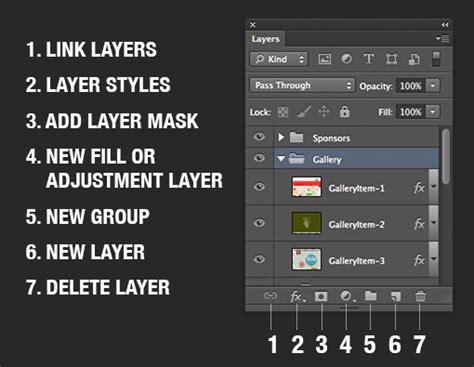
Auto-Blend Layers: With all layers selected, go to
Edit->Auto-Blend Layers….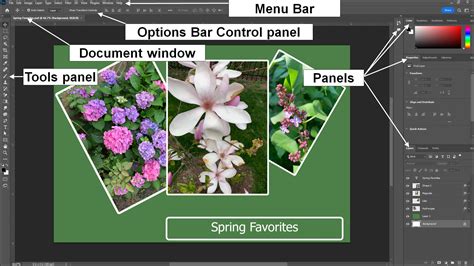
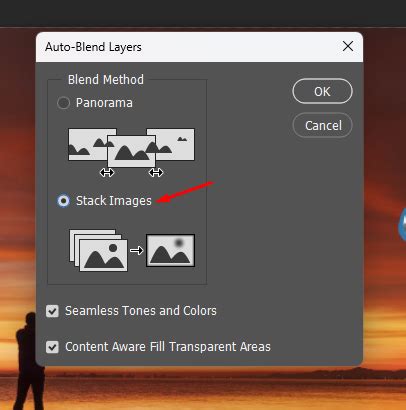
Blending Settings: In the "Auto-Blend Layers" dialogue window, ensure that
Stack Imagesis selected (it should be the default option). Check the boxes forSeamless Tones and ColorsandContent-Aware Fill Transparent Areas. Then, clickOK.
This blending action can also be time-consuming, especially with a large number of source photos. This is a good moment to take a short break.
- Review and Refine: Upon completion, you should have a single image where all areas are in focus. However, Photoshop's automatic masking isn't always perfect. You may need to correct the automatic layer masks. To inspect which part of the sharp image was derived from a specific layer, you can hide other layers. This is also where you can manually adjust masks if certain areas don't appear as sharp as desired.
- Save Your Masterpiece: Finally, save your focus-stacked image by going to
File->Save As…and selecting the.JPGfile extension. You can then further edit this final image as you see fit.
Troubleshooting Common Focus Stacking Issues
If your photos haven't stacked correctly, there are typically three main culprits:
- Alignment Failure: You may have forgotten to align the layers.
- Improper Capture: The photos themselves might not have been captured in a way that facilitates stacking.
- Incomplete Focus Coverage: Even with proper alignment and capture, certain parts of the subject might not have been in focus in any of the source images.
Photoshop itself can also occasionally make errors, selecting a blurred section of one image instead of a sharp area from another. In such instances, manual correction of the layer masks is necessary.
Forgetting to Align Layers
If you overlooked the alignment step, simply select all your layers in the Layers panel and go to Edit -> Auto Align Layers…. Choose the Auto mode and click OK. After this, proceed from step 6 onwards in the workflow described above.
Improperly Captured Photos
If the source photos were not captured correctly, there is no shortcut; you will need to go back and reshoot the entire set. With practice, your ability to capture suitable images will improve.
Blurred Areas in the Stacked Photo
Blurred areas can arise because a specific part of the subject was not captured in sharp focus in any of your source images. Alternatively, Photoshop might have made an error during the blending process. If the latter is the case, you can rectify it by manually adjusting the layer masks of the relevant layers. While detailed tutorials on layer masking are beyond the scope of this article, numerous online resources can guide you through this process.
A Beginner’s Guide to LAYERS and Layer MASKS in PHOTOSHOP
Common Pitfalls and Self-Correction
It's important to acknowledge that achieving perfect focus stacks can be challenging, and even experienced photographers encounter issues. The pursuit of perfectly sharp insect eyes, for instance, is a common goal that can be difficult to attain flawlessly.
Observing your own focus stacking results, you might notice areas that appear strangely blurred - not quite in focus and not quite out of focus. Misalignments between layers can also be apparent, leading to visible lines where the stacking is evident. For professional use, such as uploading to stock photo sites like Shutterstock or Adobe Stock, these flaws could lead to rejection. However, for personal projects or social media, these minor imperfections are often inconsequential.
Illustrative Examples and Outcomes
Let's examine some focus stacking results.
Consider a simple case with two photos of a flower, not originally intended for focus stacking. One image focused on an insect, while the other captured the center of the flower sharply. Combining these demonstrates the power of the technique.
Here's another example, a comparison between a single shot and a focus-stacked image. This clearly illustrates the utility of this feature, even with some minor blurring present due to imperfections in the stacking process. This highlights that there is always more to learn and refine.

Update (September 2021): To provide a more recent example of focus stacking results, a fresh demonstration has been included.
Key Applications of Focus Stacking
Focus stacking is an invaluable tool for photographers struggling to achieve perfect focus straight out of the camera. Its applications are widespread, with macro photography and close-up shots being primary use cases. Another scenario where it excels is in photographing a group of people in a line, especially when shooting from a distance where achieving a sharp focus across all individuals in a single frame is impossible.
When shooting close-up, the focal plane is inherently narrow, making it difficult to capture the entire subject in sharp focus. By taking multiple shots with varying focus points, you can later combine them to achieve an image that is sharp from front to back. This might require as few as two or three photographs, but often a significantly larger number is needed.
Focus Stacking for Product and Commercial Photography
Focus stacking is a technique widely employed in product photography, particularly for items like jewelry. When working at extreme close proximity and high magnification, achieving adequate depth of field is a significant challenge. This technique allows for incredibly sharp details, essential for showcasing fine craftsmanship. While often associated with macro work, focus stacking can also be beneficial for landscapes, architectural photography, and more.
A notable application is in product photography for items like diamond rings. The process involves capturing a series of images, starting with the focus at the very front of the object and progressively shifting it towards the rear, ensuring every facet is captured sharply in at least one exposure.
A Beginner’s Guide to LAYERS and Layer MASKS in PHOTOSHOP
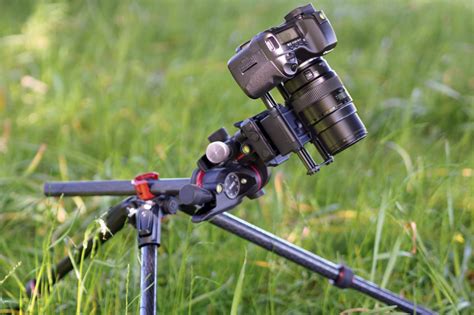
The Photographic Process: Essential Gear and Techniques
You don't need specialized equipment for focus stacking, but a tripod is absolutely essential to prevent camera shake and maintain consistent positioning between shots. A shutter release cable or your camera's self-timer can further minimize any movement when triggering the shutter. Many photographers utilize software like Hasselblad's Phocus, or tethering software like Lightroom and Capture One, to control their camera and trigger shots.
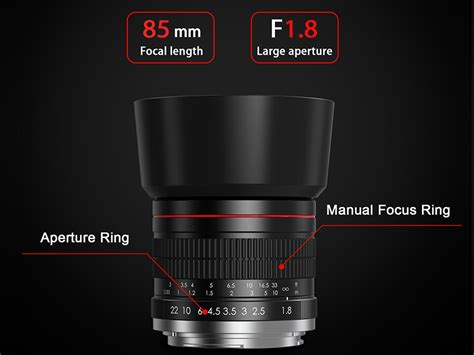
Once your scene is composed, lit, and you're satisfied with the overall look, the crucial first step is to capture a series of images with different focus points. It is imperative to switch your camera to manual focus mode for this. Gradually adjust the focus for each subsequent shot, meticulously moving from the closest focal point to the furthest.
The first image in the stack might have the focus set to the very front of your subject, while the last image focuses on the background elements.
When shifting the focus, avoid making rapid or large adjustments. Small, precise increments are key to ensuring that every point within your image is captured sharply in at least one of the exposures.
Optimizing Processing Power
Focus stacking can be computationally intensive. To expedite the process, it's advisable to perform any necessary RAW processing before importing your images into Photoshop. For instance, cropping out unnecessary surrounding space in your RAW files can significantly reduce file sizes and, consequently, processing time.
Aligning and Blending Images in Photoshop
After initial processing, load your selected images into Photoshop. The next critical stage is to align these images and initiate the focus stacking process. Photoshop offers multiple ways to achieve this.
Method 1: Using Scripts
- With your images open in Photoshop, navigate to
File->Scripts->Load Files into Stack. - In the "Load Layers" dialogue box, select
Filesfrom the dropdown menu and clickAdd Open Files. - Ensure the
Attempt to Automatically Align Source Imagesbox is checked. ClickOK.
This step is vital because slight variations in scale can occur due to focusing adjustments. Correct alignment ensures that each image is positioned precisely on top of the others, which is fundamental for a successful composite.
Method 2: Photomerge
- Open all your images in Photoshop.
- Go to
File->Automate->Photomerge. - In the Photomerge dialogue box, set the
LayouttoAuto. - Click
Add Open Filesand then check theBlend Images Togetherbox. ClickOK.
Blending the Aligned Layers
Now that your images are aligned, the next step is to blend them.
- Select all your layers in the Layers panel (click the top layer, hold
Shift, and click the bottom layer). - Go to
Edit->Auto-Blend Layers. - In the dialogue box, select
Stack ImagesandSeamless Tones and Colors. ClickOK.
Photoshop will then begin blending the layers by creating layer masks that isolate the in-focus areas of each image. This process can take a considerable amount of time.
Upon completion, each layer will have an associated layer mask. Photoshop automatically identifies the sharpest regions and uses these masks to reveal only those parts. The result is typically an image that is sharp throughout. If you wish to refine specific areas, you can manually edit these layer masks.
Depending on your Photoshop version, a new merged layer might be automatically created. If not, you can create one by selecting all visible layers and pressing Command + Option + Shift + E (Mac) or Ctrl + Alt + Shift + E (PC). This creates a composite of all visible layers.
It is highly recommended to save your work in two formats: a layered file and a flattened TIFF file. If the layered file exceeds 4GB, you'll need to save it as a PSB (Large Document Format). Maintaining the layered version allows you to revisit and make adjustments to the original focus stack if needed.
Conclusion: A Powerful Tool for Sharper Images
Focus stacking is a remarkably useful technique for overcoming the limitations of depth of field in photography. Whether you're capturing intricate macro details, expansive landscapes, or groups of people, this method empowers you to achieve images that are uniformly sharp. While the automatic processes in Photoshop are highly effective, understanding the underlying principles and being prepared to manually refine layer masks will elevate your results. By mastering focus stacking, you gain a powerful editing technique that can significantly enhance your photographic capabilities and open up new creative possibilities.