The Blender Knife tool is an indispensable utility for 3D artists, offering unparalleled precision in sculpting and refining mesh topology. This powerful feature allows users to draw custom edges directly onto existing geometry, providing a level of flexibility that surpasses simpler tools like the loop cut. Whether you're a beginner looking to understand the basics or an experienced modeler seeking advanced techniques, this guide will delve into the intricacies of activating, using, and mastering the Blender Knife tool.
Activating the Knife Tool
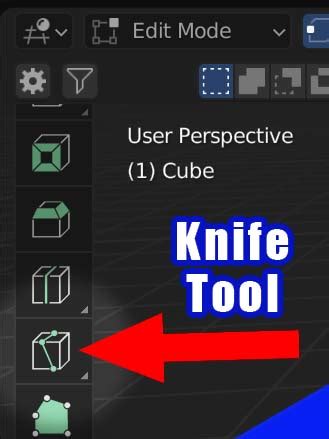
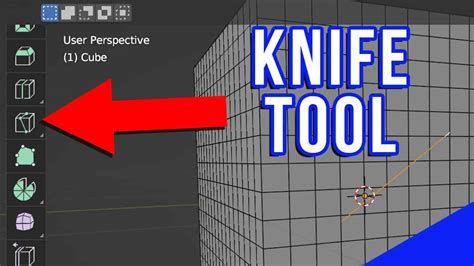
Accessing the Knife tool in Blender is a straightforward process, with multiple methods available to suit your workflow. The primary requirement is to be in Edit Mode for the object you wish to modify.
Method 1: Using the Tool Shelf
- Select your object: In Object Mode, select the mesh you intend to edit.
- Enter Edit Mode: Press the Tab key or click the "Edit Mode" button in the 3D Viewport's header.
- Open the Tool Shelf: If the Tool Shelf is not already visible on the left side of the 3D Viewport, press the T key to toggle it.
- Locate the Knife Tool: Within the Tool Shelf, find and click the icon representing the Knife tool.
Method 2: Keyboard Shortcut
A more direct approach for activating the Knife tool is through a dedicated keyboard shortcut:
- Select your object and enter Edit Mode as described above.
- Press the 'K' key on your keyboard.
Upon activation, the cursor will transform into a knife icon, indicating that the tool is ready to be used. A confirmation of the active tool will also appear in the status bar at the bottom of the Blender interface.
Understanding How the Knife Tool Works
Once activated, the Knife tool operates by allowing you to define a series of vertices that will form a new edge or cut across your mesh. This process is highly interactive and intuitive.
The fundamental workflow involves clicking on existing edges or faces to place individual vertices. As you move your cursor, a line will visually represent the path of your intended cut, connecting the placed vertices. This continuous placement of vertices allows for complex, non-linear cuts.
To finalize the cut and create the new geometry, you press Enter or the Spacebar. The vertices you've placed will then become active and editable, seamlessly integrating into your mesh. This method offers significantly more control compared to tools that operate on entire loops or predefined paths.
Step-by-Step Guide: Using the Knife Tool
Let's walk through the process of using the Knife tool with practical examples.
Cutting a Plane Mesh
Working with a simple plane is an excellent way to grasp the basic functionality of the Knife tool.
- Prepare the Scene: Upon launching Blender, you'll typically see a default cube. To focus on a plane, you can hide the cube by selecting it and pressing H.
- Add a Plane: Press Shift + A to open the Add menu, then select "Mesh" > "Plane".
- Enter Edit Mode: Select the newly added plane and press Tab to enter Edit Mode.
- Activate the Knife Tool: Press K or select it from the Tool Shelf.
- Start Cutting: Left-click on an edge or face of the plane to place your first vertex. Continue clicking to define additional vertices, creating the desired cutting path.
- Complete the Cut: To finalize the cut, you have a few options:
- Double-click the left mouse button.
- Press the 'E' key.
- Press 'Enter' or the 'Spacebar'.
Important Note: Avoid using the right mouse button after placing vertices, as this action will typically delete the cuts you've made so far.
After pressing Enter or Spacebar, the newly created edge will be applied to the plane mesh. You'll observe that the cut is now a permanent part of the geometry.
Cutting a Cube Mesh
The process for cutting a cube is similar to cutting a plane, with an added consideration for cuts that need to pass through the entire mesh.
- Enter Edit Mode: Select your cube object and press Tab to enter Edit Mode.
- Activate the Knife Tool: Press K.
- Define the Cut: Click to place vertices along the surface of the cube, defining your desired cut path.
- Apply the Cut: Press Enter or the Spacebar to finalize the cut.
Making a Cut Through the Entire Mesh
For cuts that need to penetrate the entire volume of the mesh, rather than just a single face, an additional step is required:
- Activate the Knife Tool: Press K.
- Enable "Cut Through": While the Knife tool is active, press the C key. This option allows the cut to pass through all intersecting geometry.
- Hold Shift for Constrained Cuts: When "Cut Through" is active, holding down the Shift key while making your cut will constrain the knife path to perfectly horizontal, vertical, or 45-degree angles relative to the view. This is incredibly useful for maintaining precision.
- Define and Apply the Cut: Proceed with placing your vertices as usual. Once you've completed the desired path, press Enter or the Spacebar to apply the cut, which will now have passed through the entire mesh.
How to Use the Knife Tool in Blender 🔪
You'll notice that when using the "Cut Through" option effectively, the cut will propagate to all faces it intersects, unlike a standard cut that might stop at the boundaries of a single face.
Advanced Knife Tool Functionality
The Knife tool offers several advanced options to enhance precision and control over your cuts.
Constrained Cutting (Angle Snapping)
For precise angular cuts, the Knife tool provides snapping capabilities.
- Activate the Knife Tool: Press K.
- Initiate a Cut: Click to place the first vertex. A small blue rectangle may appear on the cursor, indicating a snapping point.
- Enable Angle Snapping: Press the A key. This will cause a white straight line to appear, guiding your cut at specific angular increments.
- Adjust Angle Increment: To fine-tune the angle snapping:
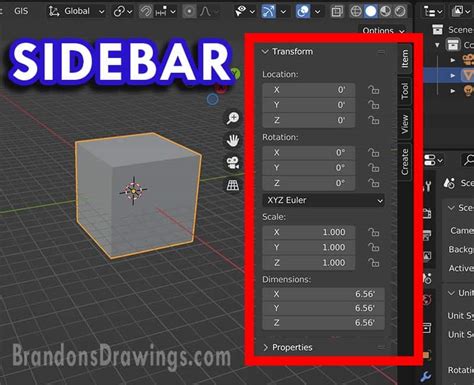
- Press N to open the Sidebar in the 3D Viewport.
- Navigate to the "Tool" tab within the Sidebar.
- Locate the "Angle Snapping Increment" option and adjust the value to your desired angle.
- Draw the Constrained Cut: With the angle set, press A again and proceed to draw your cut. The knife path will now adhere to the specified angle increments.
- Apply the Cut: Press Spacebar or Enter to finalize.
This feature is invaluable for creating symmetrical patterns or aligning cuts with specific architectural elements in your models.
Knife Tool Snap to Vertex
The Knife tool can also snap to existing vertices, edges, and faces, ensuring that your cuts align perfectly with your mesh structure. This is often enabled by default, but understanding its behavior is crucial. When placing vertices, the knife cursor will visually indicate when it's snapping to a snap-able element, often showing a yellow highlight or a specific icon.
Common Problems and Solutions
Beginners often encounter difficulties with the Knife tool, primarily due to a lack of planning or misunderstanding its impact on topology. The tool is not a universal "fix-all" for geometry issues; rather, it's a precise instrument that requires thoughtful application.
Inadvertent N-gons and Triangles
A common pitfall is inadvertently creating non-quadrilateral polygons (n-gons) or triangles within a predominantly quad-based mesh. This happens when cuts disrupt the natural flow of edge loops. For example, a cut that starts on one edge and ends on a non-adjacent edge without a clear path through quads can result in undesirable topology.
Solution: Always consider the resulting topology before making a cut. Visualize how the new edge will interact with existing faces and edges. If a cut is intended to create a clean loop, ensure it connects to existing edges in a way that maintains quad flow. Tools like the "Loop Cut and Slide" are often better suited for creating uniform edge loops.
Knife Tool Not Working as Expected
If you feel the Knife tool isn't functioning correctly, consider these points:
- Are you in Edit Mode? The Knife tool is only accessible when an object is in Edit Mode.
- Is the correct object active? Ensure the mesh you intend to cut is the active object.
- Have you finalized the cut? Remember to press Enter or Spacebar to apply the cut. Esc will cancel the current operation without applying.
- Is the "Cut Through" option interfering? If you're not intending to cut through the entire mesh, ensure 'C' hasn't been pressed inadvertently.
Troubleshooting Specific Issues:
- Cancelling the Knife Tool: If you decide not to proceed with a cut before finalizing it, press the Esc key.
- Undoing the Knife Tool: If you've applied a cut and wish to revert it, use the standard undo shortcut: Ctrl + Z.
Best Practices for Using the Knife Tool
To maximize the effectiveness of the Knife tool and avoid common pitfalls, adopt these best practices:
- Plan Your Cuts: Before you start clicking, have a clear idea of the shape and placement of your cut. Consider how it will affect the surrounding geometry.
- Utilize Snapping: Leverage vertex, edge, and angle snapping for precision.
- Maintain Topology: Aim to keep your mesh as clean as possible, favoring quads where appropriate. Understand the implications of creating triangles or n-gons.
- Use "Cut Through" Sparingly: While powerful, "Cut Through" can quickly lead to messy topology if not used with care.
- Practice with Simple Meshes: Familiarize yourself with the tool's behavior on basic shapes like planes and cubes before tackling complex models.
- Combine with Other Tools: The Knife tool often works best in conjunction with other modeling tools like extrude, bevel, and loop cut.
The Blender Knife tool is a sophisticated instrument for detailed mesh manipulation. By understanding its activation, functionality, and advanced options, you can significantly enhance your modeling capabilities, creating cleaner, more precise, and intricately detailed 3D models.