The world of digital art and photography is constantly evolving, and with the decline of simpler online editing tools, many creatives are looking for more robust and versatile solutions. Photoshop, a powerhouse in image manipulation, offers a comprehensive suite of tools for creating stunning photo collages. Whether you're aiming to tell a visual story, commemorate a special occasion, or simply enhance your social media presence, learning to create collages in Photoshop can unlock a new level of creative expression. This tutorial will guide you through the process, from selecting your images to applying finishing touches, ensuring you can transform your cherished memories into captivating visual narratives.
The Allure of the Collage: Why Create Them?
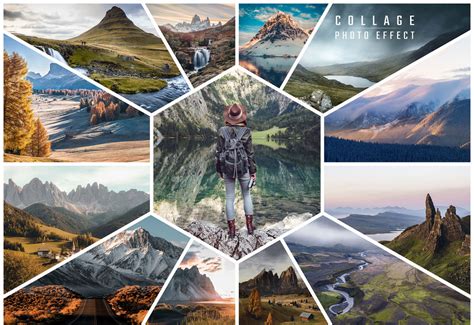
Before diving into the technicalities, it's essential to understand the inherent value of photo collages. In essence, a collage is a form of art or graphic design where different elements are combined into a new image with a new meaning. They are incredibly versatile and can elevate almost any visual display. Beyond aesthetics, collages possess the unique ability to tell a story in a way that a single photograph often cannot. Think of a collage as a visual narrative that conveys a theme, captures a special moment, or communicates a message, creating a real emotional impact.
Special occasions, such as weddings, birthdays, or holidays, are perfect candidates for collage creation. Imagine compiling the best moments from a wedding day into a single, awe-inspiring frame. Similarly, collages make fantastic holiday gifts and cards, offering a deeply personal touch. For digital content creators, a well-crafted collage can make a social media profile pop, drawing attention and engagement. The beauty of creating collages in Photoshop lies in its efficiency; with the right approach, it’s a fast and easy process, eliminating the need to spend hours fussing with complicated settings.
Preparing Your Visual Narrative: Image Selection and Theme
The foundation of any successful collage lies in the careful selection of your images. It’s recommended to choose images connected by a theme, such as a specific location, an event, or even a broader concept. This thematic coherence is crucial for creating a cohesive and impactful narrative. Include a mix of subjects at different scales; for instance, pick some wide shots that capture the entire scene, as well as some detail photos that highlight texture and personality. Without both wide and detailed perspectives, the story might feel incomplete and may not carry the desired emotional weight.

Speaking of storytelling, it often helps to focus on the narrative you aim to tell. Do you want to offer a story surrounding an event? Do you want to clearly convey a meaningful concept? Consider the emotional resonance you wish to evoke. A practical tip is to aim for at least three photos and no more than eight. Too few images might limit your ability to tell the full story, while an excessive number can lead to a cluttered and overwhelming composition. The goal is to create a harmonious blend that tells your chosen story with clarity and emotion.
Laying the Groundwork: Setting Up Your Canvas
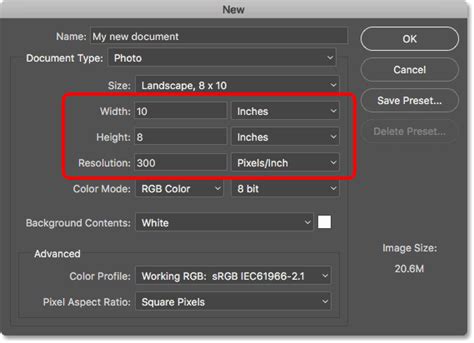
Every Photoshop collage needs a background file where all the images will eventually be assembled. To begin, navigate to File > New to create a new blank image. A "New Document" window will appear, prompting you to dial in your file preferences. The specifics of these preferences will depend on your intended use for the collage and the sizes of your chosen photos. If you are working with large JPEGs and plan to print the collage, you should probably select a width and height of 5000 pixels or more to ensure sufficient resolution. It is very important to create a document with the right resolution, which should be slightly larger than the one you want to end up with, allowing for potential cropping or adjustments later.
Assembling the Pieces: Importing and Arranging Images
Once your canvas is prepared, it's time to bring in your selected photos. Navigate to one of your open photos. You can then select the entire image by using the Marquee tool or by pressing Ctrl/Cmd+A. With the image selected, press Ctrl+C to copy it. Then, go to your new blank document and press Ctrl+V to paste the selection. This action will copy the photo into the new document, automatically placing it on a separate layer. Alternatively, you can open their folder and drag and drop them directly onto your document canvas. This drag-and-drop method has the advantage of automatically converting them to Photoshop Smart Objects, which will maintain the integrity of the image quality as you resize and manipulate them.
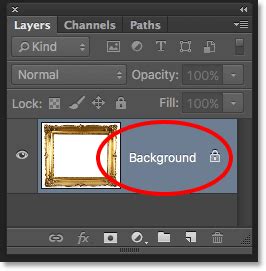
Depending on the size and resolution of the new image, you may need to make adjustments. To do this, go to Edit > Free Transform (or press Ctrl/Cmd+T). Once Free Transform is activated, you'll see a bounding box around your image. Use the corner nodes and, while holding down the Shift key (to maintain aspect ratio), set the size so that you can comfortably move and position the image within the new document. If you want to clone something, cut something, or fix something on a specific layer, right-click on that layer in the Layers Palette and choose "Rasterize Layer." Before resizing and importing photos, it's often best practice to finish editing them individually first, then continue with the collage-making process. As you add each new layer to the layout, it’s helpful to include it in the overall composition. To make it easier to see the photos you're placing, you can hide the ones you haven't placed yet by clicking the eye icon next to their layer in the Layers Palette.
After you've added all the photos you intend to use in your collage, it's time to arrange them! Move the images around until you feel that the current arrangement best conveys your story. To change the position of the photos, you can select the Move tool, then click and drag the photos to their desired locations. After creating several collages, you'll naturally develop your preferred style. Many professionals prefer to create symmetry in the layout or make it look like an interlocking puzzle. However, as the saying goes, each story has different needs, so don’t be afraid to experiment with different arrangements.
How To Make An Abstract Collage
Refining the Composition: Spacing and Borders
Once your layout is ready and the photos are adjusted to the right size, you can enhance the visual separation and definition by creating spacing between them. This can be achieved by adding a thin line, often white, between the images. This step is optional, and the width and height of these dividing lines depend entirely on your personal preference.
To implement this, you can select each photo and drag it with the mouse or use the arrow keys until a white space appears between it and the adjacent images. Another method involves double-clicking each image layer in the Layers Panel. This will open the Layer Style menu, where you can choose a blending option, such as "Stroke." In the window that opens, you can adjust the size, position, opacity, and color of the stroke, effectively creating a border. If you like how a particular border looks, you can copy and paste this layer style to additional photos for consistency. To do this, right-click on the layer with your border and select "Copy Layer Style," then right-click on the target layer and select "Paste Layer Style."
The Final Touches: Backgrounds, Adjustments, and Saving
With your collage laid out and the photos spaced as desired, you're ready to merge all the layers. The easiest way to do this is to press Ctrl+Shift+E, which merges all visible layers into a single layer. However, this is a destructive step, so it's often advisable to save a version of your collage with all layers intact before merging, especially if you anticipate making further edits.
The next step is to adjust the background layer color. Click on the layer with the background and try changing its color or adding a gradient. The background should complement and enhance your photos, not overpower them. If you're not happy with a plain background, you can also replace it with a photographic texture or a pattern, much like the darling blue pattern mentioned in the House of Smiths example.
Finally, it's time to save your new collage. Go to the menu, select "File," and then choose "Save As" or "Save a Copy." In the new window, select the desired location, enter a file name, and choose the file format, typically JPEG for web use or TIFF for high-quality printing. Select the desired image quality. Congratulations! Your Photoshop photo collage is ready.
Beyond the Basics: Customization and Creative Effects
The journey doesn't end with the basic collage assembly. Photoshop offers a wealth of tools for further customization and creative enhancement, allowing you to add unique elements and artistic flair to your creations.
- Background Variations: You can change the background of your collage from plain white to any color, a gradient, or even another photograph to set a specific mood.
- Typography and Shapes: Adding text with interesting scripts or incorporating different shapes can significantly enhance your idea and add another layer of meaning to your collage.
- Frames and Borders: Experiment with different types of frames or borders beyond simple lines. This could include ornate frames or textured borders that complement the overall theme.
- Artistic Effects: Give your photos a vintage look, add a neon light effect, or simulate a snowstorm. Combining different effects can lead to startling and unique results.
- Gradients and Splashes: Playing with gradients can add depth and dimension. You can also add bright color splashes or shimmering effects to your photos to make them pop.
- Matte and Color Adjustments: Applying a matte finish can give your photos a new appeal. You can also accentuate bright colors and enhance contrast to make your images more vibrant.
- Unique Textures: Some effects can add blobs or bubbles to the surface of your images, making them appear unique and visually interesting. Adding a glow effect can imbue the overall picture with a magical quality.
- Caricatures and Artistic Emulation: If you want to add a cute caricature or emulate the look of oil paintings, Photoshop can realistically achieve these effects quickly and beautifully.
You can try each of these effects individually or combine them as you see fit, as long as you are happy with the final result.
Exploring Alternatives: Adobe Express and Luminar Neo
While Photoshop is a powerful tool, it's worth noting that other applications offer streamlined approaches to collage creation, catering to different needs and skill levels.
Adobe Express features tons of ways to make a photo collage. You can start with a premade photo collage template that you can customize with your own images. The Layout tool allows you to switch up the layout orientation of your collage. You can select any specific image to pull up editing options and apply Photoshop-worthy filters, edits, or enhancements in seconds. If you plan to share your collage digitally, animation can be a great way to make it stand out, with dozens of different animation styles available to add movement to photos or text. Adobe Express offers a free plan that includes many core features, such as thousands of templates, photo editing and effects, animation, and 2GB of storage. Any project can also be turned into a shareable template.
For a more automated and AI-driven experience, Luminar Neo is a strong contender. This software is based on artificial intelligence and is regularly updated to become more convenient and efficient. A key feature of Luminar Neo is its ability to work with layers and masks directly within the raw converter interface, enabling users to achieve desired results without relying on other programs or plugins. Thanks to its principles of non-destructive processing, all edits can be corrected at any time. To create a collage in Luminar Neo, you would select a base image for the background, decide on additional photos to complement it (following the rule of colors and shapes), and then use the Overlay option to combine them. Luminar Neo also offers tools for tasks like clearing skies, adding highlights, and improving facial or body features, making it a powerful tool for quick and efficient photo processing for personal archives or social networks.
For those seeking a quick and easy mobile solution, Luminar Collage is a free mobile app for creating beautiful collages rapidly. It allows users to utilize templates, add filters, and create eye-catching layouts in just a few taps, making it ideal for social media and on-the-go creativity.
Final Thoughts on Collage Creation
Ultimately, creating a collage is a manifestation of your imagination and the capabilities of your chosen program. All the tools you need are at your fingertips, and it's up to you to decide how the final result of your work will look. A collage can be very simple or incredibly detailed. The first attempt might take a considerable amount of time, but with practice and experience, you'll find yourself creating them much more quickly. Remember that software programs are constantly being updated, offering new features and possibilities. So go ahead, experiment, and let your creativity flow.