Adobe InDesign stands as a cornerstone in the realm of professional design, empowering creators to craft visually compelling layouts for a myriad of print materials, including books, posters, flyers, brochures, and newsletters. A critical element that profoundly influences the aesthetic and communicative power of any design is the judicious selection and seamless integration of typography. This guide delves into the intricacies of how to effectively import and utilize fonts within Adobe InDesign, ensuring that your typographic choices elevate your projects from functional to truly impactful.
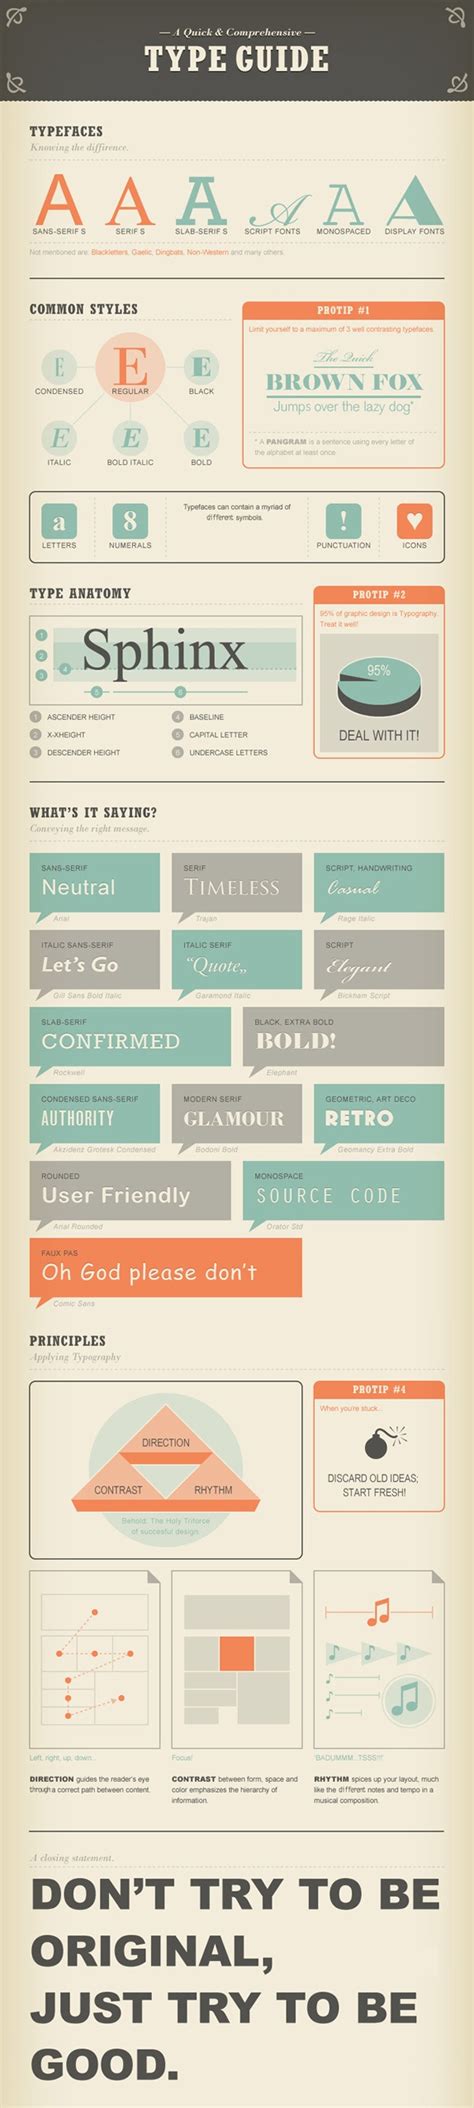
Understanding Typography and Font Fundamentals
Before we embark on the practical steps of font installation, a brief understanding of typographic terminology is beneficial. A typeface refers to the overall design of a collection of characters, while a font is a specific instance of that typeface, defined by its size, weight, and style. For example, "Garamond" is a typeface, while "Garamond Bold Italic 12pt" is a font. In the digital age, the terms are often used interchangeably, especially with the advent of vector or outline fonts, which allow for dynamic generation of various sizes from a single design. Adobe InDesign supports a wide array of font types, including OpenType, OpenType SVG, TrueType, Variable Fonts, Adobe Fonts, Type 1, Multiple Master, and Composite fonts.
Installing Fonts on Your Operating System
The most common and straightforward method to make fonts available in Adobe InDesign involves installing them directly onto your operating system. This ensures that the font becomes accessible not only to InDesign but also to other applications on your computer, such as Microsoft Word or Adobe Illustrator.
For Windows Users:
- Locate the Font File: Once you have downloaded your desired font (often in a compressed ZIP format that needs to be extracted), locate the font file(s).
- Right-Click and Install: The easiest method is to right-click on the font file and select "Install." This action will register the font with your Windows system.
- Manual Installation (Alternative): Alternatively, you can manually copy and paste the font file into the
C:\Windows\Fontsfolder. You should then be able to find the font in your system's Start menu.
For macOS Users:
- Locate the Font File: Similar to Windows, find the extracted font file.
- Open with Font Book: Double-click the font file. On macOS, this action will typically open the font in Font Book, the default font management tool.
- Install Font: Within Font Book, you will see an option to "Install Font." Clicking this will add the font to your system.
- Manual Installation (Alternative): You can also manually copy the font file into the
~/Library/Fontsfolder in Finder to install it system-wide.
It is a strong recommendation to close and reopen Adobe InDesign after installing new fonts. This ensures that InDesign refreshes its font cache and recognizes the newly added typefaces.
How to Install a New Font on Mac - Updated Tutorial 2022/23
Accessing Installed Fonts in Adobe InDesign
Once a font is installed on your operating system, accessing it within Adobe InDesign is a simple process.
- Open the Character Panel: Navigate to
Type > Characterin the menu bar. Alternatively, you can use the keyboard shortcutCtrl+T(Windows) orCmd+T(macOS). - Select the Font: In the Character panel, you will see a drop-down menu for font selection. Click the arrow pointing downwards next to the current font name.
- Choose Your Font: A list of all installed fonts will appear. You can scroll through this list to find the font you installed.
If you are using InDesign version 2019 or later, you might also find that some fonts are available directly through Adobe Fonts (formerly Typekit) without needing to download and install them separately on your system.
Leveraging Adobe Fonts for Seamless Integration
Adobe Fonts offers a vast library of high-quality fonts that are tightly integrated with Adobe Creative Cloud applications, including InDesign. This service streamlines the font acquisition and usage process significantly.
Activating Fonts from Adobe Fonts:
- Within InDesign (2019 and later): You can often browse and activate fonts directly from within InDesign without leaving the application. Look for options related to Adobe Fonts or a font browsing interface.
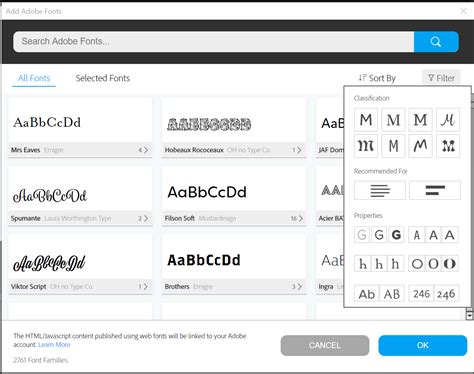
- Using the Creative Cloud Desktop App:
- Open the Creative Cloud desktop application.
- Navigate to the "Fonts" tab.
- Browse the extensive library of available fonts. You can use tags and filters to refine your search by classification (Serif, Sans Serif, Handwritten), visual similarity, or other criteria.
- When you find a font you like, click on its family page.
- To activate a font, click the toggle switch or the "Activate" icon next to its name. A cloud icon with a checkmark indicates an activated font.
- Web Project Editor: For more advanced management, you can use the web project editor on fonts.adobe.com to create curated collections of fonts for specific projects.
Once activated through Adobe Fonts, these fonts will automatically appear in the font menus of all your Adobe desktop applications, including InDesign, Photoshop, and Illustrator, as well as in Microsoft Office and iWork suites.
Important Note on Adobe Fonts: Fonts that have not been used for several months may expire from your system and require reinstallation via the Creative Cloud desktop app. You can manage your activated fonts, view their history, and add previously removed fonts from the "Removed" tab within the Creative Cloud desktop app.
Troubleshooting Common Font Issues in InDesign
Despite proper installation, fonts may occasionally not appear as expected in Adobe InDesign. Several factors can contribute to this, and understanding them can help resolve the issue.
Font Not Appearing in the List:
- Incorrect Installation Location: While system-wide installation is common, Adobe also has its own font directory. Fonts placed in
Program Files/Common Files/Adobe/Fonts(Windows) or~/Library/Application Support/Adobe/Fonts(macOS) are typically available only to Adobe products. Ensure your font is installed in the standard operating system font folders for broader availability. - Font Naming Conventions: Some fonts may have their foundry name prefixed to the font name. This can disrupt alphabetical sorting in the font menu. In such cases, try searching for the font by typing its name directly into the font selection field in the Character panel.
- Font File Corruption: If a font file is corrupt, it might not be recognized by the system or applications. Try re-downloading the font from a reputable source.
- Restarting InDesign: As mentioned earlier, always restart InDesign after installing new fonts to ensure it recognizes them.
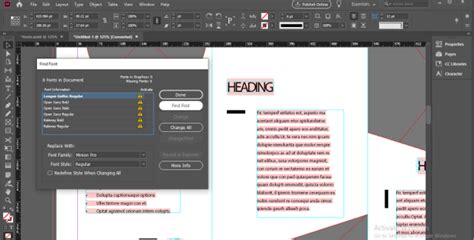
Missing Fonts in Documents:
When opening an InDesign document that uses fonts not currently installed on your system, InDesign typically displays a "Missing Fonts" dialog.
- Adobe Fonts Auto-Activation: InDesign has a feature to automatically activate missing fonts from Adobe Fonts if they are available in your Adobe Fonts library. This feature is enabled by default in recent versions. If all missing fonts are available via Adobe Fonts, they will be activated in the background without showing the dialog. If only some are available, the dialog will still appear, but the available ones will be activated. You can check the activation progress in the "Background Tasks" panel.
- Manual Activation: If auto-activation is disabled or unsuccessful, the Missing Fonts dialog will present you with options to either substitute the missing fonts with available ones or to manually locate and install the missing fonts.
- Document Fonts Folder: When a document is shared or moved to another computer, it can sometimes include a "Document Fonts" subfolder. Fonts placed in this folder are temporarily installed only when that specific InDesign document is opened. This is a convenient way to ensure a document's typography remains intact across different machines, but these fonts are not available for use in other documents. The "Package" command in InDesign can help create such a folder for distribution.
Understanding Font Types and Features
Adobe InDesign supports a wide range of font formats, each with its own characteristics.
- OpenType Fonts: These are highly versatile and can contain a much larger character set and more advanced typographic features than older formats. OpenType fonts from Adobe often include "Pro" in their name for Central European language support, while "Standard" fonts have an "Std" suffix. OpenType features include:
- Ligatures: Combining characters like "f" and "i" into a single glyph (e.g.,
fi). - Ordinals: Formatting numbers like "1st" as "1Ë¢áµ".
- Fractions: Automatically formatting fractions like "1/4" into a more readable form.
- Small Caps: Converting lowercase letters to a smaller, capitalized form.
- Proportional Figures: Numbers that have varying widths, allowing for better text flow.
- Tabular Figures: Numbers that all have the same width, useful for aligning numerical data.
- Ligatures: Combining characters like "f" and "i" into a single glyph (e.g.,
- OpenType SVG Fonts: These fonts support multiple colors and gradients within a single glyph. This is particularly useful for emoji fonts, allowing for colorful characters like smileys, flags, and food items to be included directly in your designs. You can select specific glyphs using the Glyphs panel (
Type > Glyphs). - Variable Fonts: A newer OpenType format that allows for a single font file to contain a wide range of variations, such as weight, width, slant, and optical size. This offers immense flexibility in fine-tuning typography.
When working with fonts, remember that many come in various styles (e.g., Light, Regular, Bold, Italic). Ensure you have downloaded the specific style you intend to use.
Best Practices for Font Management
Effective font management is crucial for maintaining a streamlined workflow and avoiding design inconsistencies.
- Organize Your Fonts: Use a consistent naming convention and folder structure for your downloaded fonts.
- Font Licensing: Always be mindful of font licensing agreements. Many free fonts are for personal use only, and commercial use may require purchasing a license. Reputable sources like Adobe Fonts, Google Fonts, DaFont, and Font Squirrel provide clear licensing information.
- Avoid Font Clutter: Only install fonts that you actively use. Too many installed fonts can slow down your system and make font selection more cumbersome.
- Use Favorites and Recently Used: InDesign's font menus often allow you to mark fonts as favorites or will display recently used fonts at the top of the list, expediting selection.
- Consider Font Families: When choosing fonts, consider how different weights and styles within a font family work together. Well-designed font families are created to be used in conjunction.
By following these guidelines and understanding the various methods of font integration, you can effectively harness the power of typography to enhance your Adobe InDesign projects, ensuring your designs are both aesthetically pleasing and highly communicative.