Ever wonder how professional photographers give their images a polished look? The secret often lies in how they use Lightroom presets. Presets provide a powerful and efficient way to save a group of settings and apply them to other photos, instantly transforming your images with a professional sheen. Ready to add that professional touch to your own photography? You're in the right place. This guide will walk you through the various methods of importing and managing presets in Adobe Lightroom Classic, ensuring you can easily elevate the quality of the images you capture.
Understanding Lightroom Presets: What They Are and Why You Need Them
At its core, a Lightroom preset is a saved collection of image editing adjustments. Think of it as a snapshot of your editing preferences for a specific look. When you create a preset, you're essentially packaging a series of sliders and settings from Lightroom's Develop module - exposure, contrast, color balance, tone curves, HSL adjustments, and more - into a single, reusable file.
The primary benefit of using presets is the dramatic time savings they offer. Instead of meticulously adjusting each setting for every photo, you can apply a preset with a single click. This is particularly invaluable for photographers working with large volumes of images, such as wedding photographers or event shooters, who need to maintain a consistent aesthetic across their work. Furthermore, presets can serve as excellent learning tools. By examining the settings within a preset, you can reverse-engineer and understand how specific looks are achieved, deepening your own editing knowledge.
Presets come in various file formats, with .lrtemplate files being common for earlier versions of Lightroom and .xmp files being the standard for Lightroom CC and beyond, including current versions of Lightroom Classic. While .xmp files are more versatile and can be used across different Adobe applications, .lrtemplate files are still relevant for users with older Lightroom versions.
Getting Started: Acquiring and Preparing Your Presets
The first step in learning how to install Lightroom presets is to get your hands on them. Presets can be purchased from numerous online sources, downloaded as freebies, or even created by yourself. Many photographers and photography websites offer curated collections of presets designed for specific styles, such as moody landscapes, vibrant portraits, or vintage film looks.

Once you've acquired your presets, they will often be in a compressed .zip file. Before you can import them into Lightroom, you'll need to decompress these files. On a Mac, you can typically do this by simply double-clicking the .zip file. On Windows, right-click on the .zip file and select "Extract All." This process will create a folder containing the individual preset files, which will usually be in .xmp or .lrtemplate format. It is crucial to ensure that you have unzipped these files before proceeding with the import process.
For mobile users, the process of importing Lightroom mobile presets may differ slightly. Presets often come with both DNG files (for mobile use on the free app) and XMP files (for both desktop and mobile use). If you are working with your phone and have downloaded a .zip file, you will need to download an app that can unzip files from either the Apple App Store (for iPhones) or the Google Play Store (for Androids) to extract the contents directly on your device.
Importing Presets into Lightroom Classic: Step-by-Step
The process of adding presets to Lightroom Classic is straightforward, though the exact steps can vary slightly depending on your Lightroom version and how the presets are packaged.
Method 1: Using the Import Presets Feature (Recommended for XMP Files)
This is the most common and recommended method for importing .xmp presets, which are standard for current versions of Lightroom Classic.
- Open Adobe Lightroom Classic on your desktop.
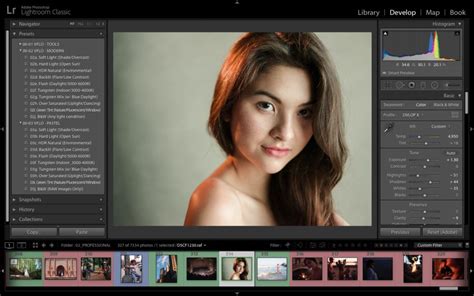
- Navigate to the Develop Module. You can usually find this by clicking on "Develop" in the top menu bar or by pressing "D" on your keyboard.
- Locate the Presets Panel. This panel is typically found on the left-hand side of the Develop Module window.
- Initiate the Import Process. In the Presets panel, click on the plus (+) sign icon located at the upper-right corner of the panel. From the displayed drop-down options, choose "Import Presets."
- Select Your Preset Files. An import dialog box will appear. Navigate to the folder where you unzipped your preset files. You can select individual
.xmpfiles or, if your presets are organized within folders, you can select the entire folder containing the presets. If you have a.zipfile containing presets that Lightroom can directly read (though unzipping is generally preferred), you can select that as well. - Click "Import." Lightroom will then process and add the selected presets to your Presets panel. The folder name will usually appear as the name of the preset collection.
Method 2: Manually Copying Presets (Primarily for LRTEMPLATE Files)
This method is often used for older .lrtemplate presets and involves manually placing the preset files into Lightroom's designated presets folder.
- Locate Your Lightroom Presets Folder. The exact location varies by operating system:
- Windows:
C:\Users\[Your Username]\AppData\Roaming\Adobe\Lightroom\Develop Presets - macOS:
/Users/[Your Username]/Library/Application Support/Adobe/Lightroom/Develop Presets - Note: The
AppDatafolder on Windows and theLibraryfolder on macOS are often hidden by default. You may need to enable "Show hidden files" in your operating system's folder options to see them.
- Windows:
- Copy Your Preset Files. Copy the folder(s) containing your
.lrtemplatepreset files. - Paste into the Develop Presets Folder. Paste the copied preset folder(s) directly into the
Develop Presetsfolder (or a subfolder within it) that you located in step 1. - Restart Lightroom. For Lightroom to recognize the newly added presets, you will need to close and then reopen the application.
Method 3: Using the Preferences Menu (Alternative for Manual Placement)
This method provides a way to access the correct preset folder directly from within Lightroom's preferences.
- Open Lightroom Classic.
- Access Preferences.
- Windows: Go to
Edit > Preferences. - macOS: Go to
Lightroom Classic > Preferences.
- Windows: Go to
- Navigate to the Presets Tab. In the Preferences box that pops up, make sure you are on the "Presets" tab.
- Show Lightroom Develop Presets. Click on the "Show Lightroom Develop Presets" button. This action will open the correct folder on your computer where Lightroom stores its develop presets.
- Copy and Paste Presets. Drag and drop or copy and paste your unzipped preset folders into this opened folder.
- Restart Lightroom. Close and reopen Lightroom Classic for the changes to take effect.
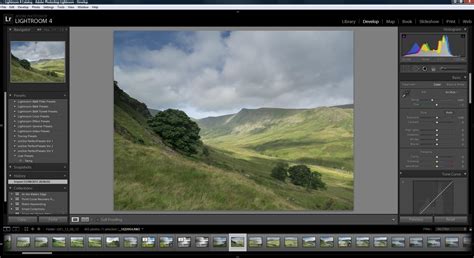
Importing presets into Lightroom Classic
Organizing Your Presets for Efficient Workflow
Once you've imported your presets, it's a good practice to organize them for easier access. Lightroom allows you to create custom groups or albums for your presets.
- Create New Preset Groups/Albums. Within the Presets panel in the Develop Module, click the "+" icon again. This time, select "Create New Preset Group."
- Name Your Group. Give your new group a descriptive name, such as the name of the preset pack (e.g., "Mastin Labs - Film Emulation," "Peter McKinnon - Moody Tones").
- Add Presets to the Group. You can drag and drop individual presets from other locations into your newly created group, or if you imported them as a folder, they might already be organized.
- Rename Preset Groups. If you need to rename a preset collection or group, right-click on the name of the group in the Presets panel and choose "Rename."
This organization is crucial for quickly finding the right preset for your image. Instead of scrolling through a long, undifferentiated list, you can jump directly to the collection that suits your needs.
Advanced Preset Management: Cleaning Up and Customizing
As you accumulate more presets, your Presets panel can become cluttered. Lightroom offers tools to help you manage and refine your collection.
Cleaning Up Default Presets
Lightroom comes with a set of built-in presets. Many of these may not align with your personal editing style, and they can add unnecessary noise to your workflow.
- Access Manage Presets. In the Presets panel, click the 3 dots (•••) at the top right.
- Select "MANAGE PRESETS."
- Uncheck Unwanted Presets. A dialog box will appear listing all your enabled preset groups. You can uncheck any or all of the default presets (and any other presets you don't frequently use) that you won’t want to use in any of your editing.
- Click "Done." The unchecked presets will be hidden from your Presets panel, making it cleaner and more focused on the presets you actually use.
Creating Your Own Presets
The ability to create your own presets is a powerful aspect of Lightroom. This allows you to save unique editing styles you develop.
- Edit a Photo to Your Liking. Make all the desired adjustments in the Develop Module until you achieve the perfect look.
- Create New Preset. In the Presets panel, click the "+" icon and select "Create Preset."
- Name Your Preset. Give it a clear and descriptive name.
- Choose a Preset Group. Select an existing group or create a new one to store your custom preset.
- Select Settings to Include. You'll have the option to include all settings or specific ones. For example, you might want to uncheck "Tools," "Details," "Optics," and "Geometry" if you only want to save color and tone adjustments. You might also uncheck "Exposure" under the "Light" tab or "White Balance" under the "Color" tab, depending on how flexible you want the preset to be.
- Click "Create." Your custom preset will now appear in your Presets panel.
Troubleshooting Common Preset Import Issues
While importing presets is generally straightforward, you might occasionally encounter issues. Here are some common problems and their solutions:
My Presets Are Not Showing After I Imported Them
- Restart Lightroom: This is the most common fix. Ensure you've closed and reopened Lightroom after the import.
- Check the Correct Catalog: If you work with multiple Lightroom catalogs, ensure you are working with the catalog where you imported the presets. Presets are generally catalog-specific when the "Store presets with this catalog" option is enabled.
- "Store Presets with this Catalog" Setting: If you have the "Store presets with this catalog" option checked in
Edit > Preferences > Presets(Windows) orLightroom Classic > Preferences > Presets(macOS), presets are stored locally with that catalog. If you move the catalog or work on a different computer without copying the presets folder, they might disappear. If you want presets to be globally available across all catalogs, ensure this option is unchecked. If you want them tied to a specific catalog for backup and portability, ensure it's checked and that you copy the associated presets folder when moving the catalog. - Partially Compatible Presets: Some presets might not show up or apply correctly if not all of their settings are compatible with the selected photo or the current Lightroom version. For instance, some older presets might rely on calibration profiles that have changed.
My Presets Are Not Working with JPEG Files
- JPEG Profile Association: Ensure that the preset has a JPEG profile associated with it. Some presets are designed specifically for RAW files and may not have been optimized for JPEGs. When creating your own presets, consider whether they will be used on RAW or JPEG files and adjust accordingly.
Presets Not Syncing Between Lightroom Desktop and Mobile
- Cloud Storage: If you are having issues getting your presets to sync from Lightroom CC Desktop to your Lightroom Mobile, your issue is probably a lack of cloud storage. Ensure you have sufficient cloud storage space with your Adobe Creative Cloud subscription.
- Lightroom CC vs. Lightroom Classic: Be aware that Lightroom CC (the cloud-centric version) and Lightroom Classic (the desktop-focused version) handle syncing differently. Presets sync automatically with Lightroom CC. For Lightroom Classic, syncing to mobile often involves specific workflows or ensuring your desktop version is set up for cloud sync.
Cannot Import XMP Presets in Older Versions
- Version Compatibility: You cannot import XMP presets in Lightroom Classic 8.2 or earlier versions. If you have an older version, you will need to update to a newer version that supports the XMP format or find presets in the older
.lrtemplateformat.
Lightroom Mobile Preset Import
Importing presets into Lightroom Mobile, especially the free version, has its own distinct process, often involving DNG files.
For Android Devices:
- Download the
.ZIPfile starting with "mobile-presets_android…" after your purchase. - Unzip the file. You will need a file manager app that can unzip files (e.g., Files by Google, Solid Explorer). Navigate to the downloaded
.ZIPfile and extract its contents to a known location on your phone. - Open the Lightroom Mobile app.
- Navigate to Presets. From your library, tap the "+" icon and choose to create a new "Folder." Name it "Presets."
- Create a New Album. Inside the "Presets" folder, tap "Create New Album" and name it after the downloaded preset pack, followed by "DNG" (e.g., "Moody Tones DNG").
- Add Photos (DNG Files). Open this new album and tap the "Add" icon. Navigate to the folder where you extracted the
.ZIPfile and select all the DNG files within the preset pack. - Convert to Presets. Once the DNG files are imported as photos, open the first DNG file in the album. Tap the three dots at the top right and select "Create Preset."
- Name and Group. Name the preset the same name it already has (e.g., "Moody Tones - 01"). In the "Preset Group" dropdown, select "Create New Preset Group" and name it the same as the album you created (e.g., "Moody Tones DNG").
- Repeat for Each DNG. Repeat this process for each DNG file in the album to create individual presets within your new preset group.
For iOS (iPhone) Devices:
- Download the
.ZIPfile starting with "mobile-presets_iphone…" after your purchase. - Open the "Files" app. After the download is complete, press the download icon in the upper right corner of your screen to open the "Files" app.
- Extract the ZIP file. Press on the downloaded
.ZIPfile. The content will be extracted, and a new folder should automatically appear in your "On My iPhone" or iCloud Drive location. - Open the Lightroom Mobile app.
- Create a New Folder and Album. Click the "+" icon in your library and choose to create a new "Folder." Name this folder "Presets." Then, open this folder and press "Create New Album." Name the album after the downloaded presets, plus "DNG" (e.g., "Dark & Dramatic DNG").
- Add DNG Files. Open the newly created album and press the "Add" icon. Navigate to the folder where you extracted the
.ZIPfile and select all DNG files in the folder. - Convert to Presets. Open the first DNG file in the album. Tap the 3 dots at the top right and select "Create Preset."
- Name and Group. Name your preset after the preset pack (e.g., "Dark & Dramatic - 01"). In "Preset Group," select "Create New Preset Group" and name it after the name of the preset pack (e.g., "Dark & Dramatic DNG").
- Repeat for Each DNG. Repeat this process for each DNG file in the album to create individual presets within your new preset group.
Enhancing Your Workflow with Presets
Once you have your presets imported and organized, you're set to elevate the quality of the images you capture. With presets, you can apply professional-grade edits to your images in a fraction of the time. Eager to put your new skills into action?
Consider exploring curated collections from reputable sources like Mastin Labs, which offers a rich collection of true-to-analog film presets and many others, designed to transform your editing workflow and breathe new life into your images. They provide a fast and easy way to add presets to your collection, removing manual processes and giving you more control over organization.

By mastering the art of importing and utilizing Lightroom presets, you unlock a world of creative possibilities, allowing you to achieve consistent, professional results with remarkable efficiency.