This tutorial presents an accessible method for altering the color of a car within Adobe Photoshop, utilizing straightforward masking techniques and color adjustments. The process requires no additional software and opens up a world of stylish color possibilities for your vehicle.
The Crucial First Step: Precise Masking
The initial and most demanding phase of this process involves meticulously creating a mask that precisely delineates all the painted areas of the car. It's important to acknowledge that there isn't a universally "super-easy" method for masking or selecting these specific areas; it often requires patience and attention to detail. However, to aid in this critical step, a dedicated tutorial on advanced masking techniques is available.
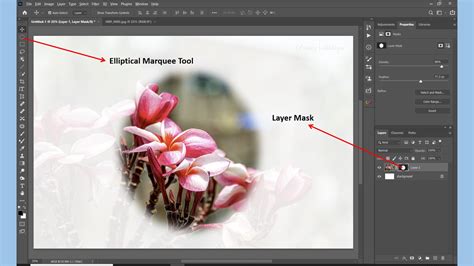
The objective is to begin with a clear selection of all the colored regions on the car that you intend to modify. Once this selection is established, the next action is to create a new "Solid Color" Adjustment Layer. Within this layer, you will then select your desired new color for the car. This stage also serves as an opportune moment to meticulously review your selection, identifying and correcting any areas that may have been inadvertently missed during the initial masking process.
Exploring Layer Modes for Color Transformation
With the mask in place and the desired base color selected, we can now explore several distinct options for achieving the final color transformation. The most effective approach often depends on the original color of the car and the target color you aim to achieve. We will experiment with three to four different Layer Modes to determine which yields the most aesthetically pleasing and realistic results for your specific color change.
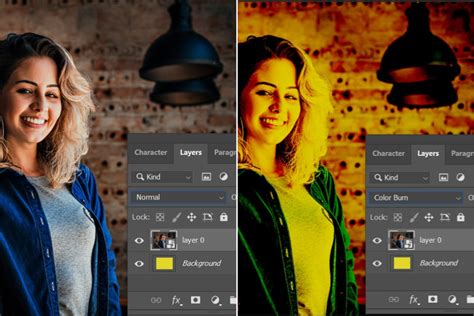
The "Color Burn" Experiment
Our first foray into Layer Modes involves "Color Burn." Applying this mode can produce noticeable shifts in color, often deepening and intensifying the hues.
Mode: Color Burn
The results from "Color Burn" might be considered "not bad," offering a significant alteration to the original color. However, it's essential to evaluate if this mode aligns with the precise shade and intensity you envision for the car.
The "Overlay" Approach
Next, we investigate the "Overlay" mode. This mode typically blends the color layer with the underlying image in a way that can enhance contrast and saturation, often creating a vibrant effect.
Mode: Overlay
The "Overlay" mode can produce "kind of cool" results, potentially adding a desirable vibrancy. However, it might not always deliver the exact color you were initially looking for, depending on the interplay between the original and target colors.
The "Vivid Light" Intensity
Our third option is "Vivid Light." This mode is known for its strong contrast and saturation adjustments, which can lead to very dramatic color shifts.
Mode: Vivid Light
The "Vivid Light" mode can appear "a little intense," potentially overwhelming the original details or creating an unnatural look. While it offers a powerful transformation, it might not be the subtle or realistic color change desired.
The "Color" Mode for Subtle Shifts
Finally, we examine the "Color" mode. This mode is particularly effective for changing the hue and saturation of an image while largely preserving the luminosity (brightness and contrast) of the original.
Mode: Color
The "Color" mode can result in a "pretty" appearance, offering a more nuanced change. However, it's possible that even this mode might not perfectly match the desired outcome.
Selecting the Optimal Layer Mode
Based on the experimentation, it appears that for this particular project, the "Color Burn" mode often provides a straightforward and effective way to achieve a noticeable color change. While other modes offer different aesthetic qualities, "Color Burn" frequently strikes a balance between significant alteration and acceptable realism.
Achieving a White Car: A Painter's Perspective
Consider the scenario where the goal is to make the car appear white. Adopting a "painter's approach" can be highly effective here. Begin by changing the color selected on your Adjustment Layer to Black. Subsequently, set the layer's blending mode to "Color." This combination effectively desaturates the image, mimicking the preparatory step of applying primer before painting.
Mode: Color
In this specific instance, the car might end up looking "pretty white." However, the results can vary, and your car might not achieve the desired level of whiteness with a single application.
To achieve a purer white, you can duplicate the Adjustment Layer (using the shortcut Ctrl+J on Windows or Cmd+J on macOS). Set the color of this duplicated layer to White and change its blending mode to "Soft Light." The "Soft Light" mode offers a gentler way to increase brightness and contrast, which can further enhance the whiteness and refine the overall look.
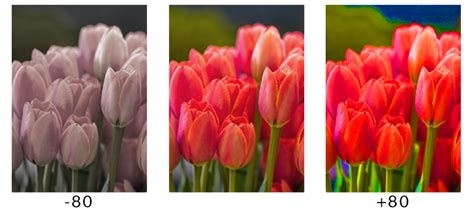
Saturation Mask? A Great Way to Enhance Colors!
By following these steps and experimenting with the various layer modes, you should be well-equipped to confidently change your car's color in Photoshop. This tutorial aims to empower you with the knowledge to achieve stylish and personalized automotive aesthetics digitally.
We are always keen to receive feedback through comments below. We are committed to presenting more interesting and innovative tutorials soon, so please continue to visit our blog for future updates and insights into digital art and photo manipulation.