Adobe InDesign offers a powerful suite of tools for precise control over text layout and appearance. Among the most fundamental and impactful of these are text indents, paragraph spacing, and the sophisticated options for paragraph rules and borders. Understanding how to effectively manipulate these features is crucial for creating professional, visually appealing, and easily readable documents. This article delves into the intricacies of text indentation, exploring various methods and their applications, from simple paragraph spacing to advanced paragraph rules and borders, ensuring your text flows seamlessly and adheres to your design intentions.
Understanding Indentation: The Foundation of Text Flow
Indentation is the amount of space between text and the boundary of a type object, such as a text frame. This fundamental concept allows designers to create visual hierarchy, improve readability, and guide the reader's eye through the content. Indentation affects only the selected paragraph or paragraphs, meaning you can apply unique spacing and alignment to individual blocks of text within a larger story. In InDesign, you can set indents using several intuitive methods: the Tabs panel, the Control panel, or the Paragraph panel. Each offers a different approach, catering to various workflow preferences and complexity levels.
Setting Indents with the Tabs Panel
The Tabs panel is a versatile tool for controlling text alignment and spacing. Within this panel, you can manipulate indent markers to precisely define how your text is positioned.
- First Line Indent: To indent only the first line of text in a paragraph, select and drag the top marker on the tab ruler. This is a common convention in many forms of print and digital media, signifying the start of a new paragraph. Alternatively, you can select the top marker and type a specific value for X in the corresponding box, allowing for exact numerical control over the indent.
- Left Indent: To indent all lines of a paragraph except the first, select and drag the bottom marker. This is often referred to as a hanging indent, where the first line "hangs" to the left of the subsequent indented lines.
- Paragraph Indent: To indent the entire paragraph uniformly, you can Ctrl-drag (Windows) or Command-drag (macOS) the bottom marker. This moves both the top and bottom markers simultaneously, ensuring that the entire paragraph is pushed inward from the left margin by the same amount.
The Tabs panel also allows you to position text at specific horizontal locations within a frame using tab stops. You can set left, center, right, and decimal or special-character tabs. Pressing the Tab key on your keyboard inserts a tab character, which then positions the text according to the tab stops you've set. This is particularly useful for aligning text at specific points or creating structured lists.
Indentation in the Control and Paragraph Panels
For quicker adjustments, the Control panel and the Paragraph panel provide direct access to indent settings. These panels often display the same indent markers as the Tabs panel, allowing you to adjust them visually or numerically. The "Left Indent" box in these panels controls the overall indentation of the paragraph from the left edge of the text frame. The "First Line Left Indent" box specifically targets the indentation of the first line, offering fine-grained control.
When working with Japanese typography, InDesign offers specialized tools like "Mojikumi Settings." These settings allow for more nuanced control over character spacing and indents, particularly for the first line of a paragraph, offering an alternative to the standard Paragraph panel indent options.
Hanging Indents: A Deeper Dive
A hanging indent is a formatting style where all lines of a paragraph, except the first, are indented. This is commonly used for bibliographies, glossaries, and other reference materials where the first line often contains a keyword or identifier that needs to stand out. You can create a hanging indent using the Tabs panel by manually positioning the indent markers as described earlier, or by setting a negative value for the "First Line Left Indent" in the Paragraph or Control panel. This negative value effectively pulls the first line of text to the left, creating the characteristic hanging appearance.
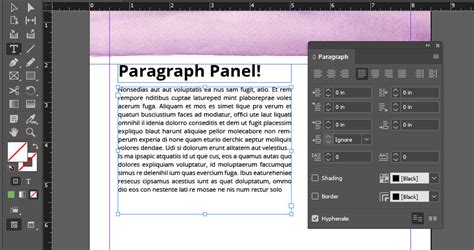
Controlling Paragraph Spacing: The Space Between
Beyond indentation, controlling the space between paragraphs is vital for visual separation and readability. InDesign allows for precise control over this spacing through two primary values: "Space Before" and "Space After."
- Space Before: This value adds vertical space above the selected paragraph.
- Space After: This value adds vertical space below the selected paragraph.
These settings are accessible within the Paragraph panel under the "Indentation and Spacing" section. By adjusting these values, you can create consistent and professional-looking gaps between paragraphs, ensuring that blocks of text are clearly delineated without being overly crowded or excessively spaced.
Space Between Paragraphs Having Same Style
A particularly useful feature is the "Space Between Paragraphs Having Same Style" option. This setting is only applied when two consecutive paragraphs share the identical paragraph style. This allows for different spacing between paragraphs that are styled differently (e.g., body text followed by a quote) compared to the spacing between consecutive paragraphs of the same body text. This nuanced control prevents paragraphs with the same style from becoming too close or too far apart, maintaining a consistent rhythm throughout your document.
Advanced Formatting: Paragraph Rules and Borders
For even more sophisticated text formatting, InDesign provides "Paragraph Rules" and "Paragraph Borders." These features allow you to add lines or decorative borders above or below paragraphs, enhancing their visual prominence or creating distinct design elements.
Paragraph Rules: Adding Lines with Precision
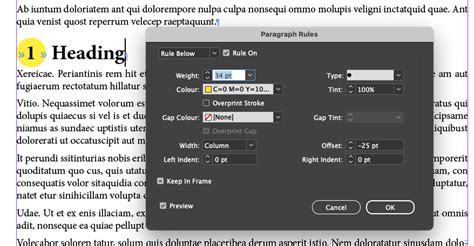
Paragraph Rules enable you to create a line above or below a paragraph. This is often used to visually separate headings from body text, to emphasize a particular point, or to create a decorative effect.
- Accessing Paragraph Rules: You can access these options through the Paragraph panel menu by choosing "Paragraph Rules."
- Rule Above and Rule Below: You can independently apply a rule above a paragraph ("Rule Above") or below a paragraph ("Rule Below"). The last character in the Paragraph Rules dialog box for "Rule Above" and "Rule Below" indicates which rule is being set.
- Defining the Rule:
- Color: Choose a color for the rule from the Swatches panel. The color's appearance is based on the specified color and its tint.
- Tint: You can specify a tint value for the chosen color, allowing for lighter or darker shades.
- Width: Determine the width of the rule. This is not a fixed pixel value but rather the width of the rule, which is determined by the column width of the text frame. The rule extends from the left edge of the column to the right edge of the column.
- Thickness: Set the thickness of the rule.
- Offset: This value determines the distance between the text and the rule. You can specify the distance from the top line of text to the bottom of the rule (for Rule Above) or from the bottom line of text to the top of the rule (for Rule Below).
- Projecting Cap: This option creates squared ends for the rule that extend half the stroke width beyond the endpoints, adding a stylistic flair.
- Color and Tint: You can also choose a specific color and tint value for the rule, ensuring it harmonizes with your document's color scheme.
Paragraph Borders: Encasing Text
Paragraph borders enable you to create a decorative border around one or more paragraphs. This can be used to highlight important text blocks, create visually distinct call-out boxes, or add a unique design element.
- Specifying Border Properties: Similar to paragraph rules, you can define various properties for the border:
- Width: Specify the overall width of the border.
- Offset: Define the distance between the text and the border. You can set unique offsets for the top, bottom, left, and right sides of the border. The "Chain button" ensures that all offset values remain consistent if you adjust one.
- Color and Tint: As with paragraph rules, you can select a color and tint for the border.
- Corner Options: Choose a size and shape for the corners of the border, allowing for rounded or custom corner styles.
Paragraph Shading: Filling the Background
Paragraph shading allows you to fill the background of a paragraph with a color. InDesign ensures that the shade expands and collapses automatically as you increase or reduce the content within the paragraph, maintaining consistent spacing. Similar to paragraph borders, you can specify the width of the shading and select corner options for rounded effects. The "Chain button" is also available here to maintain uniform offsets. The shade extends over the text within the text frame, providing a distinct visual background for the selected text.
Keeping Text Together: Preventing Unwanted Breaks
One of the challenges in typesetting is ensuring that text remains cohesive and doesn't break apart in ways that disrupt readability. InDesign provides several "Keep Options" to manage how paragraphs and lines are arranged. These options are found in the Paragraph panel menu.
Preventing Orphan and Widow Lines
Orphans and widows are single lines of text that become separated from the rest of their paragraph. An orphan is the last line of a paragraph appearing at the top of a column or page, while a widow is the first line of a paragraph appearing at the bottom of a column or page. These can be visually jarring and disrupt the flow of the text.
- Keep Lines Together: Within the "Keep Options," you can set parameters to prevent these issues. The "Keep Lines Together" option allows you to specify that a certain number of lines of the current paragraph stay with the preceding or following lines.
- Keep with Next: This setting ensures that the current paragraph stays with the paragraph that follows it. This is crucial for maintaining the integrity of elements like headings and their associated body text, preventing them from becoming separated.
- All Lines in Paragraph: Selecting "All Lines in Paragraph" prevents the paragraph from breaking entirely, forcing it to stay together on a single column or page, which can be useful for short, critical blocks of text.
- Push to Next: This option allows you to push the paragraph to the next column, frame, or page if it cannot fit within the current layout according to your other Keep Options.
Maintaining Frame Integrity: Keep In Frame
The "Keep In Frame" option, found in the Text Frame Options dialog box, ensures that the entire text frame remains visible on the page. This prevents text frames from being partially cut off during the printing process, which can occur with printing misregistration.
Composer Options: Automatic vs. Manual Text Composition
InDesign offers two primary text composition engines: the Adobe Paragraph Composer and the Adobe Single-line Composer.
- Adobe Paragraph Composer: In general, it's recommended to use the Adobe Paragraph Composer. This engine analyzes an entire paragraph (or even multiple paragraphs) to determine the most aesthetically pleasing arrangement of words and spacing. It considers factors like hyphenation and justification to create a balanced and fluid text flow.
- Adobe Single-line Composer: If a paragraph isnât composed to your satisfaction with the Paragraph Composer, you can switch to the Adobe Single-line Composer. This engine focuses on composing only the currently selected line of text. While it offers more granular control for individual lines, it can sometimes lead to less cohesive overall paragraph flow. You can access this option from the Paragraph panel menu or the Control panel menu.
Text Frame and Column Considerations
The structure of your text frame and the column layout significantly influence how indents and spacing are applied.
- Text Frame Width: The width of the text frame dictates the boundaries within which your text resides. Indents are measured relative to these boundaries.
- Column Width: When working with multiple columns, InDesign's features often adapt to the current column width. For example, the width of a paragraph rule is determined by the column width, extending from the left edge to the right edge of the column.
Aligning Text Frames to Columns
You can ensure that your text frames conform to the width of the current column. This is particularly useful when creating multi-column layouts. By setting the text frame to match the column width, you create a consistent visual rhythm across your page.
Understanding Units and Increments
When setting indents, spacing, or other typographical values, it's important to be aware of the units you are using. The "Units & Increments preferences" dialog box allows you to define your default measurement units (e.g., points, inches, millimeters). This ensures consistency throughout your document.
Special Cases: Japanese Typography and Mojikumi
As mentioned earlier, when working with Japanese type, InDesign provides specialized settings like "Mojikumi Settings." These settings allow for precise control over character spacing and indents, which are critical for the aesthetic and legibility of Japanese text. Mojikumi settings can be used to set the indent for the first line of a paragraph, offering a more advanced alternative to the standard Paragraph panel indent options.
Design a Magazine Spread in Adobe InDesign | Science Journal Layout Tutorial
By mastering these various tools and conceptsâindentation, paragraph spacing, paragraph rules, borders, and keep optionsâyou can achieve a high level of control over your text layout in Adobe InDesign. This allows for the creation of documents that are not only visually appealing but also highly readable and professional.