Adobe Photoshop, a powerhouse primarily recognized for its prowess in illustration and photograph editing, also offers robust tools for text manipulation. Whether you're a graphic designer, a digital artist, or simply looking to add captions or titles to your images, understanding how to effectively insert and style text is a fundamental skill. This guide will walk you through the process, from the initial insertion of text to applying sophisticated effects that can elevate your designs.
The Foundation: Inserting Text
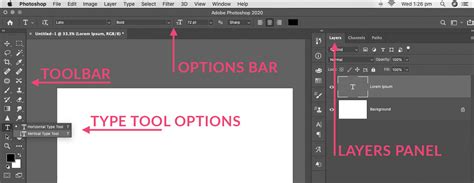
At its core, adding text in Photoshop involves utilizing the Type tool. When you select the Horizontal Type Tool (often represented by a 'T' icon), a variety of options will become accessible at the top of your Photoshop interface. These controls allow you to dictate the fundamental appearance of your text, including its color, font family, size, and alignment.
There are two primary methods for inserting text:
- Point Text: This is the most straightforward approach. Simply click anywhere on your image canvas where you want your text to begin. A cursor will appear, indicating the insertion point for your first letter. As you type, the text will extend horizontally from that point. Each line of point text you enter is independent; the length of a line grows or shrinks as you edit it, but it doesn’t wrap to the next line. To create a new line of text, you would press the Enter key.
- Paragraph Text: If you need your text to fit within a specific area or to format it as a block of copy, you can create a text box. To do this, click and drag out an area on your image before you begin typing. This action defines a bounding box, and any text you enter will automatically wrap within these boundaries. This method is particularly useful for captions, descriptions, or any instance where you require controlled text flow.
Once you have finished typing, you need to commit your changes. There are several ways to do this:
- Click outside the text box.
- Press the Ctrl (or Cmd on Mac) and Enter keys on your keyboard simultaneously.
- Click the Commit button (often a checkmark icon) in the options bar.
- Select a different tool in the toolbox.
If the text tool seems to be stuck in edit mode and keeps trying to start new text when you click out, simply click on another tool to exit the text editor and proceed with your work. It's also worth noting that keyboard shortcuts generally do not function while you are actively using the Type tool.
New Text Layers
A crucial aspect of working with text in Photoshop is that any new text you type is automatically entered into a new text layer. This is a fundamental concept in Photoshop's non-destructive editing workflow. Each text layer is independent, meaning you can modify, move, or delete your text without affecting the underlying image content. This also allows for easy application of various styles and effects. If, for some reason, the text tool doesn't seem to be creating a new layer, try creating a new layer manually before typing, or check the tool's settings.
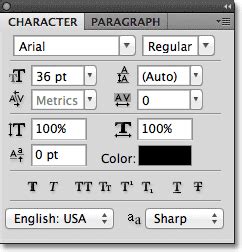
Advanced Text Controls: Character and Paragraph Panels
For complete control over your text's appearance beyond basic font and size, Photoshop offers dedicated Character and Paragraph panels. These panels resemble the text editing boxes found in programs like Microsoft Word and provide a comprehensive suite of options.
The Character panel, often identified by an 'A' followed by a vertical line, allows for fine-tuning of:
- Font Family: Applies a font family to new or existing text.
- Font Style: Applies a bold style or an italic style to new or existing text.
- Font Size: Adjusts the size of your text.
- Leading: Controls the vertical spacing between lines of text.
- Kerning: Sets the space between specific pairs of characters, crucial for optical adjustments.
- Tracking: Sets the overall space between all characters of new or selected text, affecting letter spacing.
- Horizontal and Vertical Scaling: Stretches or compresses text horizontally or vertically.
- Baseline Shift: Moves text up or down relative to its normal baseline.
- Color: Changes the color of the text.
- Anti-aliasing: Smooths the edges of text to prevent jagged appearances. Options include None, Sharp, Crisp, Strong, and Smooth.
The Paragraph panel focuses on the layout and alignment of text within a text box:
- Alignment: Specifies text alignment, letting you align text left, center, or right.
- Indentation: Controls the indentation of the first line or the entire paragraph.
- Spacing: Adjusts the spacing before or after paragraphs.
- Hyphenation: Controls how words are hyphenated at the end of lines.
- Text Wrap: Manages how text wraps around objects.
You can access these panels by going to Window > Character and Window > Paragraph. Clicking and dragging the icons or inputting values in these menus allows you to test and see their effects in real-time as you modify your text.
Enhancing Text with Layer Styles
One of Photoshop's most powerful features for text is the ability to apply Layer Styles. These effects can transform plain text into visually striking elements with depth, dimension, and unique appearances. To access these, right-click on your text layer in the Layers panel and select Blending Options, or navigate to Layer > Layer Style > Blending Options.
Within the Blending Options, you'll find a plethora of effects:
- Drop Shadow: This is a highly versatile effect that places a moveable shadow behind your text, creating a sense of depth and separation from the background. You can customize the color, opacity, angle, distance, spread, and size of the shadow.
- Inner Shadow: Similar to a drop shadow, but the shadow is cast inside the edges of the text, giving it a recessed or embossed look.
- Outer Glow: Adds a glow effect emanating from the outside edges of the text. You can control the color, blend mode, opacity, and size of the glow.
- Inner Glow: Creates a glow effect within the edges of the text.
- Bevel and Emboss: This classic effect makes the text appear 3D, as if it's raised from or pressed into the surface. You can control the style, depth, direction, size, and shading of the bevel.
- Satin: Applies a color overlay with a satin-like texture, creating subtle highlights and shadows that give the text a smooth, lustrous finish.
- Color Overlay: Simply applies a solid color over the text.
- Gradient Overlay: This allows you to fill your text with a gradient. You can choose from Photoshop's presets or create your own custom gradients, controlling the angle, scale, and blend mode.
- Pattern Overlay: Fills the text with a chosen pattern, offering a wide range of texture and visual interest.
- Stroke: Adds an outline around the text. You can specify the size, color, position (inside, outside, or center of the text edge), and blend mode of the stroke.
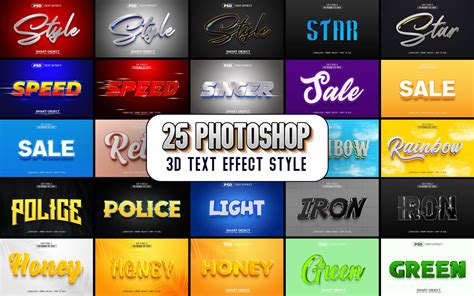
By combining and customizing these layer styles, you can achieve professional-looking type effects, from subtle enhancements to dramatic 3D treatments.
Special Type Tools and Techniques
Beyond the standard Horizontal Type Tool, Photoshop offers specialized tools for more creative text applications:
- Horizontal Type Mask Tool: This unique tool doesn't create editable text in the traditional sense. Instead, it turns your typed characters into a selection mask. This mask can then be used to reveal the underlying image content through the shape of your text, or to create cutouts with the text. It’s a powerful way to integrate text with your image in a non-destructive manner.
- Text on a Path: You can add text along the outline of a path. First, create a path using tools like the Pen Tool or by converting a selection into a path. Then, select the Type Tool, hover over the path until the cursor icon changes to depict text mode, and start typing. The text will flow along the path.
- Text on a Shape: Similar to text on a path, you can add text within the boundaries of a shape. This can be a shape created with Photoshop's shape tools or a custom path. The text will conform to the shape's outline.
How to type on a path in Photoshop | Text Curve | Adobe Tutorial
Adding New Fonts to Photoshop
The availability of fonts can significantly impact your design choices. Fortunately, adding new fonts to Photoshop is an incredibly easy process. You can find and download free or premium fonts online from numerous websites. Once you've downloaded a font file (typically in .ttf, .otf, or .woff format), you simply need to install it on your operating system. In most cases, double-clicking the font file will open your system's font viewer, where you can click "Install." After installation, Photoshop (and other applications) should recognize the new font. For some workflows, you might need to restart Photoshop for the new font to appear in the font list.
Removing Text from Images
Sometimes, you might need to remove unwanted text from a photograph. Photoshop offers several effective methods for this:
- Spot Healing Brush Tool: This tool is ideal for removing small blemishes or text. Select the Spot Healing Brush Tool (it looks like a band-aid in the toolbar), adjust the brush size as needed to cover the text, and then simply paint over the text you want to remove. Photoshop will automatically analyze the surrounding pixels and blend them to cover the text seamlessly.
- Content-Aware Fill: For more complex removals, especially larger blocks of text, the Content-Aware Fill feature is a powerful option. Make a selection around the text you want to remove, then go to Edit > Content-Aware Fill. Photoshop analyzes the surrounding image content and intelligently attempts to fill the selected area, making the text disappear. Newer AI-powered tools in Photoshop can further refine this process.
- Clone Stamp Tool: A more manual but highly effective method is the Clone Stamp Tool. This tool allows you to sample pixels from one area of an image and paint them onto another. By carefully sampling from areas adjacent to the text, you can meticulously cover it up.
Exploring Generative AI in Text and Image Creation
Recent advancements in Adobe Photoshop, particularly in versions like Photoshop Elements 2026 and later, have introduced powerful generative AI features that can revolutionize creative workflows.
- Text-to-Image Generation: With the new generative AI feature, users can input a text prompt and receive a fully rendered image in seconds. This is perfect for creating mood boards, mockups, or simply adding imagination to design workflows. You can generate elements like a hot air balloon, a person, a tree, or anything else you can imagine, and seamlessly integrate them into your existing images.
- Insert Object Feature: The Insert Object feature, powered by generative AI, allows you to add visual elements into your scene with remarkable ease. The AI automatically matches the lighting and shadows of the inserted object to your existing image, ensuring a natural and cohesive result. This eliminates the need for complex photo-bashing techniques and significantly speeds up the compositing process.
These AI-driven tools represent a significant leap forward, enabling users to create and manipulate imagery with unprecedented speed and creative freedom, all starting from simple text descriptions.
The journey of working with text in Photoshop is rich and multifaceted. From the fundamental act of typing to the advanced application of layer styles and the cutting-edge capabilities of generative AI, Photoshop provides a comprehensive toolkit for all your text-based design needs. Mastering these tools will undoubtedly enhance the quality and impact of your digital creations.