Looping a clip in DaVinci Resolve can transform your editing process, making it more dynamic and engaging. Whether you're creating an eye-catching intro for a band's show, generating atmospheric fills, or crafting mesmerizing visual content, understanding how to loop video and audio effectively is a powerful technique. This guide delves into various methods for achieving seamless loops, from simple playback toggles to advanced animation techniques, ensuring your content flows endlessly.
Understanding the Fundamentals of Looping Playback
At its core, looping playback in DaVinci Resolve is about repeating a selected section of your timeline. This is distinct from creating a seamlessly looping video file, but it's a crucial first step for previewing and perfecting your loops.
To enable looped playback, you can simply click the loop icon, often depicted as a circular arrow, located below the preview window alongside the transport controls. When this button is active, playback will automatically restart from the beginning of your timeline once it reaches the end.
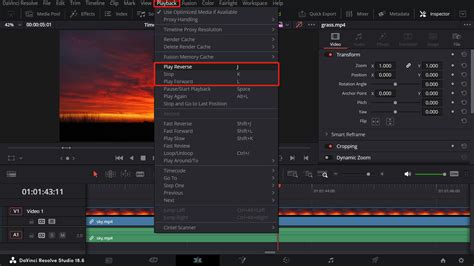
For more precise control, DaVinci Resolve allows you to define specific In and Out points on your timeline. These points act as boundaries for your loop. To set an In point, move your playhead to the desired start and press the 'I' key. To set an Out point, move the playhead to the desired end and press the 'O' key. Once these points are set, enabling the loop playback will cause the playhead to cycle continuously between them. This is incredibly useful for fine-tuning the timing of a specific section or for working with repetitive elements.
It's important to note that if you find yourself unexpectedly clicking outside the marked segment on your timeline, the loop may continue to play without restarting. The key is to be aware of whether you are interacting with the marked area or the wider timeline. You can remove these In and Out points by pressing Alt/Option + X.
Creating Seamless Video Loops: Techniques and Strategies
Achieving a truly seamless video loop, where the end of the clip perfectly transitions back to the beginning without any discernible cut, requires careful planning and execution. This is particularly important for content intended for platforms where extended viewing is encouraged, as mesmerizing loops can significantly boost average view duration and watch time.
Method 1: The Cut and Paste Approach
The most straightforward method, and one that can be surprisingly effective, involves duplicating and arranging clips. For instance, if you have a 3-minute video for a band's show, you can achieve this by copying and pasting the clip multiple times. As the user noted, once you have pasted a clip ten times, you've created a minute of content. Copying that minute and pasting it six more times would yield your desired six minutes. This approach is practical for longer durations where the exact start and end points might be less critical, especially if interspersed with other visual elements.
While simple, this method can become tedious for very long sequences. For shorter, more impactful loops, it's crucial to ensure the transitions are as smooth as possible.
Method 2: Matching Frames for a Perfect Blend
The key to a successful seamless loop in DaVinci Resolve is matching frames at the start and end of the video. This principle applies whether you are looping a single clip or a sequence.
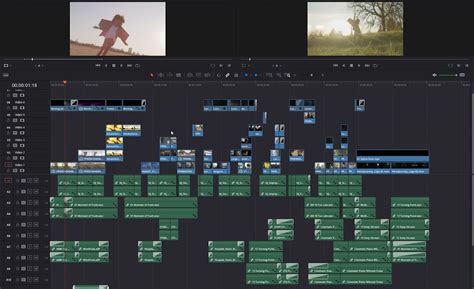
For Multiple Clips: This method works best with multiple clips that tell a story or have inherent movement. Most viewers expect transitions between clips, and the more clips you have with faster transitions, the harder it is for the viewer to recognize that they are in a loop. In a snowboarding example, the start and end could be the same clip at the top of the run, with the narrative of the clips taking the viewer down and then back up again.
For Single Seamless Clips: The "filming method" is achieved in-camera and is best for single seamless clips. The objective is to have a matching frame at both the beginning and the end of your shot. For instance, a blank table can serve as the matching frame. Any changes in exposure or focus on this blank table will ruin the effect; it needs to be a perfect match at the start and end. This often involves planning your shots with the loop in mind, capturing a static frame at both the beginning and end of the video.
For Static Videos with Moving Content: This method is ideal for static shots with some moving content, such as a flowing river. In these cases, the start and end frames won't match exactly. Any significant changes, like exposure shifts or moving vehicles, will be tough to hide and still create a seamless effect.
A common technique to achieve this match is to cut a portion from the start of your sequence and move it to the end. This effectively stitches the beginning to the end. Another strategy is to blend the beginning and end. This can involve cutting part of the first clip or the start of the sequence and positioning it at the end of the video track above. A manual fade transition can then be added to the top clip to blend seamlessly with the clip below.
How to Create a Seamless Loop in DaVinci Resolve (Pika Labs Animation Tips)
Method 3: Utilizing the Spline Editor in Fusion for Animations
For looping animations seamlessly in DaVinci Resolve, the Fusion page and its Spline Editor offer powerful tools.
- Add an Adjustment Clip: Place an Adjustment clip on your timeline.
- Go to the Fusion Page: With the Adjustment clip selected, navigate to the Fusion page.
- Add a Background Node: Add a Background node and set its color.
- Add a Transform Node: Connect a Transform node to the Background node.
- Keyframe Animation:
- Go to the first frame and add a keyframe for the 'Size' parameter, setting it to 0.5.
- Move forward by 5 frames and change the 'Size' to 0.8.
- Move forward another 5 frames and change the 'Size' back to 0.5.
- Open the Spline Editor: Ensure the 'Size' keyframes are ticked in the Spline editor.
- Loop the Keyframes: Select all the 'Size' keyframes and click the Looping button within the Spline editor. This will configure the animation to repeat infinitely.
This method allows for precise control over animated elements, ensuring they loop smoothly and continuously.
Method 4: Third-Party Plugins (BCC Looper)
For users seeking a more specialized and often simpler solution, third-party plugins like BCC Looper, part of the Continuum license, can be invaluable.
- Set Up Your Project: Import your video clip into DaVinci Resolve and place it on the timeline. Make any necessary edits on the Edit page before applying the effect.
- Apply BCC Looper: Open the Effects library, navigate to the Open FX section, and search for BCC Looper within the BCC Time category. Drag this filter onto your clip.
- Adjust Parameters in the Inspector: In the Inspector panel, under the Effects tab, you'll find the BCC Looper settings. You can choose from various presets or manually configure your loop.
- Start Frame: Use the Start Frame slider to define the beginning of your loop.
- Loop Length: Adjust the Loop Length slider to set the duration of the loop in frames.
- Offset: The Offset parameter allows for a variable loop effect, determining how many frames the loop will vary for subsequent cycles.
- Select Loop Modes: BCC Looper offers different loop modes:
- Normal: Plays the loop forward and then returns to the start.
- Reset after N Cycles: Similar to Normal, but resets the Increment value after a set number of cycles.
- Back & Forth: Creates a boomerang effect by playing the loop forward and backward.
- BF Repeat Ends: Includes the ending frame in each cycle of the Back & Forth mode.
- Fades and Dissolves: When using the Normal Loop Mode, you can utilize the Fade parameter group to create smooth dissolves and fades between loop cycles.
Using plugins like BCC Looper can significantly speed up the process of creating professional-looking video loops, especially for those who frequently work with this type of content.
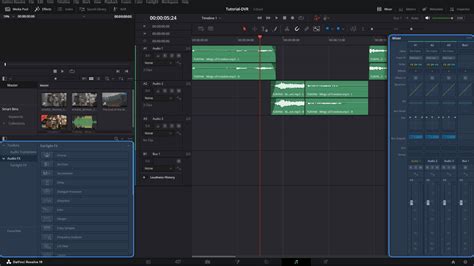
Seamless Looping for Audio
Creating seamless looping audio in DaVinci Resolve follows the same fundamental principles as video: the start and end must match or be expertly blended.
If you're incorporating music or sound effects, selecting audio files specifically designed for looping is ideal. For instance, ambient tracks made to loop seamlessly can be incredibly useful for background atmospheres.
Alternatively, silence can be a powerful tool. A brief pause, such as when taking a breath in dialogue or a sound effect, can serve as a natural point to seamlessly loop back to the beginning of a segment.
The user's experience with Fairlight's "fit to fill range" function, which involves copying a clip, marking an in/out, and selecting "fill," highlights a desire for such integrated tools within Resolve. The ability to reverse alternate clips for seamless room tone fills, as mentioned, is also a valuable technique that many editors hope to see more directly integrated into Resolve's editing workflows, not just within specialized audio post-production environments.
Advanced Considerations and User Experiences
The process of looping, while conceptually simple, can present practical challenges. As one user noted, remembering the exact steps for looping a portion of a video, musical track, or image sequence can be a recurring issue. The user's experience with DaVinci Resolve's manual indicating looping of entire clips, and the seemingly inoperative 'i' and 'o' shortcuts on the Edit page (while the menu selection works), points to potential discrepancies or user interface quirks that can be confusing.
The behavior of the loop icon itself, which lights up but may not immediately produce the expected playback loop, can also lead to frustration. This underscores the importance of understanding the precise conditions under which these features function. For example, if the playhead is clicked outside the marked loop area, the loop might not restart as anticipated.
The concept of "cut and paste" is a foundational element, but it's the subtle art of making these repetitions imperceptible that elevates the final product. This involves not just the visual and auditory elements but also the pacing and rhythm of the loop itself.
Thinking Beyond Basic Loops
While the primary focus is on creating continuous loops, DaVinci Resolve's flexibility allows for more complex looping behaviors. For instance, the ability to reverse alternate clips, as mentioned in the context of Fairlight, could be extended to video. Imagine a clip of a dancer performing a move; reversing every other playback could create a unique, almost hypnotic effect.
The integration of features that facilitate seamless transitions, like those found in dedicated audio tools, is a recurring theme. The desire to have these capabilities directly accessible on the Edit page, for both picture and sound, reflects a broader trend towards all-in-one editing solutions.
Ultimately, mastering looping in DaVinci Resolve is about combining technical understanding with creative intent. Whether you're employing simple duplication, precise frame matching, or advanced animation tools, the goal is to create a fluid, unbroken visual or auditory experience that captivates your audience.