Lightroom's evolution continues to empower photographers with increasingly sophisticated tools for image editing. Among the most significant recent advancements are Adaptive Presets, a revolutionary approach that moves beyond static adjustments to intelligently interact with the unique characteristics of each photograph. This article delves into the intricacies of these dynamic presets, with a particular focus on ISO Adaptive Presets and the broader category of Adaptive Profiles, explaining their functionality, benefits, and how to leverage them for more efficient and impactful editing workflows.
The Evolution of Presets: From Static to Dynamic
For years, presets in Lightroom have served as invaluable time-savers, allowing photographers to apply a consistent look or a series of edits to multiple images with a single click. However, traditional presets operate on a "one-size-fits-all" principle. They apply the exact same set of adjustments regardless of the image's content, lighting, or capture conditions. This often necessitates further manual tweaking to achieve optimal results, especially when dealing with variations in ISO, exposure, or color.
Adaptive Presets, on the other hand, represent a paradigm shift. They are designed to intelligently respond to the specific attributes of a photograph, offering a more nuanced and effective starting point for editing. This adaptability ensures more consistent and pleasing results without the need for constant manual intervention.
ISO Adaptive Presets: Tailoring Adjustments to Sensitivity
One of the most practical applications of adaptive technology is found in ISO Adaptive Presets. These presets are specifically designed to streamline the process of adjusting settings that are directly influenced by the camera's ISO value, such as Luminance Noise Reduction and Sharpening.
Why Use an ISO Adaptive Preset?
Consider the default adjustments applied to an image upon import. Typically, this involves an Adobe Color profile coupled with a generic set of sharpening and noise reduction values. For images captured at base ISO, these defaults might apply an unnecessary amount of color noise reduction and may not be aggressive enough in sharpening. Conversely, for high ISO shots, more noise reduction is often desired, especially for luminance noise, to combat digital grain.
While these shortcomings can be addressed manually on a per-image basis, this is a time-consuming endeavor. An ISO Adaptive Preset, when set as the default for a specific camera, can automatically analyze the ISO value embedded in the image's EXIF data and apply the appropriate level of sharpening and noise reduction. For instance, on a Nikon Z7, the default noise reduction might be too aggressive, inadvertently reducing fine detail. An ISO adaptive preset can be configured to apply less noise reduction at lower ISOs and progressively more as the ISO increases, ensuring optimal image quality across the entire dynamic range of ISO sensitivities.
The goal with an ISO adaptive preset is to have Lightroom automatically apply increasing amounts of noise reduction at higher ISOs, rather than relying on a uniform setting for every ISO value, which is the usual default behavior.
Creating Your Own ISO Adaptive Preset
The process of creating an ISO Adaptive Preset involves defining a set of reference images that represent different ISO points. Lightroom then uses these references to interpolate and apply appropriate settings for ISO values in between.
Selecting Your Reference Images
The success of an ISO Adaptive Preset hinges on the careful selection of reference images. Here are key characteristics to look for:
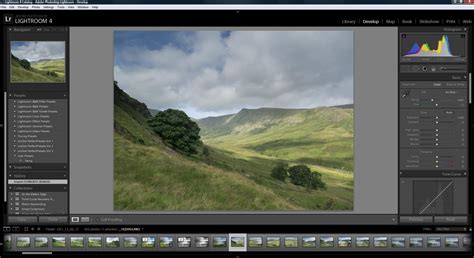
- Typical Shots: Choose images that represent your common shooting scenarios. If you primarily photograph landscapes, use landscape images, as content can influence sharpening needs.
- Clear Content: Select images where the subject and details are easily discernible without additional edits. They should be properly exposed with typical contrast.
- Single Camera Model: Different cameras exhibit varying performance at different ISOs. Ensure all your reference images are from the same camera model.
- Range of ISOs: Cover a spectrum of ISO values, from base ISO through higher settings you commonly use. Spacing these out (e.g., ISO 100, 400, 1600, 6400) provides a good representation of your sensor's behavior. While technical aspects of ISO exist, for this purpose, focusing on low, middle, and high ISOs is sufficient.
- Raw Files: Use uncompressed Raw files for the most accurate representation of image data.
- Absence of Artifacts: Ensure images are free from camera shake, motion blur, or other issues that can complicate the assessment of sharpening and noise reduction.
- Typical Lens: Shoot with the lens you most frequently use. If you work with multiple lenses, consider using files from the one that generally requires the least amount of sharpening by default, to avoid over-sharpening in your preset.
- Unedited or Resettable: The reference files should be unedited or easily resettable to a neutral state. If a file has existing edits, create a virtual copy and reset it to achieve a blank slate. This virtual copy can be deleted after the preset is created.
- Single Catalog: All selected images must reside within the same Lightroom catalog to facilitate simultaneous selection for preset creation.
Making the Adjustments
Once you have your reference images, it's time to make the necessary adjustments:
- Organize Images: Create a dedicated collection for your reference images and arrange them in order of ISO for clarity.
- Develop Module: Open the image with the lowest ISO in the Develop module.
- Focus on NR and Sharpening: Configure your desired settings, prioritizing Noise Reduction and Sharpening. Avoid altering White Balance or other global settings, as these will be incorporated into the preset. You can, however, change the default profile if you prefer a different base look.
- Utilize Alt/Option Key: When adjusting sliders like Masking, hold down the Alt or Option key to visualize the impact of the slider, revealing where sharpening is being applied.
- Personal Taste: The optimal values for sharpening and noise reduction are subjective and depend on your shooting style and subject matter.
- Sync Settings: As you move to higher ISO images, sync the settings from the previous file (using Sync Settings or Ctrl+Shift+S) and then adjust for the increased ISO. This process can be completed for multiple files in a short period.
- Achieve "Right" Look: The goal is for each reference file to exhibit an appropriate level of sharpening and noise reduction for its respective ISO.
Creating the ISO Adaptive Preset
With your reference images adjusted, you can now create the preset:
- Select All Files: In the Develop module, select all your adjusted reference images.
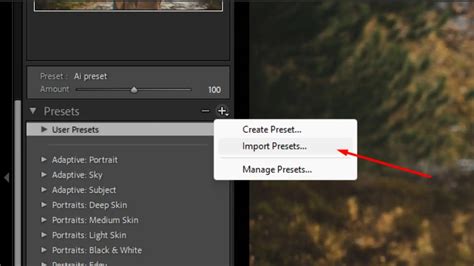
- Create Preset: Navigate to the Presets panel on the left-hand side, click the plus (+) icon, and select "Create Preset."
- Configure Settings: Ensure that "NR" (Noise Reduction) and "Sharpening" boxes are checked. Crucially, check the "Adaptive ISO" box at the bottom. It's recommended to uncheck all other boxes unless you intend to include settings like camera profiles or specific Basic panel edits within this preset.
- Name and Save: Give your preset a descriptive name (e.g., "Nikon Z7 ISO Adaptive") and save it. It will then appear under "User Presets" in the Presets panel.
Setting Your Preset as the Default
To maximize the utility of your ISO Adaptive Preset, you can configure Lightroom to use it as the default for files from that specific camera:
- Preferences: Open Lightroom's Preferences via the top menu bar.
- Presets Tab: Navigate to the "Presets" tab.
- Override Global Settings: Check the "Override Global Settings" option.
- Select Camera and Preset: In the panel that appears, choose your specific camera model and then select your newly created ISO Adaptive Preset.
- Update Default: Click "Update Default" to save the changes.
Now, when you import or work with files from that camera, Lightroom will automatically apply your custom ISO Adaptive Preset. To verify, reset an image from that camera; you'll observe that Lightroom applies your adaptive ISO preset as the default adjustment. This process can be repeated for any other cameras you own, with Lightroom even supporting defaults on a per-serial number basis for advanced scenarios.
How To Create Lightroom Classic Adaptive Presets
Adaptive Profiles: Intelligent Enhancements Beyond Color
Lightroom's Adaptive Profiles introduce another layer of intelligent editing, offering a dynamic starting point that goes beyond the capabilities of traditional profiles. Introduced in Adobe Camera Raw and now integrated into both Lightroom Classic and the cloud-based version, these profiles intelligently adjust to the specific image, providing a unique form of automatic enhancement.
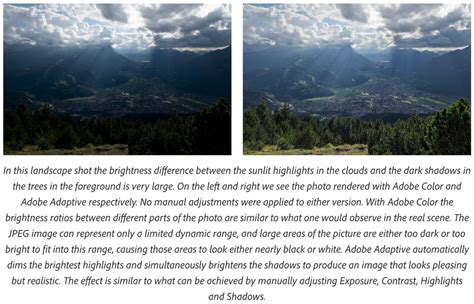
Adaptive Profiles act as a dynamic starting point, intelligently adjusting color, contrast, and tonal details in ways that traditional profiles simply cannot. They interact more directly with the highlights and shadows of an image, leading to a more balanced and nuanced result. For instance, they can enhance contrast, depth, and definition, particularly in challenging areas like clouds and foliage.
Unlike traditional profiles, which primarily focus on color rendition, Adaptive Profiles influence the overall tonal structure of an image. For users with HDR-capable monitors, the benefits of these profiles are even more pronounced, revealing greater detail and dynamic range.
How Adaptive Profiles Work
Adaptive Profiles function similarly to other Develop profiles. When you apply an Adaptive Profile, it doesn't alter the existing edit settings' values. Instead, it fundamentally changes the color response and emphasizes different colors, akin to switching from one film stock to another. For example, applying an "Adobe Adaptive" profile might brighten deep shadows and reduce clipped highlights. It can also adjust color saturation and shift hues, such as making greens appear more yellow or shifting greens towards blue.
Crucially, there is no direct correlation between what a profile does and specific edit settings like Highlights or Clarity. This is particularly true if a profile utilizes a Color Look-Up Table (LUT), which allows for arbitrary color substitutions and gradient map-like adjustments. This capability means a profile can achieve adjustments that are impossible to replicate using standard Develop settings alone.
Adaptive Profiles vs. Presets
It's important to distinguish Adaptive Profiles from presets. While presets apply a fixed set of adjustments, profiles alter the foundational color and tonal characteristics of an image. Switching to a different profile doesn't change the values of your existing edit settings. If you adjust the white balance first, an Adaptive Color profile might redefine the image's base color balance, but you won't see the Temp/Tint values change. The profile can alter the color balance in ways that extend beyond just temperature and tint.
One significant advantage of using an Adaptive Profile for basic color adjustments is that it preserves the full range of edit settings. With a preset, if a setting like Shadows is already at +70, your ability to further increase it is limited by the slider's maximum value. Adaptive Profiles, however, complement existing edits. You still retain full control, and if the profile moves the image in a desirable direction, it can save you time and potentially offer a more optimal range for further slider adjustments.
Addressing Concerns and Misconceptions
Some users have expressed concerns that Adaptive Profiles might "take away" control or devalue photography. However, as explained, Adaptive Color, like any other profile, is additive. You haven't lost any control; you are expected to refine the results further using edit settings and masks.
A common critique is that Adaptive Profiles can be "too much of a blanket setting," affecting more than just the desired elements, including color. However, as noted, Adaptive Color inherently behaves as a color profile. While some may wish to adjust individual components, the current method is consistent with how other profiles operate. Future iterations might allow for mask adjustments, potentially leading to a different naming convention. It's worth noting that some existing Lightroom and ACR features, such as the Shadows slider's inherent masking to prevent affecting brighter tones, already utilize hidden auto-generated masks.
The approach taken by Adobe with Adaptive Profiles is akin to providing automatic component masks. For instance, ISO adaptive presets can be seen as a form of auto-generated mask for ISO-specific adjustments. Similar to how you might adjust the "Amount" slider of a profile like Adobe Landscape if its effects are too strong or too weak, and then create your own mask to customize it further, Adaptive Profiles offer a similar workflow.
Leveraging AI Selection Tools with Adaptive Presets
The power of Adaptive Presets extends to utilizing Lightroom's advanced AI selection tools. Presets can be created that incorporate Sky, Subject, Background, and People AI selections. This allows for highly targeted adjustments that adapt to the specific content of an image. For example, a "Sunrise" adaptive preset might automatically create a mask for the sky, and then further refine it to "Sky 1" using AI to select the sky. Adjustments like warming the temperature slider can then be applied specifically to this masked area.
While the "Auto" feature in Lightroom attempts to improve any image using basic panel controls, creating a preset that applies this feature can be beneficial. By resetting an image, creating a new preset, and ensuring only the "Auto Settings" option is checked (while deselecting all other adjustment groups), you can create a preset that applies Lightroom's intelligent automatic adjustments.
Beyond Presets and Profiles: Other Lightroom Enhancements
The recent updates to Lightroom, as highlighted by resources like Matt Kloskowski's insights into the February 2025 update, bring a host of other improvements designed to enhance user experience and workflow efficiency.
Enhanced Backup Management
Lightroom now features an improved backup management system. Users can conveniently view, delete, and organize backups directly within the software, eliminating the need to navigate through complex folder structures.
Improved Tethering Support
Significant enhancements have been made to tethering capabilities for users of Sony, Nikon, and Canon cameras. This includes the ability to set focus points and adjust focus areas directly within Lightroom, streamlining the shooting process for studio and event photographers.
Performance Optimizations
Performance enhancements are a key focus, ensuring that Lightroom maintains speed and responsiveness, even when working with complex masks and numerous adjustments. Users who have experienced slowdowns when applying multiple masks will find that updating Lightroom addresses these issues.
Dual Monitor Mode and Compare View
The cloud-based version of Lightroom now includes the same Adaptive Profiles as Lightroom Classic. Additionally, a highly requested dual monitor mode is now available. The Compare View has also been upgraded to offer true side-by-side before-and-after comparisons, providing a clearer visual representation of edits.
Conclusion: Embracing Intelligent Editing
Lightroom's introduction of ISO Adaptive Presets and Adaptive Profiles marks a significant advancement in photo editing software. These tools move beyond static, one-size-fits-all solutions to offer intelligent, image-aware adjustments. By understanding and implementing these features, photographers can streamline their workflows, achieve more consistent and impactful results, and ultimately, unlock new levels of creative control. Whether it's automatically managing noise reduction across different ISOs or intelligently enhancing tonal and color characteristics with Adaptive Profiles, these innovations empower users to edit with greater efficiency and precision.