Creating a continuous, engaging audio experience is a cornerstone of effective video production. Whether you're crafting a dynamic movie trailer, a captivating social media clip, or an immersive explainer video, the ability to seamlessly loop background music is an invaluable skill. DaVinci Resolve, a professional-grade video editing and post-production software, offers robust tools within its Fairlight audio page to achieve this. This guide will walk you through the process, from basic music looping to more advanced techniques, ensuring your audio flows as smoothly as your visuals.
Understanding the Fundamentals of Audio Looping in Fairlight
At its core, looping audio in DaVinci Resolve's Fairlight page involves identifying a section of music that can be repeated without jarring transitions. This often means finding a point where the music naturally feels like it could continue or where edits can be made to create that illusion. A common scenario is adapting a song to fit a specific video edit length. For instance, if you have a piece of music that is 1:00 long and your edit requires 1:20, you'll need to skillfully extend the audio.
For this tutorial, we'll use the example of editing a 1:00 song to fit a 1:20 edit. A practical approach involves dissecting the music into usable segments. Imagine a song, "Great Day," which, if downloaded, might have distinct sections. A common observation is that the music might sound more upbeat when the drums kick in at a certain point, say, the 18-second mark. This introduction with softer drums could then serve as an effective breakdown or a point from which to start a loop.
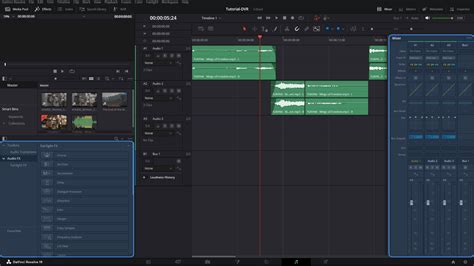
Before diving into editing, it's crucial to ensure your project is set up correctly. Import the music you intend to loop and load it onto a dedicated audio track. It's essential to verify that your audio track type is set to stereo, as most music is mixed in stereo. For better organization and control, it's generally recommended to edit each source element on its own track.
A key feature for precise audio editing is "Audio Scrubbing." Ensure this is turned on (shortcut: Shift + S). With Audio Scrubbing enabled, you can drag the Playhead along the Timeline with your mouse and hear the music as you move. This allows you to pinpoint specific moments, like the beat around the 18-second mark (which might be precisely at 18:16). Clicking and dragging with your mouse offers significantly more precision than using the keyboard's left and right arrow keys for navigation. For editors who spend extensive time on the timeline, having a comfortable mouse, or even using alternative input devices like trackballs or tablets, can greatly enhance efficiency and comfort.
Identifying and Isolating the Loopable Section
Once you've located a promising section of music, the next step is to make a cut. The keyboard command for cutting in DaVinci Resolve is Control + \ (on Windows) or Command + \ (on Mac). After making a cut, listen carefully to the music. Counting "one-two-three-four" can help you identify the beat and measure within the music, which is vital for creating a rhythmic loop. At this stage, you are actively creating edits and isolating usable loops. While this exercise focuses on creating one loop, the principles can be applied to generate as many as your project requires.
To facilitate the manipulation and duplication of your chosen music segment, it's beneficial to add another audio track. Right-click in the Track Panel and select "Add Track," then choose "Stereo." This new track will serve as a temporary space for moving duplicate elements.
Click to select the cut loop that begins at your identified point (e.g., the 18-second mark). Copy this clip by navigating to the menu bar, selecting "Edit," and then "Copy." Now, click on your new track (e.g., Audio 2) to highlight it. Go back to the menu bar, select "Edit," and then "Paste." This action places a duplicate of the music segment onto the new track, typically below your original score.
Drag this newly pasted music segment to the beginning of your timeline. To extend your loop to the required duration (e.g., 1:20), you will likely need to repeat this copy-and-paste process. Copy and paste the bar of music again, following the same steps, and then drag this new duplicate to the end of the previous one on the timeline.
Smoothing Transitions for a Seamless Experience
As you begin to stitch together your looped audio, you might notice imperfections. It's common to need to "push down" the audio in the original track to make space or to ensure the duplicated loops play correctly. To select multiple clips on Track 1, hold down the Control key (Windows) or Command key (Mac) and click on each piece of music.
When you listen to the song with the loops in place, you might encounter abrupt edits or short gaps. For example, an edit point at 10:05 might sound harsh, or there might be a small silence at 20:10. Addressing these is crucial for a professional finish.
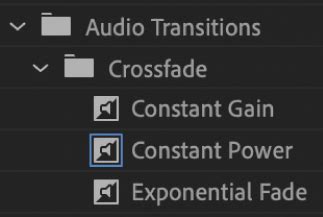
Starting at an edit point like 10:05, zoom in on the timeline. You can do this using the scale bar at the top or the shortcut Control/Command + (plus sign). Hover your mouse precisely between the two clips at the edit point. Right-click and select "Add 2 Frame Cross Fade." A crossfade is a fundamental audio transition that gradually blends the audio from two different clips. This process smooths out the differences between them, making the transition less noticeable and more natural.
Move to the problematic section at 20:10, where there might be a short gap. Hover your mouse over the right edge of the incoming audio clip. Click and drag to trim the music precisely to where the waveform starts up again. This effectively removes the silence and ensures the audio flows continuously.
Beyond Basic Looping: Advanced Techniques and Considerations
While the above steps cover the essential method for looping background music, DaVinci Resolve offers more sophisticated ways to achieve seamless audio, particularly when dealing with video loops. The principles for creating seamless video loops often mirror those for audio, emphasizing the importance of matching start and end points.
When creating short-form video content, the secret to a successful seamless loop lies in meticulous editing. One effective technique involves moving the first clip in the sequence to the end. Then, cut this clip in half and move the second half back to the beginning of your sequence. This method helps to match the beginning and ending frames, creating a more fluid loop.
Shooting with a video loop in mind from the outset is also highly beneficial. During filming, capture a static frame at both the beginning and the end of your video. This provides a consistent visual anchor that can be used to bridge the loop.
Another approach involves blending the beginning and end of the video. You can cut a portion from the first clip or the start of the sequence and position it at the end of the video track, often on a layer above. Adding a manual fade transition to this top clip allows it to blend seamlessly with the clip below. Playing back the sequence and making any necessary adjustments will refine the effect.
Adding a title or graphic animation can also enhance the perceived loop. Placing these elements at the beginning and end of the clip can effectively bookend the loop, starting and finishing with a visual flourish.
Seamless Water Loop in Davinci Resolve | In under 2 minutes
Leveraging Plugins for Enhanced Looping Capabilities
For users seeking more advanced and automated looping solutions, third-party plugins can be incredibly powerful. One such example is BCC Looper, a plugin available with a Continuum license. This tool allows for the creation of video loops with just a few clicks and offers extensive customization. You can adjust its duration, select the starting frame, offset the loops, and add fades and dissolves between clips to create truly eye-catching videos.
To utilize BCC Looper effectively, ensure you have the latest version of Continuum installed. If you're not already a Continuum user, a free trial is often available, allowing you to follow step-by-step guides.
The process typically begins by importing your video into DaVinci Resolve and placing it on the timeline. Make any preliminary edits on the Edit page before applying the BCC Looper effect. You can find BCC Looper within the Effects library, usually under the Open FX section and the BCC Time category. Dragging the BCC Looper filter onto your clip in the timeline reveals its settings in the Inspector panel. While presets can offer a quick way to create a loop, manually adjusting parameters provides greater control.
Key BCC Looper parameters include the "Start Frame" slider, which determines where the loop begins, and the "Loop Length" slider, which defines the duration of the loop in frames. The "Offset" parameter allows for variable loop effects by introducing variations in the start frame for subsequent cycles.
Furthermore, BCC Looper offers various "Loop Modes." The "Normal" mode plays the loop forward and then returns to the beginning. "Reset after N Cycles" functions similarly but resets the increment after a specified number of repetitions. The "Back & Forth" mode creates a boomerang effect by playing the loop forward and then backward. For scenarios where the ending frame needs to be included in each forward and backward cycle, "BF Repeat Ends" is the appropriate selection. Additionally, the "Fade" parameter group, when used with the "Normal" Loop Mode, allows for the creation of dissolves and fades, further enhancing the seamlessness of the loop.
The Art of Seamlessness: Matching Frames and Blending Edits
Ultimately, the key to any successful seamless loop, whether audio or video, lies in the meticulous matching of frames or the skillful blending of transitions. In DaVinci Resolve, this principle applies across all media types.
When creating audio loops, try to use music specifically designed for looping or find natural points of repetition. Silence, such as a pause during dialogue or a breath, can also be effectively used as a loopable element for sound effects or spoken word.
For looping animations within DaVinci Resolve, the Fusion page and its Spline editor offer powerful tools. By adding an Adjustment clip and navigating to the Fusion page, you can manipulate nodes like Background and Transform. Setting keyframes for parameters like "Size" at different frames and then utilizing the Spline editor's "Looping" button can create continuously repeating animation cycles. For example, animating a background element's size from 0.5 to 0.8 and back to 0.5 over a few frames, and then applying a loop to these keyframes, will create a seamless pulsating effect.
Looping playback in DaVinci Resolve itself is straightforward: enable the loop icon in the toolbar or use keyboard shortcuts to define In and Out points for playback. However, creating the actual video or audio content that seamlessly loops requires a deeper understanding of editing principles and careful planning.
Consider these methods for achieving seamlessness:
Multi-Clip Sequences: This method works best when your video tells a story or involves continuous movement. The more clips you use and the faster the transitions between them, the harder it is for the viewer to detect the loop. For example, a snowboarding video showing a rider going down a slope and then back up can create a natural loop if the start and end frames are identical.
In-Camera Filming: This technique is ideal for single, continuous clips. It requires careful setup during filming. For instance, a static shot of a blank table can serve as a matching frame at the start and end. Any changes in exposure or focus on this static element can ruin the effect, demanding precision.
Static Shots with Moving Content: This method is suitable for videos with a stable background and some dynamic elements, like a flowing river. While the start and end frames might not match perfectly, significant changes like moving vehicles or drastic lighting shifts need to be minimized to maintain the illusion of a seamless loop.
By mastering these techniques, you can create captivating video and audio content in DaVinci Resolve that flows continuously, keeping your audience engaged and enhancing the overall professional quality of your productions. This skill is not just about repetition; it's about crafting an immersive experience that feels unending.