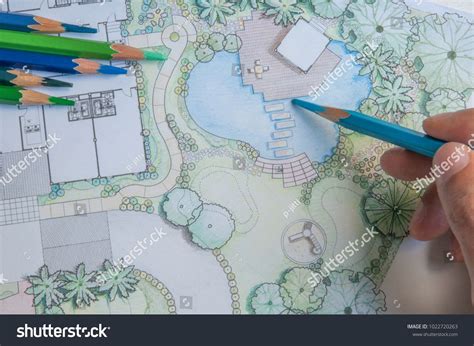
The art of landscape design, while deeply rooted in creativity and aesthetic sensibility, also demands precision and clarity in its presentation. For centuries, hand-drawn plans have been the cornerstone of communicating design intent, a practice that often imbues a project with a personal touch and a certain artistic flair. However, the very nature of manual drafting, whether with pen, colored pencils, or markers, introduces an inherent vulnerability. A single slip of the hand, a stray smudge, or an unintended mark can undo hours of meticulous work, leading to frustration and potentially significant delays. This inherent nervousness associated with manual drafting, while perhaps adding a unique character, can also become a barrier to achieving polished, error-free final presentations.
Recognizing these challenges, many designers and students have turned to digital tools to enhance their workflow. Among these, Adobe Photoshop stands out as a powerful and versatile software that can transform the way landscape plans are created and refined. The ability to easily correct mistakes, experiment with different elements, and achieve a professional finish without the fear of permanent errors has made Photoshop an invaluable asset. This tutorial delves into a comprehensive workflow for utilizing Photoshop to prepare and enhance landscape plans, building upon established techniques and offering a clear path from initial sketch to final presentation-ready graphic.
The Evolution of Landscape Plan Presentation
Historically, landscape plans were exclusively rendered by hand. Architects, designers, and draftsmen would meticulously draw lines, symbols, and annotations using drafting tools, pens, and various coloring mediums. This process, while time-consuming, allowed for a high degree of personalization and artistic expression. Each line could convey a sense of the designer's hand, and the subtle variations in color and shading could add depth and mood to the plan. The "nervousness" often associated with hand-drawing, where a marker slip or pen smudge could be disastrous, was a trade-off for this unique artistic quality. This manual approach demanded a high level of skill, patience, and a certain tolerance for imperfection. The fear of messing up was a constant companion, and the pressure to execute flawlessly was immense.
However, as technology advanced, digital tools began to offer compelling alternatives and complementary workflows. The advent of computer-aided design (CAD) software revolutionized the industry by enabling precise drafting, easy modifications, and efficient reproduction. Yet, for many, the artistic soul of hand-drawing remained important. This led to hybrid approaches, where hand-drawn elements were integrated with digital processing. Photoshop emerged as a crucial bridge in this evolution. It provided a digital canvas that could not only replicate the look of hand-drawn elements but also offer unparalleled editing capabilities. The ability to "erase mistakes" digitally removed the inherent anxieties of manual drafting, empowering designers to focus on creativity and refinement.
Embracing Photoshop for Landscape Plan Enhancement
The decision to learn and integrate Photoshop into a landscape design workflow can be a transformative one. It addresses the core anxieties of manual drafting by offering a safety net for errors and providing a robust suite of tools for enhancing visual quality. Many educators now introduce Photoshop as a fundamental step in preparing landscape plans for final presentations, especially for those who still wish to maintain a hand-drawn aesthetic. This digital intervention allows for the preservation of the hand-drawn charm while ensuring a polished, professional output.
The typical process often begins with a foundational black and white plan, which is then scanned into the digital realm. Once in Photoshop, the scanned image can be meticulously cleaned up, sharpened, and adjusted. This digital cleaning process is where Photoshop truly shines. It allows for the removal of unwanted smudges, the correction of skewed lines, and the enhancement of contrast and clarity. The edited plan then serves as a strong base for further development. This cleaned-up version can be exported and imported into other design software, such as Adobe Illustrator, for the addition of precise labeling, title blocks, and other graphic elements. This layered approach leverages the strengths of each software, resulting in a comprehensive and visually compelling final product.
A Step-by-Step Workflow: Cleaning Up Your Landscape Plan in Photoshop
The video tutorial accompanying this article provides a visual guide to the process of cleaning up a landscape plan within Photoshop. For those who prefer a written, step-by-step approach, the following outlines the essential stages:
1. Scanning Your Hand-Drawn Plan:Begin by scanning your hand-drawn landscape plan. The resolution of your scan is crucial for maintaining detail. Aim for a minimum of 300 DPI (dots per inch) to ensure that finer lines and details are captured accurately. Use a flatbed scanner if possible to avoid distortion. If scanning a large plan, consider scanning it in sections and stitching them together in Photoshop later. Ensure the scanner bed is clean to prevent dust specks from appearing on your scan.
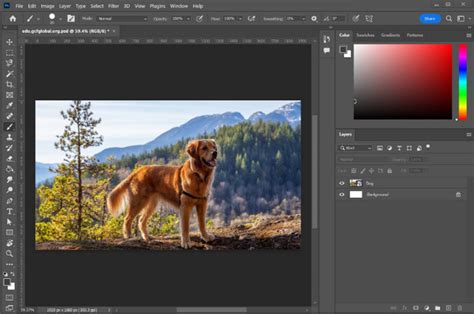
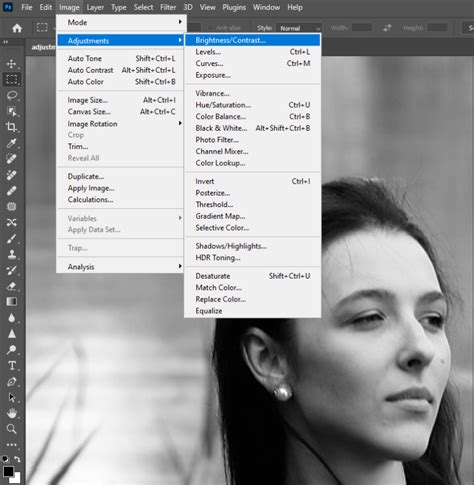
2. Importing and Initial Adjustments:Open the scanned image in Adobe Photoshop. The first step is often to convert the image to a more manageable color mode, such as Grayscale or RGB, depending on your intended final output. If your scan is a bit skewed, use the "Transform" tools (Edit > Transform > Rotate or Skew) to straighten it. Adjust the overall brightness and contrast to make the lines clearer and the background whiter. The "Levels" or "Curves" adjustment layers are excellent tools for this, allowing you to fine-tune the tonal range of your image.
3. Cleaning Up Imperfections:This is where Photoshop's power becomes evident.
- Removing Smudges and Stray Marks: Use the "Eraser Tool" with a soft or hard edge, depending on the nature of the mark you need to remove. For small, precise erasures, a smaller brush size is recommended.
- Correcting Uneven Lines: If some lines are too faint or too thick, you can use the "Brush Tool" to subtly reinforce faint lines or the "Eraser Tool" to gently reduce the thickness of overly bold ones. For significant line correction, consider tracing over them with the "Pen Tool" and then creating new, clean lines.
- Enhancing Line Definition: The "Sharpen" filter (Filter > Sharpen > Unsharp Mask) can be applied judiciously to make your lines crisper. Be careful not to over-sharpen, as this can introduce unwanted artifacts or a gritty texture.
- Whitening the Background: If the paper has yellowed or there are subtle background tones you wish to remove, use adjustment layers like "Curves" or "Levels" to push the white points further to pure white. You can also use the "Magic Wand Tool" or "Quick Selection Tool" to select the white background areas and then fill them with pure white.
4. Isolating Key Elements (Optional but Recommended):Depending on your final presentation needs, you might want to isolate specific elements of your plan, such as planting areas, hardscaping, or structures. You can use selection tools like the "Lasso Tool," "Polygonal Lasso Tool," or "Pen Tool" to create precise selections around these areas. Once selected, you can copy these elements to new layers, allowing for independent manipulation, coloring, or even exporting them as separate graphics.
5. Adding Color and Texture (Basic Introduction):While this tutorial primarily focuses on cleanup, Photoshop also excels at adding color. You can use "Solid Color Fill" layers, "Gradient Fill" layers, or even textured brushes to add washes of color to different zones of your plan. For instance, a light green fill could represent lawn areas, a darker tone for planting beds, and a grey for hard surfaces. Clipping masks are invaluable here, ensuring that your color fills only affect the intended areas defined by your plan's lines.
6. Preparing for Export:Once you are satisfied with the cleanup and any initial coloring, save your work. When exporting for use in other programs like Illustrator or for a high-quality print, use formats like TIFF or high-resolution JPEG. If you plan to maintain transparency for elements you've isolated, PNG is a suitable format. Ensure your export settings match the resolution and color mode required for your next step.
Plan Render in Photoshop | Landscape Plan Rendering
Beyond Cleanup: Further Enhancements and Workflow Integration
The cleaning and enhancement of a landscape plan in Photoshop is often just one part of a larger design and presentation process. The skills learned here can be expanded upon to create even more compelling visuals.
1. Adding People and Figures:A common post-processing step involves adding human figures to a plan to give a sense of scale and activity. This can be done by importing stock images of people and then carefully masking them to fit the perspective of your plan. Alternatively, you can find simplified, graphic representations of people that can be easily integrated. The key is to ensure the lighting and style of the added figures are consistent with the overall aesthetic of your plan.
2. Color Overlays and Mood Setting:Beyond simple color fills, Photoshop allows for the application of color overlays and adjustment layers that can dramatically alter the mood and feel of your plan. Using layers like "Color Balance," "Hue/Saturation," or even subtle "Gradient Maps" can imbue your plan with a warm, cool, or specific thematic tone. This is particularly useful for creating different presentation options or for aligning the plan's visual style with a client's branding or the project's overall atmosphere.
3. Integrating with Other Software (Illustrator):As mentioned, Photoshop is often the first step. The cleaned-up plan can then be brought into Adobe Illustrator. Illustrator is superior for vector-based graphics, precise text placement, and the creation of formal elements like title blocks, legends, and scales. In Illustrator, you can:
- Add Text Labels: Use the "Type Tool" to add plant names, material callouts, and dimensions. Illustrator's typography controls offer a vast array of options for creating clear and aesthetically pleasing labels.
- Create Title Blocks and Legends: Design professional title blocks containing project information, designer's name, and dates. Develop clear legends that explain the symbols used in your plan.
- Incorporate Additional Graphics: Import logos, site context maps, or other illustrative elements to enrich the presentation.
- Vectorizing for Scalability: If you need your plan to be infinitely scalable without losing quality (e.g., for large-format printing), tracing over key linework in Illustrator with the "Pen Tool" can convert raster elements into sharp, clean vector paths.
4. Advanced Photoshop Techniques:For those looking to push their skills further, Photoshop offers a wealth of advanced techniques applicable to landscape plans:
- Layer Styles: Use "Drop Shadows" to give elements a sense of depth, "Bevel and Emboss" for subtle textural effects, or "Outlines" to define specific areas more clearly.
- Custom Brushes: Create or download custom brushes that mimic natural textures like grass, gravel, or water. This can add a sophisticated layer of detail to your plans.
- Filters and Effects: Experiment with various filters to achieve specific visual styles. For instance, a subtle "Gaussian Blur" can be used to soften backgrounds, or a "Texturizer" filter can add a paper-like quality.
- Smart Objects: Convert your scanned plan or elements within it into Smart Objects. This allows you to apply non-destructive filters and transformations, meaning you can always go back and edit them without degrading the image quality.
The Benefits of a Hybrid Digital-Manual Approach
The fusion of hand-drawn elements with digital processing in Photoshop and other software offers a compelling set of advantages:
- Preservation of Artistic Touch: It allows designers to retain the unique character and personal expression that comes with hand-drawing, avoiding the sometimes sterile feel of purely digital outputs.
- Error Correction and Flexibility: The ability to easily correct mistakes, experiment with different color schemes, and make revisions without redoing entire sections significantly streamlines the design process and reduces stress.
- Professional Polish: Digital tools enable a level of precision, clarity, and visual sophistication that is difficult to achieve with purely manual methods, leading to more professional and impactful presentations.
- Efficiency: While there is an initial learning curve, mastering Photoshop and related software can ultimately save time compared to meticulous manual redrafting for every iteration.
- Versatility: Digital files can be easily shared, reproduced at various scales, and integrated into a wide range of presentation formats, from digital slideshows to large-format prints.
Cultivating Further Design Knowledge
For those interested in deepening their understanding of landscape design and graphics, subscribing to resources like "THE PENCIL CASE" newsletter can provide valuable insights, tips, and inspiration. Such resources often cover a broad spectrum of topics, from fundamental garden design principles to advanced graphic techniques, ensuring a continuous learning journey. The pursuit of knowledge in both design theory and digital execution is key to creating truly exceptional landscape plans.
The journey of mastering landscape plan presentation is an ongoing one, blending artistic intuition with technical proficiency. Photoshop serves as a powerful ally in this endeavor, empowering designers to overcome the anxieties of manual drafting and to translate their visions into clear, compelling, and beautiful visual documents. By embracing these digital workflows, designers can elevate their presentations, communicate their ideas with greater confidence, and ultimately bring their landscape designs to life with exceptional clarity and artistry.