Instagram carousels offer a dynamic way to tell a story, showcase a product, or share a tutorial, allowing users to swipe through multiple images or videos. This step-by-step guide will teach you how to design and export visually appealing carousels that grab attention and drive engagement, utilizing the powerful tools within Adobe Photoshop.
Understanding Instagram Carousel Specifications
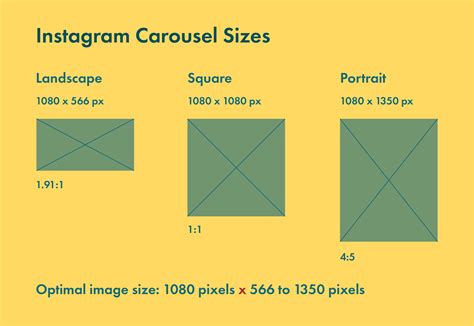
To create visually appealing Instagram carousels, start by ensuring your images adhere to the platform’s recommended dimensions. Instagram has specific guidelines for single images and carousels. While square images (1080 x 1080 pixels) are an option, portrait images (1080 pixels wide by 1350 pixels high) tend to occupy more screen real estate, thus capturing more attention. When planning a carousel, it's essential to calculate the total width required for your design. This is achieved by multiplying the single image width (typically 1080 pixels) by the desired number of images in your carousel. For instance, a carousel with the maximum of 10 images will require a total width of 10800 pixels (1080 pixels/image * 10 images).
Setting Up Your Photoshop Document for Seamless Carousels
Once you've opened Photoshop, the first crucial step is to create a new document. As mentioned, while square formats are viable, we will focus on the portrait orientation for maximum impact. Therefore, set your document height to 1350 pixels. The width will be dynamic, determined by the number of images you intend to include in your carousel. For a 10-image carousel, your canvas width will be 10800 pixels.
The next vital step involves dividing your canvas into equal sections, each representing an individual slide in your carousel. To achieve this, navigate to View > New Guide Layout. In the dialog box, uncheck "Rows" and "Margins," as we only require columns for this process. Here, input the number of images you plan to use for your carousel. For a 10-image carousel, you will enter "10" into the "Columns" field. It's important to ensure there is no "Gutter" selected, as this would introduce unwanted spacing between your slides.

Utilizing the Slice Tool for Export
With your guides in place, the next step is to employ the Slice tool. This tool can be found within the drop-down menu of the Crop tool; you may need to hold down the Crop tool icon to reveal it. Once selected, right-click on your canvas and choose "Slices from Guides." This action will automatically create individual slices based on the guides you previously set up, ensuring each section of your design is treated as a separate image for export.
This technique is particularly effective for creating "seamless" carousels, where a single image or design flows across multiple slides, creating a captivating visual narrative. This is a common technique used by the filmmaking community to showcase work, and it can be adapted for various purposes on Instagram. You've seen people use these for panoramas, tutorials, and detail shots. There are so many things you can do with this technique, so let's jump into Photoshop and I'll show you how I set it up. For the sake of this example, I'm just going to do a simple panorama, however, you can use this technique to create any kind of seamless image you like.
Designing Your Carousel Content
With your document set up and sliced, you can now arrange your image content. Whether you're creating a panoramic landscape, a step-by-step tutorial, or a product showcase, this layered approach allows for immense creative freedom. You can design each slice as a distinct element or meticulously craft a continuous visual across all slices. Remember, the sliced images can also be used as standalone photos, offering further flexibility in your content strategy.

Exporting Your Carousel Images
Once your image or design is arranged to your satisfaction, it's time to export. Photoshop's "Save for Web (Legacy)" function is ideal for this purpose. Within the Save for Web dialog box, ensure that the "Quality" is set to 100% to maintain the highest fidelity of your images. For resizing images destined for the web and social media, using "Bicubic Sharper" is a recommended setting to enhance clarity.
When you select "Save," a dialog box will appear. Crucially, make sure to select the "All Slices" option at the bottom of this dialog box. This ensures that all the individual slices you created are exported as separate files. While this was covered in a previous tutorial about 3-panel Instagram posts, it bears repeating for clarity.
How to Slice Your Instagram Carousel - Easy photoshop Tutorial
Uploading Your Carousel to Instagram
With your individual image slices exported, you're ready to upload them to Instagram. Open the Instagram app on your mobile device or access it via a desktop browser. Navigate to create a new post. Select the first image of your carousel. Instagram's interface is designed to recognize multiple selected images as a carousel. You can add all the details you normally would, including hashtags, location, and a compelling description.
When you select all of your images, Instagram should recognize them as portrait format. However, it's always a good practice to go into the "Edit Photo" section and confirm that "Portrait" is selected if it isn't already. This ensures that each slide is displayed optimally within the Instagram feed. Now, when you're ready, all you need to do is select "Publish."
Beyond the Basics: Creative Applications of Carousels
The ability to create multi-slide posts opens up a world of creative possibilities for your Instagram presence. Beyond simple image sequences, consider these advanced applications:
- Tutorials and How-Tos: Break down complex processes into digestible steps, using each slide to illustrate a different stage. This is perfect for DIY projects, recipe guides, or software demonstrations.
- Before & After Transformations: Showcase dramatic changes, whether it's a room renovation, a fitness journey, or a creative project's evolution.
- Product Spotlights: Detail different features, angles, or color options of a product. This allows potential customers to get a comprehensive view without leaving the app.
- Storytelling and Narrative: Craft a visual story that unfolds across the slides, drawing your audience in and encouraging them to swipe through to discover the conclusion.
- Infographics and Data Visualization: Present information in a visually engaging way, with each slide conveying a piece of data or a key takeaway.
- Behind-the-Scenes Glimpses: Offer your followers an exclusive look into your creative process, your workspace, or the making of your content.
- Curated Collections: Group related images together, such as a series of vintage printables, a mood board for an upcoming project, or a collection of inspirational quotes. This can be particularly effective for shops or artists sharing their work.
The gallery wall is coming along quite nicely, and a vintage printables shop will be opening soon. I can’t wait to share the first curation with you. In other news, I found this beautiful fiddle-leaf fig at Home Depot the other day! Isn’t she lovely? Today, we've explored how to create a seamless layout for posting on Instagram or a lovely long and short layout like at the top of this post.
To see a seamless carousel in action, check out my recent Instagram post HERE. And if you have a few minutes to read the caption and all the lovely comments shared, please do!! And as always, I’d love to hear all about your superpowers too.
This is the second seamless carousel tutorial I’ve shared over the years. If you’d like to see how to make a seamless carousel with one single landscape image in Photoshop, click here.
Let’s dive into today’s tutorials. Starting in Lightroom, then into Photoshop. If you’d like a quick jump start to your seamless multiple-image creation, be sure to download today’s free templates too.
Oh, and you can use the sliced images as stand-alone photos too. Oh, the possibilities! I’d LOVE to see your seamless carousel posts. Please feel free to pop a link in the comments below and tag me on Instagram too.
I feel we’re all navigating a challenging world right now. Thank you again for stopping by. As always, I LOVE knowing you were here. Please say hello in the comments if you have a few.
You’re all set! You’re now equipped to create visually stunning and engaging social media carousels that go beyond the ordinary, offering a richer and more interactive experience for your audience.