Creating precise geometric shapes, such as triangles, is a fundamental skill for anyone working with graphic design software like Adobe InDesign. Whether you're designing a company flyer, a brochure, or a complex annual report, understanding how to construct and manipulate triangles efficiently can significantly elevate your design capabilities. This tutorial will explore various methods to create triangles in InDesign, from using dedicated tools to converting existing shapes, ensuring you can produce the perfect triangular element for any project.
The Versatile Polygon Tool for Triangle Creation
One of the most straightforward methods for creating a triangle in InDesign is by utilizing the Polygon Tool. This tool is designed to generate shapes with a variable number of sides, making it ideal for crafting polygons of any configuration, including the three-sided triangle.
To begin, select the Polygon Tool from the Tools panel, typically located on the left side of your InDesign workspace. Once selected, you have two primary approaches to creating your triangle:
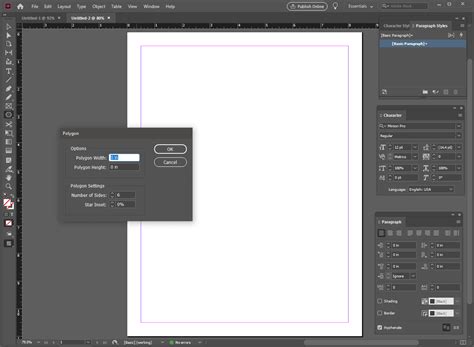
Clicking for Options: Simply click once on your document's canvas where you want the triangle to appear. This action will open the "Polygon Settings" dialog box. Within this dialog, you can specify the exact "Number of sides" you require. For a triangle, enter "3". You can also define the "Width" and "Height" of the polygon here, allowing for immediate control over its dimensions. The triangle will be drawn from the point you clicked, extending to the right and down by default.
Clicking and Dragging: Alternatively, after selecting the Polygon Tool, you can click and drag directly on the canvas. As you drag, a polygon will begin to form. To adjust the number of sides while dragging, you can press the "Up Arrow" or "Down Arrow" keys on your keyboard. Holding the "Shift" key while dragging will constrain the shape to a more uniform aspect ratio, and pressing the "Spacebar" will allow you to reposition the shape as you draw. Releasing the "Spacebar" will return you to the drawing mode, and releasing the mouse button will finalize the shape.
When using the Polygon Tool, InDesign remembers the last settings you entered. This means if you've previously created a triangle, subsequent uses of the Polygon Tool will default to creating another triangle, which can be a time-saver for repetitive tasks.
Adjusting Polygon Properties During Creation
While drawing with the Polygon Tool, a range of keyboard shortcuts can be employed to fine-tune the shape in real-time:
- Arrow Keys: As mentioned, the "Up" and "Down" arrow keys are crucial for adjusting the number of sides. For a triangle, ensure you press "Down" until you have three sides.
- Spacebar: This key acts as a toggle. Pressing it once while dragging allows you to reposition the shape. Pressing it again returns you to the standard drawing mode.
- Shift Key: Holding "Shift" while dragging constrains the polygon's proportions, ensuring it remains geometrically balanced as you resize it.
These dynamic controls offer a fluid way to experiment with different polygon configurations directly on the canvas, allowing for quick iterations and adjustments without needing to open dialog boxes repeatedly.
Precision with the Pen Tool
For ultimate control over shape creation, the Pen Tool stands out as an indispensable asset in Adobe InDesign. While it requires a bit more practice than the Polygon Tool, it offers unparalleled precision, enabling you to craft custom shapes, including perfectly formed triangles, with exact anchor points and bezier curves.
To create a triangle using the Pen Tool:
Select the Pen Tool: Locate and select the Pen Tool from the Tools panel.
Create Anchor Points: Click on the canvas to establish your first anchor point. This will be one vertex of your triangle.
Second Anchor Point: Click again to create the second anchor point. This defines the second vertex.
Third Anchor Point: Click a third time to establish the third vertex.
Close the Shape: To complete the triangle and form a closed path, click back on the very first anchor point you created. A small circle will appear next to the Pen Tool cursor when you hover over the starting point, indicating that clicking will close the path.

The Pen Tool allows you to create not only basic triangles but also intricate custom shapes by manipulating the bezier handles that appear after you create an anchor point. By adjusting these handles, you can control the curvature and angle of the lines connecting the anchor points, offering a level of customization not possible with the Polygon Tool.
Converting Existing Paths to Triangles
InDesign provides a powerful feature that allows you to convert existing paths or shapes into predefined geometric forms, including triangles. This "Convert Shape" functionality is particularly useful if you have a rectangle or other shape that you wish to transform into a triangle without manually redrawing it.
To convert a shape to a triangle:
Select the Object: First, select the object you wish to convert using the Selection Tool. This could be a rectangle, a star, or even a custom path.
Access Convert Shape: Navigate to the Object menu at the top of the screen, then select "Convert Shape."
Choose Triangle: Within the "Convert Shape" submenu, you will find various options for predefined shapes. Select "Triangle."
InDesign will then attempt to convert your selected object into a triangle. The success and appearance of the conversion will depend on the original shape. For instance, converting a rectangle to a triangle might result in a right-angled triangle by default, as InDesign intelligently interprets the conversion. If you started with a square or rectangle, InDesign can transform it into an equilateral triangle where all three sides are of equal length.
Refining and Transforming Your Triangles
Once you have created a triangle, InDesign offers a suite of tools and options to refine its appearance, scale, rotate, and position it precisely within your layout.
Customizing Appearance
After creating your triangle, you can easily customize its visual attributes:
- Fill Color: Use the Swatches panel or the Color panel to apply a fill color to the interior of the triangle.
- Stroke Color: Similarly, you can set a stroke color for the outline of the triangle.
- Stroke Width: Adjust the thickness of the stroke using the Stroke panel. You can also control the stroke's weight, cap, and corner styles.
These basic customizations are essential for integrating the triangle seamlessly into your overall design aesthetic.
Scaling and Rotating
Transforming a triangle to fit your design requirements is a common task:
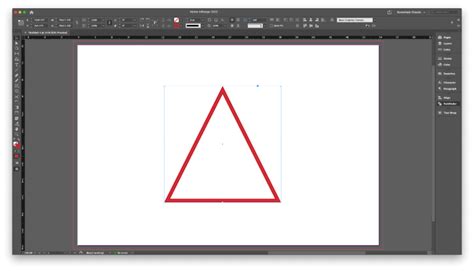
Scaling: Select the triangle with the Selection Tool. You will see a bounding box with handles around it. To resize the triangle, click and drag any of the corner handles. To maintain the triangle's original proportions and prevent distortion, hold down the "Shift" key while dragging. This ensures that the width and height are scaled proportionally.
Rotating: To rotate the triangle, move your cursor slightly outside one of the corner handles of the bounding box. The cursor will change into a curved, double-headed arrow. Click and drag to rotate the triangle. You can also hold "Shift" while rotating to snap the rotation to increments of 15 degrees, which is useful for precise alignment.
Using the Transform Panel for Precision
For absolute numerical control over transformations, the Transform panel (Window > Object & Layout > Transform) is invaluable. Here, you can input exact values for:
- Position (X, Y): Define the precise coordinates of the triangle's reference point on the page.
- Width and Height: Set exact dimensions for the bounding box.
- Rotation Angle: Specify a precise degree of rotation.
- Shear: Skew the triangle to create angled effects.
The Transform panel ensures that your transformations are exact and repeatable, which is crucial for professional design workflows.
Advanced Triangle Applications in Design
Beyond basic shape creation, triangles in InDesign can serve more complex roles within a design, acting as visual anchors, masking elements, or even guiding text flow.
Triangles as Clipping Paths
A triangle can be used as a clipping path to mask an image, revealing only the portion of the image that falls within the triangle's boundaries. This is a powerful technique for creating visually interesting compositions where parts of an image are deliberately obscured or shaped.
To use a triangle as a clipping path:
Create or Place an Image: Place an image onto your InDesign page.
Create a Triangle: Draw a triangle over the image using any of the methods described above. Ensure the triangle's fill is set to "None" and it has a stroke or no stroke, as the path itself will define the clipping area.
Make Clipping Path: With both the image and the triangle shape selected, go to the Object menu and choose "Clipping Path." Select "Make."
Adjust Path Options: You can further refine the clipping path by selecting the triangle again and going to "Object > Clipping Path > Options." This allows you to adjust the path's tolerance and smoothness.
Text Wrapping Around Triangles
Text wrapping allows you to create dynamic layouts where text flows around objects, enhancing readability and visual appeal. A triangle can be used to guide text flow in unique ways.
To apply text wrapping to a triangle:
Create a Triangle: Draw your triangle on the page.
Apply Text Wrap: Select the triangle and then open the Text Wrap panel (Window > Text Wrap).
Choose Wrap Style: Click on one of the "Wrap Around Object" options. The most common is "Wrap Around Bounding Box."
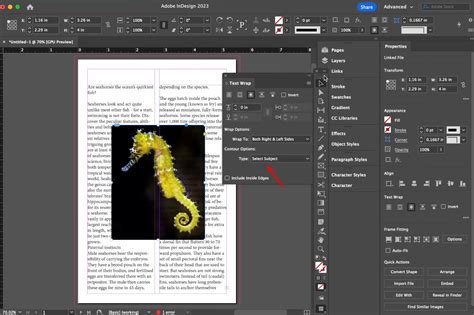
Adjust Contour: For more precise control, especially with complex shapes like triangles, you can choose "Wrap Around Object Shape." Then, click the "Contour Options" button and select "Detect Edges" or manually adjust the contour to follow the triangle's path closely. You can also set the "Offset" value to control the distance between the text and the triangle.
This capability is particularly useful for creating magazine layouts, brochures, or any design where you want text to interact organically with graphical elements.
Achieving Specific Triangle Types
While the Polygon Tool is excellent for general triangles, you might need specific types, such as a right-angled or an equilateral triangle with precise side lengths.
Creating a Right-Angled Triangle
When using the Polygon Tool, the default triangle created has acute angles. To create a right-angled triangle:
- Draw a Rectangle: Use the Rectangle Tool to draw a rectangle on your page.
- Convert to Triangle: Select the rectangle and go to "Object > Convert Shape > Triangle." InDesign will typically convert the rectangle into a right-angled triangle, using two of its sides as the legs of the right angle.
Alternatively, you can use the Pen Tool to click three points that form a right angle and then close the shape.
Crafting an Equilateral Triangle
An equilateral triangle has three sides of equal length and three angles of 60 degrees. Achieving this precisely in InDesign can be done through a combination of dimension control and a bit of mathematical calculation.
- Set Equal Width and Height: Use the Transform panel or the control bar to ensure the width and height of your triangle (or the bounding box it sits within) are equal. For instance, set both to 20 picas.
- Calculate Height for Equilateral: The height of an equilateral triangle with side length 's' is given by
s * sqrt(3) / 2. If your width is 's', you need to adjust the height. In InDesign, you can leverage its calculation capabilities. With the height field selected in the Transform panel, you can input a formula. If your width is 20 picas, you would input20 pica * 0.8660254. The number 0.8660254 is the approximate value ofsqrt(3) / 2. - Enter the Formula: Type the formula directly into the height field (e.g.,
20 pica * 0.8660254) and press Enter. InDesign will calculate the result and set the height accordingly, creating a near-perfect equilateral triangle.
This method, while involving a specific mathematical constant, ensures a level of precision that is difficult to achieve by eye or with standard drawing tools alone.
How to Make a Triangle - InDesign Tutorial for Beginners
Conclusion and Further Exploration
Mastering the creation and manipulation of triangles in Adobe InDesign is a valuable skill that opens up a world of design possibilities. From the simple drag-and-drop of the Polygon Tool to the precise control of the Pen Tool and the transformative power of the Convert Shape feature, InDesign offers multiple pathways to achieve your desired triangular elements. By understanding how to customize, transform, and apply advanced effects like clipping paths and text wrapping, you can elevate your designs from basic layouts to sophisticated visual compositions. The ability to create specific types of triangles, such as right-angled or equilateral, further empowers you to meet the exacting demands of professional design projects. As you continue to explore InDesign, remember that practice with these fundamental shapes will build a strong foundation for tackling more complex design challenges.