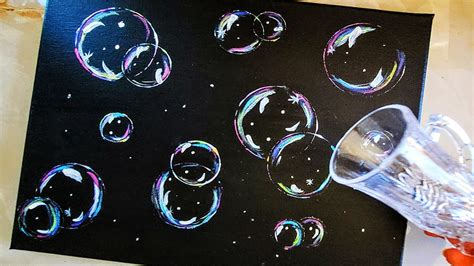
Creating convincing bubbles in Adobe Photoshop can elevate designs, adding a touch of realism or a whimsical flair. Whether for underwater scenes, playful graphics, or comic-style elements, mastering bubble creation is a valuable skill. This tutorial delves into two primary methods: crafting a custom bubble brush for efficient repetition and utilizing Photoshop's built-in shape tools for distinct speech bubbles. We will explore the intricacies of layer styles, brush dynamics, and selection manipulation to achieve diverse bubble effects.
Designing Your Master Bubble Brush
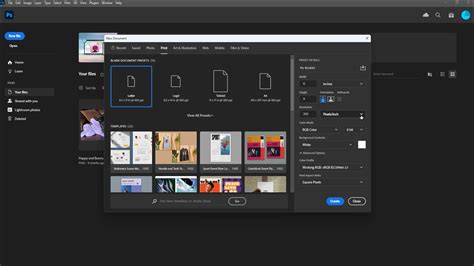
To begin crafting our reusable bubble brush, we first need a pristine canvas. Let's start by creating a new Photoshop document. This action opens Photoshop's New Document dialog box. Enter 600 pixels for both the Width and Height of the new document and 72 pixels/inch for the Resolution. There's no particular reason why we're using these specific settings other than it keeps us both on the same page. Finally, make sure the Background Contents option is set to White. Click OK when you're done to close out of the dialog box.
Next, we'll establish the fundamental shape of our bubble. Select the Elliptical Marquee Tool from the Tools panel. With the Elliptical Marquee Tool selected, hold down Shift+Alt (Win) / Shift+Option (Mac), click in the center of the document, and then drag out an elliptical selection outline which will become the basic shape of our bubble. Holding the Shift key down as you drag is what forces the selection outline into a perfect circle, while holding the Alt (Win) / Option (Mac) key tells Photoshop to use the spot you clicked on as the center of the selection, extending it out in all directions from that spot.
Now, let's imbue this circular selection with the characteristics of a bubble. We'll achieve this through layer styles. Right-click on the selection and choose "Stroke…" to open the Stroke dialog box. Set the Stroke Width to 5 px and its location to Inside. In the Color Picker dialog box, select black color which is located at the corner of the color preview. You can also input number of the color, which is R: 0, G: 0, and B: 0. You will be brought back to the Stroke dialog box. This is the result we have. We need to create a soft ball as the basis of the bubble, not just a sharp outline. To do this, we need to soften the line using a blur filter. Apply a Gaussian Blur filter (Filter > Blur > Gaussian Blur). In the next dialog box, set the radius size until the edge is softened. For now, we don’t need the selection; to remove it, hit Ctrl + D or click Select > Deselect.
To add depth and a sense of translucency, we will introduce highlights and shadows. This opens Photoshop's Layer Style dialog box. First, change the Blend Mode from Screen to Multiply, which will turn our inner glow into an inner shadow. Click on the color swatch below the word "Noise" and choose black from the Color Picker. Click OK to close out of the Color Picker when you're done. This creates a subtle darkening around the edges, mimicking how light might be subtly blocked by the bubble's curvature.
Next, click on the words Gradient Overlay in the list of layer styles along the left side of the Layer Style dialog box. This changes the middle column of the Layer Style dialog box to the options for the Gradient Overlay. This opens the Gradient Editor. Select the black-to-white gradient from the list of Presets by clicking on its thumbnail (third from the left, top row). With the Layer Style dialog box still open, click in the center of the bubble in the document window and drag the black center of the gradient into the top left of the bubble to create a large highlight. This artificial light source gives the bubble a spherical appearance.

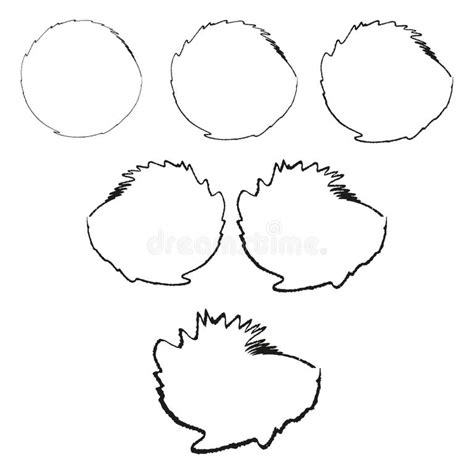
To refine the highlight and add a more nuanced sense of curvature, we can employ the Brush Tool. With the Brush Tool selected, make sure black is selected as your Foreground color by pressing the letter D on your keyboard, which will reset the Foreground and Background colors to the defaults (black is the default Foreground color). Hold down your Ctrl (Win) / Command (Mac) key and click directly on the preview thumbnail for Layer 1 in the Layers panel. This loads the selection of our bubble shape. Now, select the Brush Tool again. Reduce its Opacity to 40%. Right-click inside the canvas and change the brush Size to about 100 px. We are going to paint black. To use this color, you need to change the foreground color to black. We will put the new painting in a separate layer for easier management. Click on the New Layer icon at the bottom of the Layers panel to add a new blank layer. Paint a small stroke on the opposite side of the main highlight, creating a secondary, softer highlight. And paint again on top of the curve. Take a look at the image below for reference. Repeat the same step, this time smaller and its opposite side. To change the brush size, we can right-click and change the Size setting. But, there is a faster way. The highlight we just paint is very crude. That’s okay, we can fix it easily. Just click Filter > Blur > Gaussian Blur. The Gaussian Blur we have just applied earlier will spread the pixels and some might end up outside the bubble. We don’t want that. We have to delete all pixels outside the bubble. That’s why we saved the selection that shaped the bubble to a channel. Now, we need to load it back. Open up the Channels Panel and then select the channel. We need to go back to the original image. In the Layers Panel, activate the layer where we paint the highlight. Current selection is selecting inside the bubble. Because our intention is to delete pixels outside the bubble, we will invert the selection. Click Select > Inverse or hit Shift + Ctrl + I. Using this command, areas outside the bubble are now selected. Now, hit Delete key to delete any pixels outside the bubble.
Click OK to exit out of the dialog box, then press Ctrl+F (Win) / Command+F (Mac) twice to apply the same filter (Gaussian Blur) two more times to the image. Each time you apply the filter, you'll see the smaller highlight appear more curved, enhancing the illusion of a spherical surface.

Now that we've drawn our bubble, let's save it as a brush. We need to get rid of the background. Click the eye icon of the Background layer to hide it. To define the brush, go to Edit > Define Brush Preset… In the Brush Name dialog box, give the brush a decent name, such as "Realistic Bubble". And with that, we're done creating our initial bubble brush!
Applying Your Custom Bubble Brush
With our bubble brush created, we can now efficiently add multiple bubbles to any image. Open the photo you want to add bubbles to. Click on the New Layer icon at the bottom of the Layers panel to add a new blank layer above the Background layer. It's always a good idea to draw in a different layer, never directly on the image. This way, if you don’t like the result, you can just simply remove the layer and start all over again.
Select the Brush Tool from the Tools panel if it's not already selected. With the Brush Tool selected, right-click (Win) / Control-click (Mac) anywhere inside the document and choose your bubble brush by clicking on its thumbnail in the Brush Preset picker. It should be the last brush in the list.
Press F5 on your keyboard to quickly open Photoshop's main Brushes panel, which contains all of the Brush Dynamics options that allow us to control the behavior of the brush as we paint with it. We know it’s not perfect, but at least the brush is working. Obviously, we need to set up the brush settings. First, make sure to set the brush Opacity to 100%. You can use a shortcut for this.
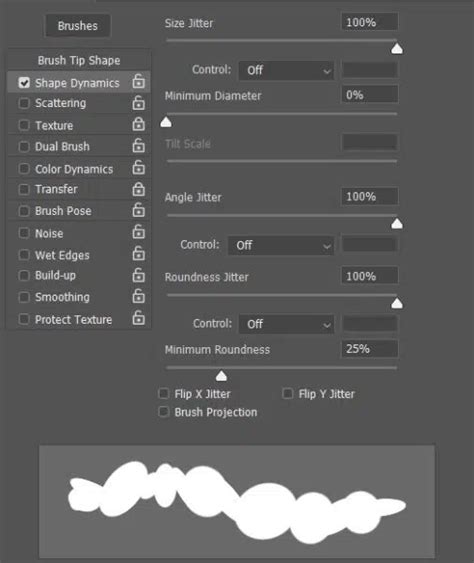
With the Brushes panel open, click directly on the words Shape Dynamics on the left of the panel. Increase the Size Jitter to 100% by dragging the slider all the way to the right. This will give us lots of random variations in the size of the bubbles as we paint them. Do the same thing for the Roundness Jitter, increasing it to 100%, which will give us random variations in the shapes of the bubbles so they don't all look perfectly round. Increase Angle Jitter and Roundness Jitter a bit.
Click directly on the words Scattering below Shape Dynamics on the left side of the Brushes panel, then increase the Scatter amount to around 250%, which will spread the bubbles out randomly as we paint them rather than having them all appear in a straight line. Increase the Scatter size.
We're ready to paint in our bubbles! We're going to want to paint them with white, so we need to make sure our Foreground color is set to white. Your bubble brush will most likely be too big at its default size, so press the left bracket key on your keyboard a few times to make the brush smaller (the right bracket key makes the brush larger).
Then, with the new layer selected in the Layers panel, simply paint in your bubbles. For best results, paint in short strokes from the bottom of the photo to the top and leave some space between the strokes to create clusters of bubbles. If you're not happy with how the bubbles look, press Ctrl+Z (Win) / Command+Z (Mac) to undo the last brush stroke, or Ctrl+Alt+Z (Win) / Command+Option+Z (Mac) to undo multiple strokes, then try again.
At the moment, the bubbles look a little too crisp and sharp compared with the rest of the underwater image, so let's give them more of a murky underwater glow. Apply a Gaussian Blur filter (Filter > Blur > Gaussian Blur). Click OK when you're done to exit out of the dialog box.
As an optional last step, add another new blank layer to the document by clicking on the New Layer icon at the bottom of the Layers panel, then use a larger size brush to add a couple of additional columns of bubbles. The larger bubbles will appear to be closer to the viewer than the smaller bubbles. Finally, press Ctrl+F (Win) / Command+F (Mac) to re-apply the Gaussian Blur filter, which will completely blur out the bubbles as if they're too close for the viewer's eyes to focus on them. This is a lot better. We’ll get back to the Brush Settings Panel. I think this is a lot better. We’ll get back to the Brush Settings Panel.
Creating Speech Bubbles with Photoshop Shapes
Knowing how to create speech bubbles in Photoshop can be very useful as they can be used for all sorts of designs. Maybe you need a speech bubble for a comic book or manga, a pop art poster, or just for a sticker design. We’ll show you how to load, edit the appearance, and add text to speech bubble shapes that come with Photoshop. For this tutorial, we used a bold comic font called Raging. If you’re creating a comic or pop art style design, you can find some really good color palettes on Design Bundles, such as this psychedelic color palette.
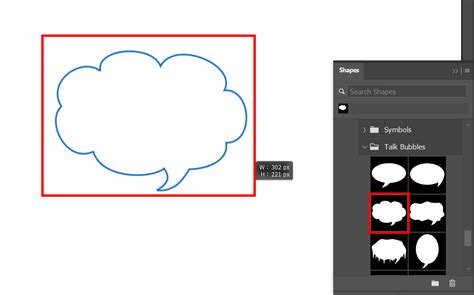
Loading Legacy Shapes
You'll have to do this step if you’ve never loaded the legacy shapes before. Open the Shapes panel (Window > Shapes), click the menu button at the top right of the panel, and select Legacy Shapes and More. The Legacy Shapes and More folder will be added to the end of the list in the Shapes panel.
Creating a Speech Bubble Path
Select the Custom Shape Tool (U) from the left toolbar, and choose Path from the dropdown in the Options bar at the top. Then select a speech bubble shape in the Options bar or the Shapes panel (Window > Shapes). Note: the speech bubble shapes are located by going to the following folders: Legacy Shapes and More > All Legacy Default Shapes > Talk Bubbles. With your speech bubble shape selected, click and drag on the canvas to create your speech bubble path.
Editing the Speech Bubble's Appearance
Adding a Fill
First, click the Create a New Layer icon at the bottom of the Layers panel. Then double-click on the layer name and change it to "Fill". Next, select either the Path Selection Tool (A) or Direct Selection Tool (A), right-click on the canvas, and choose Fill Path. In the Fill Path dialog, select Foreground Color. The color doesn't matter as we'll show you how to change it later. You should now see a speech bubble filled with the Foreground color.
Adding an Outline
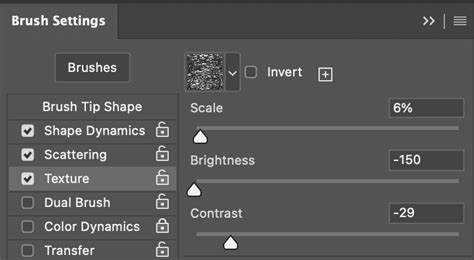
Create a new layer and rename it to "Outline". Then open the Brushes panel (Window > Brushes), and select the brush you’d like to use to create the speech bubble outline. Change the brush size in the Brushes panel if needed. You can modify the brush even more with the advanced brush settings in the Brush Settings panel. Select either the Path Selection Tool (A) or Direct Selection Tool (A). Then right-click on the canvas and click Stroke Path. Make sure Brush is selected for the Tool option in the Stroke Path dialog. Your speech bubble should now have an outline.
Applying Layer Styles
Now we will add layer styles to the layers so we can quickly change their appearances if we want. Double-click on the Fill layer. Make sure Preview is enabled in the Layer Style dialog and click on Color Overlay. Then click the color icon to pick a different color. Notice the change of the fill color in the actual speech bubble. You can also add a Color Overlay for the Outline layer to change the color of the speech bubble outline. The other layer styles can make for some fun effects, but we won’t go over those in this tutorial. After the layer styles have been added, you can always double-click on a layer style in the Layers panel to modify it.
Adding Text to Your Speech Bubble
Select the Horizontal Type Tool (T), click outside the speech bubble shape, and enter your text. Enable Free Transform (Ctrl/Cmd + T) to resize the text using the bounding box handles and move the text by clicking and dragging. Press Enter to commit the changes. You can also change the settings in the Character and Paragraph panels to further edit the text. Our current design is shown below. You can take it one step further and also add layer styles to the text layer to enhance your design. We added a Color Overlay, Stroke, and Drop Shadow layer style to the text layer to create what you see in the image below.
Another option for the speech bubble text is to follow our Photoshop tutorial on creating 3D comic text! The finished design would look so awesome! This tutorial will show you how to draw bubbles, lots of them. Obviously, you don’t want to draw each bubble, one by one. We will use Photoshop’s amazing brush to do the magic for us.