DaVinci Resolve has undergone a remarkable transformation over the past decade, evolving from a specialized tool for professional colorists into a comprehensive post-production suite. While Blackmagic Design's engineering prowess ensures robust performance, often surpassing competitors like Premiere Pro and Final Cut Pro, users may still encounter instances of laggy playback and suboptimal performance. This article delves into the common reasons behind these performance issues and provides a detailed guide on how to make DaVinci Resolve run faster, ensuring a smoother and more efficient editing experience.
Identifying DaVinci Resolve Lag
Before implementing solutions, it's crucial to accurately identify what constitutes laggy performance in DaVinci Resolve. Lag is a tangible sensation experienced during editing. When you initiate playback, does the timeline respond instantaneously, or is there a noticeable buffer? If it's the latter, you're experiencing performance lag. This can also manifest during editing actions; a lagging DaVinci Resolve will exhibit stuttering reaction times for edits, delays in deletions, and even prolonged import times that can feel akin to the slow speeds of dial-up internet.
Beyond obvious stuttering, a reliable indicator of smooth operation is the frames per second (FPS) counter, typically located in the top left of the viewing monitor. When editing at 24 frames per second, a green indicator signifies that DaVinci Resolve is running smoothly. Conversely, if pressing play causes the FPS to drop to 10 or 15, accompanied by a red light, it's a definitive sign of laggy playback. Addressing this issue often begins with ensuring your system meets the software's fundamental requirements.
Seven Steps to Enhance DaVinci Resolve Speed and Eliminate Lag
To systematically address and resolve performance bottlenecks, a multi-faceted approach is recommended. The following seven steps offer a comprehensive strategy for optimizing DaVinci Resolve's performance.
1. Verify System Requirements Alignment
The foundational step in troubleshooting any software performance issue is to confirm that your system meets the minimum specifications set by the developer. For DaVinci Resolve, this is particularly critical. Experiencing laggy playback might simply indicate that your hardware is not sufficiently powerful for the demands of the software.
Minimum System Requirements for macOS:
- Operating System: macOS 12 Monterey
- System Memory (RAM): 8 GB (16 GB recommended for Fusion usage)
- Blackmagic Design Desktop Video: Version 12.0 or later
- Graphics Card: Integrated GPU or discrete GPU with at least 2 GB of VRAM
- GPU Support: Metal or OpenCL 1.2 compatible GPU
Minimum System Requirements for Windows:
- Operating System: Windows 10 Creators Update
- System Memory (RAM): 16 GB (32 GB recommended for Fusion usage)
- Blackmagic Design Desktop Video: Version 10.4.1 or later
- Graphics Card: Integrated GPU or discrete GPU with at least 2 GB of VRAM
- GPU Support: OpenCL 1.2 or CUDA 11 compatible GPU
- GPU Driver: Latest version as required by your specific GPU (NVIDIA/AMD/Intel)
If your system meets these minimum requirements but DaVinci Resolve continues to lag, proceed to the subsequent troubleshooting steps. However, if your hardware falls short, upgrading your computer components will be necessary to resolve the performance problems.
2. Inspect Graphics Card and Driver Status
Before delving into DaVinci Resolve's internal settings, it's essential to examine your graphics card and its drivers, especially for PC users. NVIDIA GPUs, for instance, offer two primary driver types: "Game Ready" and "Studio" drivers. While both drivers are based on the same core technology, the Studio driver undergoes more rigorous testing specifically for creative applications like DaVinci Resolve. Game Ready drivers are released more frequently to coincide with major game launches, potentially introducing instability for professional software.
Using a Game Ready driver might lead to an unstable installation that negatively impacts DaVinci Resolve's performance. Fortunately, switching to the more stable Studio driver is a straightforward process:
- Launch GeForce Experience from your system tray by right-clicking the NVIDIA icon and selecting the application.
- Navigate to the Drivers tab.
- Click the vertical dots next to "Check for updates" and select the Studio Driver option.
After switching to the Studio Driver, relaunch DaVinci Resolve to assess if the performance has improved. This change alone can sometimes provide the necessary boost for smoother operation. If lag persists, it's time to explore the software's configuration options.

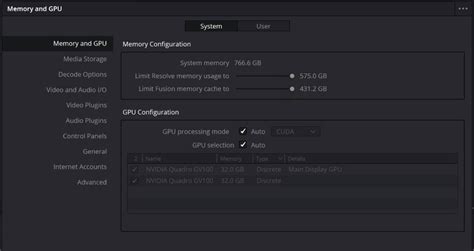
3. Optimize DaVinci Resolve Memory and GPU Settings
Within DaVinci Resolve itself, specific settings in the Preferences menu can significantly enhance GPU and memory utilization. Access these by navigating to DaVinci Resolve > Preferences, then selecting the Memory and GPU tab.
Here, you can allocate more system memory (RAM) to DaVinci Resolve and ensure the GPU configuration is optimized. In most scenarios, setting both the GPU processing mode and GPU selection to Auto is sufficient to leverage your hardware effectively. This configuration helps maximize the software's performance and efficiency.
4. Consider a Graphics Card Upgrade
DaVinci Resolve is fundamentally a GPU-intensive application. While it does utilize the CPU, the GPU plays a more dominant role in powering the editing and rendering processes. In contrast, software like Premiere Pro tends to be more CPU-bound. Therefore, if Resolve is lagging, a primary culprit is often an underpowered or outdated GPU, or footage that is simply too demanding for your current graphics card.
If your GPU is several generations old, such as a GTX 1080, an upgrade might be necessary. Even when working with performance-friendly codecs like BRAW at 2K resolution, older GPUs can struggle with general processing tasks. Newer graphics cards, like those in the RTX 3080 series, offer substantial performance improvements and have become more accessible in terms of pricing.
To gauge your system's capabilities with Blackmagic Design's proprietary RAW format, the Speed Test tool can provide valuable insights. While focused on BRAW footage, it benchmarks your GPU and offers a clear indication of your current system's editing potential.
ivsEdits GPU Speed Tester Tutorial; the best benchmark for video editing on Windows 10
5. Adjust Timeline Resolution for Reduced Lag
Even with a powerful, modern GPU, working with high-resolution, high-data-rate footage from cameras like the RED V-RAPTOR can demand immense processing power. In such cases, even the most robust GPUs might struggle to process the footage in its native format, leading to frustrating lag.
When faced with this challenge, a highly effective strategy to make DaVinci Resolve run faster is to adjust the timeline resolution to 1080p. Even if your final project is intended for 6K delivery, editing within a 1080p timeline significantly reduces the processing load for previews. This results in improved playback performance and a more fluid editing experience. It's important to recognize that maintaining lower timeline resolutions during the editing phase should be a standard practice, not just a workaround for lag, ensuring a consistently responsive editing environment.
To change your timeline resolution:
- Right-click on the timeline file within the Media Pool to access the Timeline Settings menu.
- Select 1920 x 1080 HD from the Timeline Resolution drop-down menu and click OK.
6. Modify Preview Resolution for Enhanced Performance
For exceptionally data-rich footage, such as the substantial 6K files generated by cameras like the Panasonic S1H, even downscaling to a 1080p timeline might not be sufficient for efficient decompression and playback. In these situations, adjusting the preview resolution offers an additional layer of optimization.
To modify the preview resolution:
- Navigate to the top menu and select Playback > Timeline Proxy Resolution.
- Choose either Half or Quarter resolution. This action generates a proxy preview by reducing the display resolution of the footage.
It's important to note that depending on the original footage's scale, reducing the preview resolution to a quarter on a 4K or 1080p timeline can significantly diminish visual quality. This may make detailed editing more challenging as you won't be seeing the true quality of the footage. While not an ideal solution for final quality assessment, it's a highly effective method for improving playback speed.
7. Utilize Optimized Media and Proxy Media
If you continue to experience playback issues and lag after implementing the previous steps, the focus shifts to optimizing the media files themselves. This involves generating lower-resolution versions of your footage that are more manageable for your system to play back and edit. DaVinci Resolve offers two primary methods for this: generating Optimized Media or Proxy Media.
Both processes serve a similar purpose: creating a playable and editable version of media files that are too dense for your hardware to handle efficiently. The distinction lies in how these adjusted files are created. Many editors prefer using proxy media for the initial editing pass, prioritizing a fluid editing experience over immediate fine detail.
You can initiate the generation of either Optimized Media or Proxy Media by right-clicking on a media file within the Media Pool and selecting Generate Proxy Media⦠or Generate Optimized Media.
Optimized Media
Optimized Media transcodes your original files into a more editing-friendly format, making them easier to play back. This method retains high quality and is stored in a user-defined location. Although it can preserve your original resolution, even up to 8K, your computer can handle it more easily due to the absence of inter-frame compression.
You can configure the settings for Optimized Media by going to DaVinci Resolve > Preferences > User > Playback Settings. Here, you can select the resolution and format for the optimized media, balancing quality and performance according to your specific needs.
Proxy Media
Proxies are lower-resolution versions of your original clips, designed to be lightweight and easy to edit, particularly when working with high-resolution footage. While there will be a noticeable loss in clarity and potentially some color shifts, the primary goal of proxies is to create lightweight versions of heavy footage with a minimal system footprint.
A crucial note regarding Optimized Media: DaVinci Resolve stores these files on your hard drive. If you have limited disk space, this could become an issue.
Proxy media settings can be specified under DaVinci Resolve > Project Settings > Master Settings > Optimized Media and Render Cache.
It's important to be aware that when using either proxy or optimized media, you are no longer working within the original color space and codec of the camera-generated file. Consequently, if you are using these optimized versions on the Color page, you are not grading the true representation of your footage. Before proceeding to color grading, it is recommended to disable the use of optimized media or proxies. This can be done in the playback menu by either disabling proxies or unchecking the Use Optimized Media if Available setting.

Further Efficiency Gains and Considerations
The fine folks at Blackmagic Design have undoubtedly made DaVinci Resolve a standout tool in the video editing landscape. The software's increasing popularity is evident in the wealth of online tutorials and discussions. For newcomers, resources on DaVinci Resolve basics and export settings are readily available.
However, the journey to a smooth editing experience isn't always seamless. Following the outlined steps can significantly alleviate laggy performance and lead to a more streamlined post-production workflow.
Workflow Enhancements
To further boost editing efficiency, consider exploring DaVinci Resolve templates. These can be invaluable for saving time and increasing productivity, especially for professional video editors where time directly translates to revenue. Performance issues like lagging video and dropped frames can significantly disrupt a post-production workflow.
DaVinci Resolve, like all professional video editing software, is resource-intensive. The high demands of video editing can challenge even the most powerful workstations. While upgrading your system to meet the minimum requirements is the ideal solution, it's not always financially feasible, especially for hobbyists or those with smaller budgets. Even with a budget, a system upgrade might not entirely resolve all performance bottlenecks.
DaVinci Resolve Studio Version
If you are experiencing persistent playback performance issues such as lagging video, dropped frames, or application crashes, upgrading to the Studio version of DaVinci Resolve is highly recommended. While the free version is exceptionally capable, it does not fully utilize your GPU's potential, and certain advanced functions are restricted. This is particularly relevant if you have a powerful system with a high-end GPU. The Studio version often provides a significant improvement in performance for demanding tasks.
Render Cache and Render in Place
When the render cache is set to Smart, DaVinci Resolve automatically renders effects and clips that require it in the background when the software is idle or during playback. This process improves playback performance, with the render progress indicated by a red bar on the timeline, which turns blue for rendered sections.
For clips that are particularly taxing on your system, even with proxies or optimized media, due to heavy effects or color grading, the Render in Place function can be a lifesaver. By right-clicking a clip and selecting Render in Place, you can render that specific clip with all its applied effects and grading as a single, new clip. You can choose the codec and resolution for this rendered file, effectively creating a pre-rendered, easily playable version of a problematic segment.
Disk Speed Considerations
It's easy to overlook the impact of disk speed when upgrading a workstation, yet it plays a crucial role in overall performance. Editing and rendering directly from an SSD, or even better, an NVMe M.2 SSD, can yield surprising improvements in editing and rendering speeds.
Fusion and Visual Effects
The Fusion page within DaVinci Resolve is exceptionally powerful for visual effects but is also intensely resource-hungry. It demands every available system resource, and there's limited recourse other than ensuring your hardware is as capable as possible.
Software Solutions for Hardware Limitations
While hardware upgrades are often the most direct solution, DaVinci Resolve offers several software-based strategies to alleviate system strain if upgrading your hardware is not immediately possible. Employing the render cache, reducing timeline resolution, generating optimized media or proxies, and utilizing the "Render in Place" feature are all effective methods to enhance performance and achieve a smoother editing experience.
Johan Kok, a passionate visual storyteller based in Auckland, New Zealand, runs a small video production business specializing in corporate and event work. He finds immense satisfaction in combining his love for the outdoors with his passion for visual storytelling.