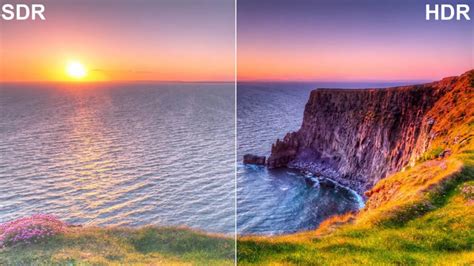
High dynamic range, or HDR, photography has revolutionized our ability to capture and render scenes that possess a greater luminance range than traditional digital imaging techniques allow. This advanced photographic approach aims to emulate the remarkable adeptness of the human eye in viewing a wide dynamic range in real-time, instantly adjusting to varied light conditions. By using HDR methods, we're able to combine multiple exposures of the same scene to achieve an image that accurately represents the intensity levels found in real-world scenarios, from the darkest shadows to the brightest highlights. This contrasts with a standard image that is captured in a single shot with a fixed exposure; HDR processing merges these exposures to create a photo with richer contrast and greater detail.
The Foundation: Capturing Bracketed Exposures
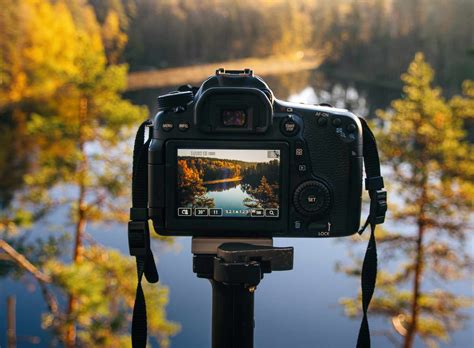
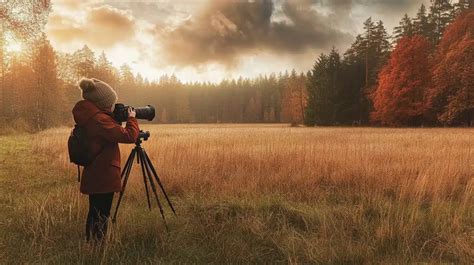
High Dynamic Range (HDR) photography hinges on capturing multiple exposures of the same scene and combining them to produce a photo with superior dynamic range. Before we set out, selecting the appropriate camera and lenses is crucial. We want a camera capable of Auto Exposure Bracketing (AEB) to ensure our exposures span the needed range. We must delve into our camera settings to configure bracketing correctly. Our goal here is to capture bracketed images-usually a set of three to five-that vary in shutter speed while keeping the aperture constant. To achieve alignment between our bracketed shots, a tripod is non-negotiable. Using a sturdy tripod ensures our camera remains stable and our images are free from misalignment, which can complicate the merging process later.
Exposure Value (EV) determines the brightness or darkness of a photo and is crucial when creating bracketed exposures. We use different EV settings to capture multiple photographs of the same scene at varying brightness levels, which we will later merge into a single HDR image. Bracketing exposures means taking several shots of the same subject using different exposure settings. Our aim is to capture the complete spectrum of light, from the darkest shadows to the brightest highlights. By bracketing exposures, we ensure that no part of our scene is lost to excessive darkness or lightness. When we set our camera for overexposing a shot, we increase the EV value; this allows more light to hit the camera's sensor, capturing details hidden in shadows. Using these techniques effectively requires practice and understanding of your camera’s exposure settings.
The minimum number of photos for a bracketed set should be three. Varying the shutter speed is the primary method to create different exposures, while keeping the aperture constant is essential for maintaining depth of field. If your HDR bracketing is less than 3.0 stops in total separation (-1.5, 0, +1.5), you can often use only the darkest and brightest exposures to generate an HDR. Capturing the middle exposure, or zero exposure, is not strictly necessary for generating a quality exposure blend in such cases. If you are a photographer using the ± 1.5 exposure bracket, you can indeed ignore the zero or middle exposure. This approach helps in faster rendering and improves alignment odds in the resultant HDR by reducing the chances of potential camera movement between the exposures. If you are a 5-shot ± 4.0 stop shooter, you can now potentially drop from 5 shots to 4 shots for merging and processing HDR.
It is important to make sure that nothing is moving in the scene when capturing bracketed exposures, as HDR processing works only with differently exposed images of the identical scene. Moving objects found in other images will be removed during the merging process, but it's best to avoid them if possible for cleaner results. Capturing images with exposure changes that are too small (e.g., only one or two f-stops apart) can produce lower-quality results because the dynamic range captured might not be sufficient. The goal is to have distinct differences in light capture in each frame, ensuring that details present in one exposure are not lost in the next.
Merging Exposures in Photoshop: The Merge to HDR Pro Workflow
In Adobe Photoshop, we have the capability to blend multiple exposures into a single High Dynamic Range (HDR) image using a feature known as Merge to HDR Pro. Merge to HDR Pro in Photoshop allows us to create HDR images by combining several photographs taken at varying exposures. The feature provides a way to reproduce a greater range of luminosity than what is possible with standard digital imaging techniques. We'll begin with bracketed images, which are a series of photos of the same subject taken at different exposure levels.
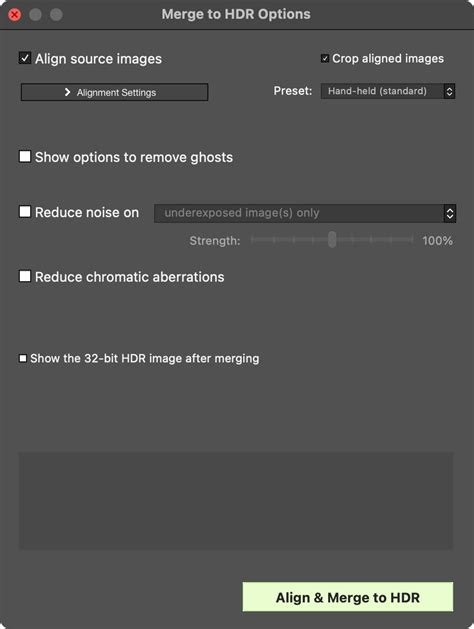
To initiate the process, navigate to File > Automate > Merge to HDR Pro. You can then add your bracketed images by clicking "Add Open Files," or by choosing Use > Folder to select a directory containing your images. Once your images are loaded, Photoshop will present the Merge to HDR Pro dialog box. Here, you can select a preset or begin manual adjustments. The "Remove Ghosts" checkbox is particularly useful during the Merge to HDR Pro process, as it ensures that changes or movements between your bracketed shots don't appear as translucent or ghostly images in the final HDR photo. This feature automatically detects and attempts to align or blend out moving elements.
Within the Merge to HDR Pro dialog, you'll find various controls to refine your HDR image. The "Preview" area allows you to see the effects of your adjustments in real-time. You can adjust the white point preview of the merged image by moving the slider below the histogram. This preview adjustment is stored in the HDR file and applied whenever you open the file in Photoshop. You can also choose to work with the image in 32-bit mode initially, which can store all the HDR image data. Photoshop allows us to work in different bit depths, notably 16-bit and 32-bit modes, which provide a wider range of colors and more gradation than the standard 8-bit. Converting from 32-bit to lower bit depths (16- or 8-bit) requires careful management of exposure and contrast.
The "Toning Curve" displays an adjustable curve over a histogram, showing luminance values in the original, 32-bit HDR image. By default, the Toning Curve and Histogram limit and equalize your changes from point to point. To remove this limit and apply more extreme adjustments, you can select the "Corner" option after inserting a point on the curve, allowing for more drastic tonal shifts. You can also choose to save a custom response curve by clicking the response curve menu in the upper-right corner of the Merge to HDR Pro dialog and selecting "Save Response Curve." This allows you to apply the same tonal adjustments to future HDR merges.
How to create better HDR photos in Photoshop
Refining Your HDR Image: Post-Merge Adjustments in Photoshop
After merging your bracketed exposures, the journey to a stunning HDR image is far from over. Adjusting an HDR image in Photoshop after merging allows us to fine-tune the details, ensuring that the final photograph matches our creative vision. When working with HDR images, setting the correct bit depth is critical for maintaining high-quality detail. While the initial merge might be in 32-bit, you'll likely want to convert it to a 16-bit or even 8-bit image for further editing and output, as many Photoshop tools and filters work best with these bit depths. This conversion process requires managing exposure and contrast to preserve as much detail as possible.
To enhance the tonal range of our HDR images, we must master Photoshop's powerful adjustment tools, particularly Curves and Levels. With Curves, we can pinpoint specific tonal ranges and adjust them with precision, making subtle shifts in highlights, shadows, or midtones. This offers granular control over the image's luminosity. Layers are one of the most powerful features in Adobe Photoshop, offering the ability to edit non-destructively. We use adjustment layers to individually tweak the HDR images' color balance, exposure, and other properties without permanently altering the original layer. This non-destructive workflow is crucial for experimentation and refinement.
Tone mapping is essential in displaying our HDR images on devices with limited dynamic range, such as standard computer monitors or prints. We utilize this process to convert the broad range of luminance in an HDR image into something more manageable and visually appealing for these output mediums. For greater control over specific areas of our HDR image, we embrace local adaptation. This technique allows us to finely adjust tones and details within localized regions, enhancing contrast and bringing out subtleties often lost in uniform adjustments. Luminosity masks offer us a high level of detail control, working on the principle that different areas of the image have varying levels of brightness. By creating layers based on these luminosity levels, we can make selective adjustments without affecting the entire image.
After crafting your HDR photo through blending multiple exposures in Photoshop, the next crucial steps involve finessing colors, honing details, and preparing the image for output. To start, we ensure color fidelity in our HDR photos by correcting any color imbalances and adjusting saturation levels. For precise control, we use Photoshop's Camera Raw filter to fine-tune the hues and vibrancy. Our goal here is to draw attention to the details without introducing unwanted noise or creating an overly artificial look.
Leveraging the Adobe Ecosystem for HDR Workflows
In our exploration of HDR photography, it's paramount to understand how Adobe's ecosystem seamlessly integrates HDR capabilities. Adobe Camera Raw (ACR), Lightroom, and the Creative Cloud suite offer robust tools for creating and enhancing HDR images. When we begin the HDR process, Adobe Camera Raw (ACR) is often our first stop. ACR allows us to make preliminary adjustments to the exposure, contrast, and color of our RAW files before merging. Using ACR's powerful editing capabilities, we ensure each exposure is optimized for the HDR merge.
We also appreciate the harmony between Photoshop and Lightroom when managing our HDR workflow. Lightroom's "Photo Merge" feature enables us to combine our bracketed photos seamlessly before sending them to Photoshop for detailed adjustments. This streamlined approach can significantly speed up the HDR creation process, especially for those who prefer Lightroom's cataloging and initial processing capabilities.
Lastly, diving into Adobe Creative Cloud broadens our creative spectrum. Here, we have access to a suite of applications and services that offer various ways to refine and apply creative touches to our HDR images. Whether we’re adding finishing touches in Photoshop, utilizing the vast library of effects within Creative Cloud, or even exploring AI-powered enhancement tools, our HDR images can truly stand out and achieve a professional, polished look.
Advanced Techniques and Considerations
When working with HDR images, especially in 32-bit mode, understanding the HDR Color Picker is beneficial. This tool allows you to select and adjust a foreground color in relation to different exposure settings within the HDR image, providing a more accurate representation of how colors will appear across the dynamic range. The Preview area of the HDR Color Picker helps you select and adjust a foreground color in relation to different exposure settings in the HDR image. You can set specific stop increments for preview swatches, allowing for precise color sampling across various brightness levels.
While Photoshop's Merge to HDR Pro is a powerful tool, it's worth noting that you can also combine different exposure layers manually in Photoshop to create an HDR effect, though this is a more labor-intensive process. HDR toning in Photoshop allows for precise control over the HDR effect with a range of adjustable parameters, offering an alternative to the automated merge. Creating an HDR image in Lightroom, on the other hand, is often a more streamlined process, ideal for quick and natural-looking results.
It's also important to be aware of potential pitfalls. If your bracketed exposures are too close together, the resulting HDR might not offer a significant improvement. Conversely, if the scene contains a lot of movement, ghosting can become a significant issue, making the "Remove Ghosts" feature essential. Overdoing the HDR effect can lead to surreal, unnatural-looking images, which has become a trendy aesthetic for some photographers, but it's crucial to understand that the primary goal of HDR is often to more accurately represent the scene as perceived by the human eye.
We finish by preparing our HDR images for their final destination, whether it's print, web, or display. This involves ensuring the image is correctly sized, color-corrected for the intended output medium, and saved in an appropriate file format. HDR photography enhances images to reflect a broader dynamic range of luminosity, and with the tools available in Photoshop, photographers can achieve stunning results that truly capture the essence of a scene.