Adobe Illustrator, a cornerstone for vector graphics design, offers robust tools for creating and manipulating artboards, the canvases upon which your digital creations take shape. For designers working on large-scale projects, such as banners, murals, or intricate architectural plans, understanding how to effectively manage and resize artboards is paramount. This guide delves into the intricacies of creating and adjusting large artboards in Illustrator, ensuring your workflow remains seamless and your designs are export-ready, regardless of their dimensions.
Understanding the Canvas and Artboard Distinction
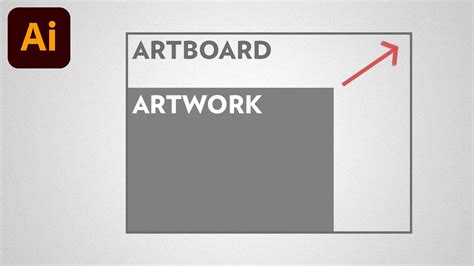
Before diving into the mechanics of resizing, it's crucial to differentiate between the canvas and the artboard in Adobe Illustrator. The artboard is the specific area where you actively create and arrange your design elements; it's the printable or exportable region of your document. Conversely, the canvas refers to the larger, often black, background space that surrounds your artboard. While the canvas provides a visual workspace, it is the artboard that defines the final output dimensions.
The Evolution of Large Canvas Capabilities
Adobe Illustrator has progressively enhanced its capabilities for handling large-scale artwork. The introduction of the "large canvas" feature, particularly with updates to version 24, significantly expanded the potential dimensions for artboards. Previously, a common limit might have been around 227 inches in width. However, with these advancements, Illustrator now allows for much larger workspaces, with a notable maximum limit of 2270 x 2270 inches. This represents a tenfold increase in potential width, enabling designers to work on expansive projects that were previously challenging or impossible within the software. This substantial increase in canvas size is a game-changer for those involved in creating graphics for various formats, especially for large-scale applications.
Navigating the Artboard Tool
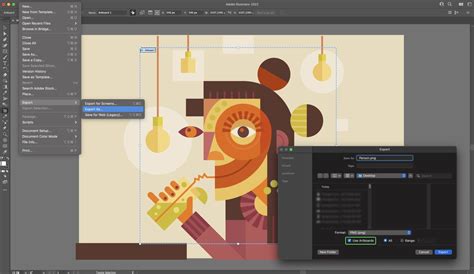
At the heart of artboard manipulation lies the Artboard Tool. This dedicated feature allows users to precisely control the size and position of their artboards. To access it, simply press Shift + O on your keyboard. Once activated, you can either manually drag the bounding box of the artboard to resize it, or you can input specific numerical dimensions for greater accuracy.
Manual Resizing with the Artboard Tool
When the Artboard Tool is active, clicking on an existing artboard will highlight its bounding box. You can then click and drag the corner or side handles to visually adjust the artboard's dimensions. This method is intuitive for quick adjustments or when an exact numerical value isn't critical.
Numerical Input for Precision
For designers requiring exact dimensions, the Artboard Tool also offers precise numerical input. After selecting the Artboard Tool and clicking on your desired artboard, you will find options in the Control bar at the top of the window or within the Properties panel. Here, you can directly enter the desired width and height values for your artboard. This is particularly useful for adhering to specific print specifications or project requirements.
Leveraging the "Scale Artwork with Artboard" Feature
A significant advancement in recent Illustrator versions (specifically noted in Adobe Illustrator 2025, though its origins trace back to earlier updates) is the "Scale Artwork with Artboard" feature. This functionality dramatically simplifies the process of resizing your designs in tandem with the artboard itself, saving considerable time and effort.
Activating "Scale Artwork with Artboard"
To utilize this powerful feature:
- Select the Artboard Tool (Shift + O) to enter artboard editing mode.
- Click on the artboard you wish to resize.
- In the Control bar or the Properties panel, locate and activate the "Scale Artwork with Artboard" button. This button will typically darken when activated.
When this setting is enabled, any changes made to the artboard's dimensions will automatically scale the artwork contained within it proportionally. This prevents elements from becoming misaligned or requiring manual resizing after the artboard has been adjusted.
Controlling the Scaling Origin Point
The 9-block icon (also known as the reference point or anchor point) in the Properties or Control bar plays a crucial role when scaling. By selecting a specific point within this icon, you determine the origin from which the scaling will occur. You can choose to scale from the center, from the sides, or from the corners of the artboard. This offers granular control over how your artwork resizes in relation to its new artboard dimensions.
Important Considerations for Patterns and Strokes
When scaling artwork that includes pattern fill swatches, it's essential to ensure patterns scale correctly. Navigate to Preferences > General and check the "Transform Pattern Tiles" option. This setting ensures that the pattern elements within a swatch resize proportionally with the artboard.
It's also important to note that the "Scale Strokes and Effects" preference setting in Illustrator is ignored by the "Scale Artwork with Artboard" feature. This means that stroke weights and effects will always scale along with the artwork. If your project demands fixed stroke weights (e.g., technical drawings), you will need to manually adjust these after the scaling operation.
Preparing Your Artwork for Resizing
For the "Scale Artwork with Artboard" feature to function optimally, certain conditions regarding your artwork should be met:
Ensure Artwork Touches the Artboard
If your artwork does not physically touch the boundaries of the artboard, it will not be included in the scaling process. Always ensure that your design elements extend to or beyond the artboard edges if you intend for them to be resized with the artboard.
Image Resolution is Key
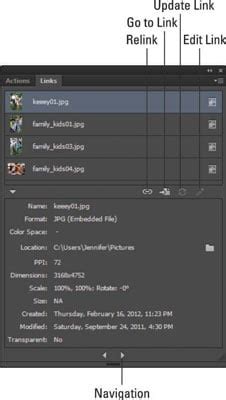
When scaling artwork that includes raster images, be mindful of their original resolution. Scaling up raster images will inevitably decrease their resolution, potentially leading to pixelation and a loss of quality in the final output. Before enlarging, check the image resolution. Select the image and look for resolution information in the Control bar, or open the Links panel via Window > Links for detailed information. It is always best to start with images that have sufficient resolution for the intended final size.
Review Text Elements After Scaling
Scaling text can sometimes result in decimal font sizes. While Illustrator handles this, it's good practice to review your text elements after resizing to ensure consistency and readability. In some cases, you might need to round font sizes to the nearest whole number or adjust leading and kerning for optimal typographic appearance.
Potential Pitfalls and How to Avoid Them
While the "Scale Artwork with Artboard" feature is a significant time-saver, there are common mistakes that can lead to undesirable results. Being aware of these can help you avoid them:
Forgetting to Enable "Scale Artwork with Artboard"
This is perhaps the most common oversight. If this setting is not activated, resizing the artboard will not affect the artwork, leading to elements being misaligned or falling outside the new artboard boundaries. Always double-check that the feature is enabled before initiating an artboard resize.
Unintentionally Scaling Strokes and Effects
As mentioned earlier, the "Scale Artwork with Artboard" feature will scale strokes and effects regardless of your general preferences. If your artwork requires fixed stroke weights (e.g., for technical diagrams, blueprints, or certain branding guidelines), you must manually adjust these stroke thicknesses after scaling the artboard. This might involve applying a "Uniform" scaling to strokes or manually resetting their weights.
Resizing Without Locking Proportions
When manually inputting dimensions for an artboard, it's crucial to maintain the correct aspect ratio unless specifically intended otherwise. Ensure the Constrain Proportions link icon is enabled in the Control bar or Properties panel when entering new width or height values. This prevents the artboard from becoming distorted.

Overlapping Surrounding Artboards
If your Illustrator document contains multiple artboards, resizing one artboard can potentially cause it to overlap with adjacent ones. Before scaling, consider the arrangement of your artboards. You can use the "Move Artwork with Artboards" button in conjunction with the Artboard Tool to reposition other artboards if necessary. Carefully checking the reference point setting will also help manage how artboards shift in relation to each other.
Working with Different Illustrator Versions and File Compatibility
The introduction of the large canvas feature is a relatively recent development in Illustrator's history. The large canvas capability was introduced around June 2020 with the ".2" update to Illustrator version 24. While this is a significant improvement, it's important to consider file compatibility when working with older versions of Illustrator or when sharing files with collaborators using different software.
Saving Down to Older Versions
If you save a large canvas Adobe Illustrator file to a version earlier than version 24, the artwork will be scaled down to 10% of its original size. This is because older versions of Illustrator do not support the larger canvas dimensions. When saving, you cannot select specific CC versions to save down to; you can only choose broader compatibility ranges (e.g., CS6, or even older versions like 3). Features exclusive to newer versions, like the expanded canvas size, will not be preserved. Artwork would need to be simplified or adjusted accordingly to be compatible with the target older file version.
Compatibility with Other Design Software
Different design applications have their own limitations and methods for handling canvas and artboard sizes. For instance, Photoshop has its own image/canvas size limits, which are quite substantial (currently around 300,000 x 300,000 pixels). However, Photoshop's effects gallery can become unavailable for very large dimensions (around 200" at 150dpi).
When dealing with specialized plugins or workflows, such as those used in large-format printing or cutting, be aware of how they interpret Illustrator files. For example, some cutting software might read files with large artboards as being at a 1/100 scale, which can lead to unexpected tiny output if not accounted for. This is sometimes due to what is perceived as "PDF scale trickery" rather than a true increase in the underlying file structure's scale.
Creating Large Canvas Files from Scratch
To create a large canvas file from the outset:
- Go to File > New.
- In the New Document dialog box, enter a width or height that exceeds the default size (i.e., greater than 227 inches). For instance, you could input 2270 inches.
- Customize other settings such as units, color mode, and the number of artboards as needed.
- Select Create. Illustrator will then generate your new document with the specified large canvas dimensions.
Create Multiple Artboards in Adobe Illustrator
This approach ensures that your project starts with the necessary space, allowing you to design large-scale artwork from the beginning without constraints.
Conclusion
Mastering the creation and manipulation of large artboards in Adobe Illustrator is an essential skill for designers working on expansive projects. By understanding the distinction between canvas and artboard, utilizing the powerful Artboard Tool, and leveraging the "Scale Artwork with Artboard" feature, you can streamline your workflow and ensure your designs are perfectly scaled and positioned. Always be mindful of image resolution, stroke scaling, and file compatibility to avoid common pitfalls. With these techniques, you can confidently tackle any large-scale design challenge Illustrator throws your way.