Creating transparent images in Photoshop is a valuable skill for graphic designers and photographers alike. This capability allows for the seamless integration of elements into various design projects, from marketing materials and social media graphics to e-commerce product displays and web design. Adobe Photoshop offers a powerful set of tools for image editing and creation, and understanding how to manipulate transparency is fundamental to leveraging its full potential. This guide will delve into the various techniques and considerations involved in achieving transparency, from basic background removal to advanced blending effects.
The Foundation of Transparency: Understanding Layers in Photoshop
Layers are the bedrock upon which transparent images are built in Photoshop. Think of layers like transparent sheets stacked on top of each other. Each layer can contain different elements of an image-text, shapes, or photographs-and their stacking order dictates how they interact. This layered approach is what enables selective visibility and, consequently, transparency.
To begin a new project in Adobe Photoshop, we click "File" then "New" in the top menu. We can choose from preset sizes or enter custom dimensions. The Photoshop interface consists of several key panels and tools. The Properties panel adapts to our selected tool or layer, providing relevant options and adjustments. On the left, we find the Tools panel with various editing instruments. The Move tool helps position elements, while selection tools like the Magic Wand allow us to isolate parts of an image.
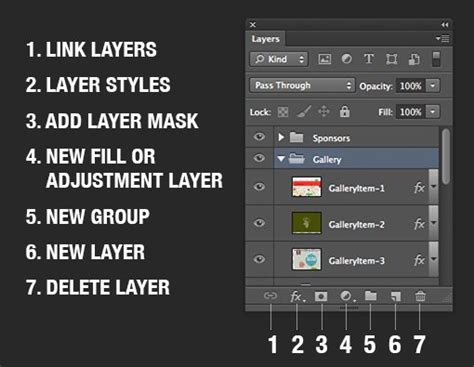
Crucially, to start working with transparency effectively, we often need to convert the background layer to a regular layer. This is typically done by double-clicking the "Background" layer in the Layers panel and assigning it a new name. Layers in Photoshop can be duplicated by right-clicking on a layer and selecting "Duplicate Layer" or using the keyboard shortcut Ctrl+J (Cmd+J on Mac). To rearrange layers, we simply click and drag them up or down in the Layers panel, altering their visual hierarchy. The eye icon next to each layer in the Layers panel allows us to toggle its visibility, giving us a clear view of individual elements or the composite image.
Isolating Subjects: Essential Selection Tools for Transparency
The core of creating a transparent image lies in accurately isolating the subject from its background. Photoshop provides a robust suite of selection tools, each suited to different scenarios.
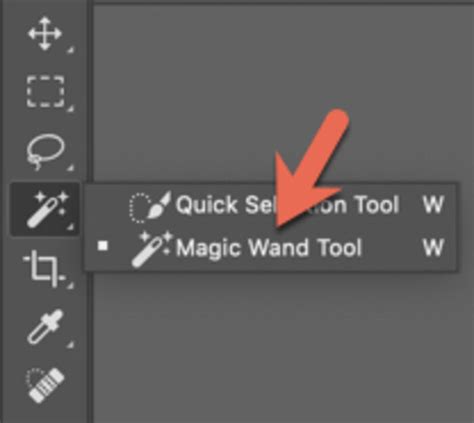
Magic Wand Tool: Selecting by Color
The Magic Wand tool is excellent for selecting areas with similar colors. When you click on an area, it selects adjacent pixels of a similar hue. We can adjust the "tolerance" to control how closely colors must match. A lower tolerance selects a narrower range of colors, while a higher tolerance selects a broader range. The "Contiguous" option, when checked, limits the selection to adjacent areas with similar colors. If unchecked, it will select all pixels of that color range throughout the entire image. To use the Magic Wand, we click on the area we want to select.
Quick Selection Tool: Painting Your Selection
The Quick Selection tool allows us to paint our selection quickly. It works by analyzing color and texture to intelligently guess the area we want to select. As you drag your cursor over an image, Photoshop dynamically expands the selection to include areas with similar tones and textures. This tool is particularly effective for subjects with well-defined edges.
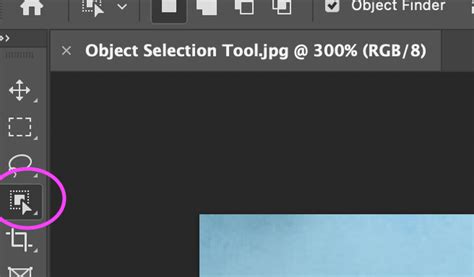
Object Selection Tool: AI-Powered Precision
In the latest Photoshop version, the Object Selection tool uses artificial intelligence to identify and select entire objects within an image. You can either draw a rectangle or lasso around the object you want to select, and Photoshop's AI will do the heavy lifting of isolating it. This tool can significantly speed up the selection process for clearly defined subjects.
Pen Tool: Unparalleled Precision for Complex Shapes
For highly precise selections, especially around intricate details or complex curves, the Pen tool is the professional's choice. It allows you to create paths by strategically placing anchor points and adjusting curve handles. While it has a steeper learning curve, the accuracy it offers is unmatched, making it ideal for tasks like isolating hair or fine-grained textures.
Lasso Tools: Manual Control for Irregular Selections
The Lasso tool offers manual control for creating freehand selections. There are three variations: the standard Lasso tool for freehand drawing, the Polygonal Lasso tool for creating selections with straight lines, and the Magnetic Lasso tool, which attempts to snap to edges in the image as you move your cursor. These tools are useful when you need to make manual adjustments or select irregular shapes that automated tools might miss. We can combine Lasso tools with other selection methods for more refined results.
Removing Backgrounds: From Quick Actions to Refined Edges
Once a subject is selected, removing the background is the next critical step. Photoshop offers several methods, ranging from automated features to manual refinement.
Photoshop's Quick Actions: One-Click Background Removal
Photoshop's Quick Actions provide a fast way to remove backgrounds. To use it, we select the layer containing our image and click "Remove Background" in the Properties panel or the Quick Actions section. For images with clear contrast between the subject and background, this method works exceptionally well and is often the fastest route. Adobe Sensei-powered tools automatically remove backgrounds in the Layers panel.
Refine Edge Tool: Precision for Complex Details
When Quick Actions or other selection tools don't provide perfect results, especially around areas like hair or fur, we turn to the Refine Edge tool (often found within the "Select and Mask" workspace) for more precise control. This tool analyzes the contrast and texture in these challenging areas to create a more accurate selection. We can adjust settings like "Smooth," "Feather," and "Contrast" to further improve the selection quality. The Refine Edge brush within the "Select and Mask" workspace is crucial for hair and fur. Access it via Select > Select and Mask.
11 Shortcuts to Remove Background in One Click! - Photoshop Tutorial
Creating Transparency: Beyond Simple Background Removal
Transparency in Photoshop isn't limited to just removing backgrounds. It can also be used to create partial transparency, layered effects, and dynamic text.
Layer Masks: Non-Destructive Transparency Control
Layer masks are powerful tools for creating transparent areas in an image without permanently deleting pixels. When you add a layer mask to a layer, a white thumbnail appears next to the layer thumbnail in the Layers panel. White areas of the mask reveal the layer content, while black areas hide it. We can paint on the mask with black or white brushes to hide or reveal parts of the layer, offering a non-destructive way to control transparency. Using a large, soft brush with black as the foreground color, we paint on the mask where we want transparency.
Blending Modes: Creative Transparency Effects
Layers in Photoshop can interact with each other in numerous ways through blending modes. These modes determine how a layer's pixels blend with the pixels of the layers beneath it. Hovering over blend modes in the Layers panel allows you to see a real-time preview of how each mode affects your layer, removing guesswork and making it easier to choose the right effect. Blending modes can create various special effects, from subtle overlays to dramatic transformations.
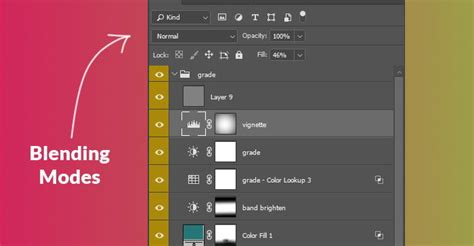
Fill Opacity vs. Opacity: Nuances of Transparency
It's important to distinguish between "Opacity" and "Fill Opacity" in Photoshop. "Opacity" affects the entire layer, including layer styles. "Fill Opacity," on the other hand, affects only the fill of the layer itself, leaving layer styles unaffected. This distinction is particularly useful when creating effects like partially transparent text.
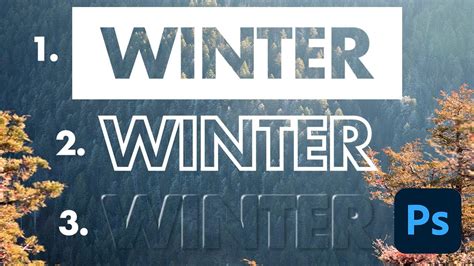
Transparent Text: Making Text a Window to Your Image
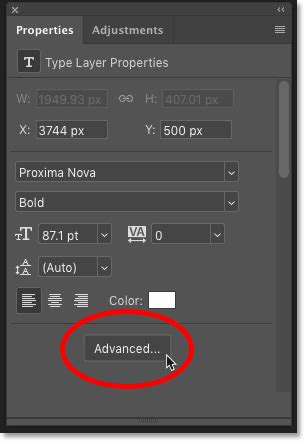
Creating transparent text in Photoshop allows the image behind the text to show through the letters. This is an excellent technique when you need to add text to an image but there's no ideal place for it. We start by adding a new layer above the image and filling it with white. Then, we add our text. To make the text transparent, we use Photoshop’s Advanced Blending options. In the Layer Style dialog box, under the Advanced Blending section, changing "Knockout" from "None" to "Shallow" makes the text itself transparent, as well as the area on the layer directly below it, as if the text punched a hole through it. We can then adjust the opacity of the white-filled layer to fine-tune the visibility and readability of the text.
Blend If: Luminosity-Based Transparency
For creating partial transparency based on luminosity, the "Blend If" feature is a powerful tool. This advanced technique allows you to control how a layer blends with the layers below it based on the brightness values of the pixels. It's incredibly useful for creating subtle overlays or integrating elements more seamlessly into existing images.
Saving and Exporting Transparent Images: Preserving Your Work
Once you've achieved the desired transparency, it's crucial to save and export your image correctly to preserve these transparent areas.
PNG Format: The Standard for Web Transparency
When working with transparency, the Portable Network Graphics (PNG) format is generally the preferred choice, especially for web use. PNG supports alpha transparency, meaning it can handle varying levels of opacity, allowing for smooth gradients and intricate transparent details. Select PNG format when exporting to ensure your transparency is maintained.
GIF Format: Limitations of Transparency
While Graphics Interchange Format (GIF) also supports transparency, it has limitations. GIFs only support binary transparency, meaning a pixel is either 100% transparent or not transparent at all. There is no in-between for partial transparency. Therefore, for most applications requiring nuanced transparency, PNG is superior.
Exporting for Web and Beyond
To export a transparent image as a PNG in Photoshop, we navigate to "File" > "Export" > "Quick Export as PNG" or "Export As…" for more control over settings like transparency, color space, and file size. For web use, we recommend sticking with PNG.
Advanced Techniques and Applications of Transparency
Mastering transparency in Photoshop involves honing your workflow and exploring advanced techniques for creative and practical applications.
Creating Composite Images
Transparent images are essential for creating composite images by combining multiple layers with varying levels of opacity. This allows for the creation of surreal dreamscapes, collages, and layered artistic effects. By blending images, adding textures, and using effects like double exposure, you can craft unique art and branded assets.
Product Photography and E-commerce
Making product images transparent is crucial for e-commerce. It allows for consistent branding across different platforms and enables customers to see products clearly without distracting backgrounds. We use transparency to create 360-degree product views, allowing customers to see items from all angles. Transparent images also enable easy creation of product mockups.
Marketing and Social Media Graphics
Transparent backgrounds are frequently used in marketing to create eye-catching designs that stand out. Transparent elements add depth to social media graphics, making them more engaging and professional.
Scripting for Bulk Transparency
For designers working with large volumes of images, Photoshop allows for scripting to automate tasks. You can create a script that takes a set of images and applies specific actions, including making backgrounds transparent, to all of them. To run a script, use File > Scripts > Browse… in Photoshop and select the script file.
Efficiency and Workflow for Transparency
Efficiency is key when working with transparent images. Utilizing keyboard shortcuts and understanding tool behaviors can significantly speed up your workflow.
Keyboard Shortcuts for Quick Adjustments
- Eraser Tool (E key): For quick transparency adjustments.
- Number Keys: For precise opacity control. Pressing '5' sets the opacity to 50%, '7' for 70%, and so on. This applies to the active tool's opacity or flow, and also to layer opacity when no tool is specifically active.
Utilizing AI for Faster Isolation
Leveraging AI-powered tools like the Object Selection tool and automatic background removal features can dramatically reduce the time spent on initial isolation. These tools, with a little help from AI, can automatically isolate any subject from a distracting background.
Non-Destructive Editing with Masks
Always prioritize using layer masks over direct deletion when creating transparency. This non-destructive approach allows you to revisit and refine your selections and transparency at any point without permanently altering the original image data. Mask layers allow you to hide and reveal selected portions of your background nondestructively.
By mastering these techniques, you can unlock the full potential of transparency in Photoshop, enabling you to create professional, engaging, and versatile visual content for a wide range of applications.