Photoshop stands as a cornerstone in the digital photography workflow, often representing the final, transformative stage after the shutter has clicked. It is a powerful yet remarkably intuitive tool that empowers photographers to elevate their images from good to exceptional. For any serious photographer aiming to unlock the full potential of their captures, a solid understanding of how to edit pictures with Photoshop is not just beneficial, but essential. This tutorial will guide you through the fundamental steps and advanced techniques to bring your photographs to life, covering everything from basic adjustments to sophisticated retouching.
The Foundation: Importing and Initial Adjustments
The journey into Photoshop editing begins with importing your photograph. Once your image is open, the first critical step is often to assess and refine its composition.
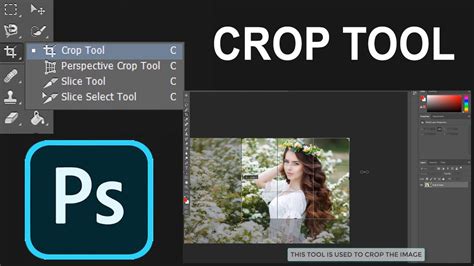
Cropping for Impact
Sometimes, the most profound improvements come from the simplest actions. Cropping, while seemingly minor, can dramatically alter a photograph's composition, guiding the viewer's eye and eliminating distractions. Even an image that appears perfect at first glance can benefit from a well-considered crop, which can refine focus and enhance the overall aesthetic appeal.
Achieving Perfect Exposure
Despite meticulous efforts behind the camera, achieving ideal exposure can sometimes be challenging. Overexposed images can wash out details, particularly in skin tones, while underexposed images may appear too dark, losing richness. Photoshop offers a suite of tools to rectify these issues.
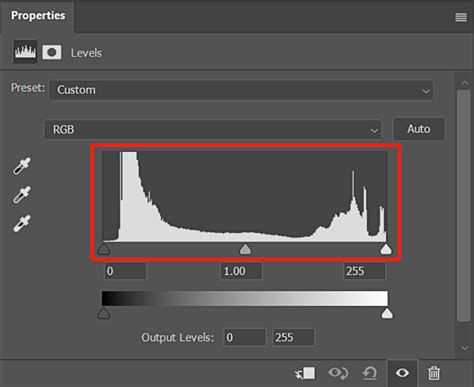
Brightness/Contrast, Exposure, and Shadows/Highlights are straightforward sliders that allow for intuitive adjustments. For more precise control, understanding and utilizing a histogram is invaluable. This visual representation of tonal distribution aids in making accurate adjustments, especially when working with advanced tools like HDR Toning, Curves, and Levels, which are favored by experienced professionals for their nuanced control over exposure.
Color Correction: Restoring Accurate Hues
While proper white balance settings in-camera can minimize the need for extensive color correction, Photoshop provides robust tools to fine-tune hues and ensure color accuracy. If your image possesses an unwanted color cast, such as a blue tinge, Photoshop can help neutralize it or create a desired aesthetic.
The recommended approach for color adjustments is to utilize adjustment layers. This method preserves the original image data, allowing for non-destructive editing and the flexibility to revisit and modify changes later. To create an adjustment layer, navigate to the Layers panel, click the Adjustment Layer icon, and select your desired adjustment type. Alternatively, you can access these options via the Layer > New Adjustment Layer menu. Tools such as Vibrance, Hue/Saturation, and Channel Mixer offer comprehensive control over color. Furthermore, Photoshop CC 2019 and later versions include a Color Wheel Color Picker, enabling visual selection of colors based on harmonies like complementary and analogous schemes, offering a more intuitive way to explore color palettes.
Color Correct with One Click | 1-Minute Photoshop (Ep. 5)
Refining Details: Selective Edits and Retouching
With the foundational exposure and color corrected, the focus shifts to refining specific areas of the image and addressing any imperfections.
Addressing Sensor Dust and Imperfections
Even the cleanest sensors can sometimes accumulate dust, leading to small, persistent spots in your photographs. Modern Photoshop versions are equipped with powerful tools to tackle these issues. The Content-Aware Fill option, for instance, intelligently analyzes the surrounding pixels to seamlessly remove unwanted elements, such as dust spots or even larger distractions.
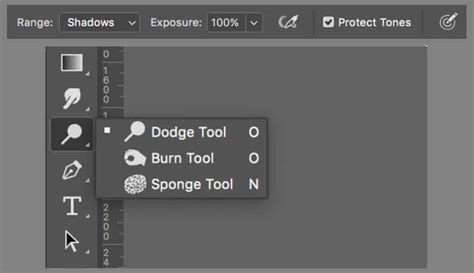
The Power of Local Adjustments: Dodge and Burn
A technique borrowed from traditional darkroom printing, "dodging" and "burning" allows for targeted lightening and darkening of specific areas within an image. Unlike global adjustments that affect the entire photograph, dodge and burn tools enable you to precisely paint light and shadow onto smaller regions, subtly sculpting the image and drawing attention to key subjects. This can be achieved by creating a new gray layer, setting its blend mode to "Color Dodge" or "Color Burn," and then painting with white or black, respectively, with a low opacity brush.
Object Removal and Spot Healing
Photoshop offers several tools for removing unwanted elements, from minor blemishes to significant distractions like power lines or photobombers. The Spot Healing Brush tool is exceptionally effective for quickly removing small spots and imperfections with a single click or stroke. For more complex removals where the surrounding texture is crucial, the Clone Stamp tool provides greater control. By sampling a reference area with the Alt/Option key and then painting over the unwanted object, you can meticulously reconstruct the background and achieve a believable result. Zooming in during these edits is crucial for ensuring a seamless integration.
Enhancing Definition and Aesthetics
Beyond correction, Photoshop offers tools to enhance the visual impact and overall aesthetic of your photographs.
The Art of Sharpening
Sharpening is a crucial step that adds definition to the edges of your subjects, making them appear crisper and more detailed. The necessity and degree of sharpening often depend on the intended viewing medium, whether it's a digital display or a print. A general rule of thumb in photo editing is to apply sharpening incrementally and sparingly, avoiding over-sharpening, which can introduce halos and an unnatural, artifacted appearance. Tools within the Camera Raw filter or the Unsharp Mask filter can be used for this purpose.

Vignettes for Focus
A subtle vignette, which involves darkening the edges of an image, can be an effective technique to draw the viewer's attention towards the center of the frame, enhancing the subject's prominence. This can be achieved through various methods, including using the Elliptical Marquee tool in conjunction with a feathered selection and an exposure adjustment, or more directly within filters like Camera Raw.
Advanced Techniques and Workflow Best Practices
As you become more proficient, exploring advanced features and adopting a strategic workflow will significantly enhance your editing capabilities.
The Power of Layers and Layer Masks
Working with layers is fundamental to a non-destructive editing workflow in Photoshop. Layers act like transparent sheets stacked upon one another, allowing you to apply edits to individual elements without permanently altering the base image. Each adjustment, retouching step, or added element can reside on its own layer, providing unparalleled flexibility.
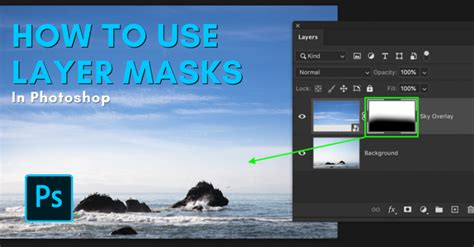
Layer masks are equally critical. They allow you to selectively reveal or conceal parts of a layer, enabling precise control over where an adjustment or effect is applied. By painting with black, white, or shades of gray on a layer mask, you can define the opacity and visibility of the layer's content, creating sophisticated composite images and targeted edits. For instance, you can apply a sky replacement only to the sky area by using a mask.
Smart Objects and Smart Filters
Smart Objects are special layers that preserve the original image data, allowing for non-destructive transformations and filter applications. When you convert a layer to a Smart Object, any filters applied to it become "Smart Filters." This means you can re-edit, adjust, or even disable these filters at any time without degrading the image quality. This is particularly useful for experimentation and for ensuring that your edits remain flexible throughout the post-processing phase.
Utilizing Adjustment Layers
Adjustment layers, as mentioned earlier for color correction, are a cornerstone of non-destructive editing. They provide a dedicated layer for tonal and color adjustments, such as Brightness/Contrast, Levels, Curves, Hue/Saturation, and Vibrance. These adjustments can be applied globally or selectively using layer masks, offering immense control over the image's appearance.
Neural Filters: AI-Powered Editing
Photoshop's Neural Filters leverage Adobe Sensei AI technology to automate complex edits with remarkable speed and accuracy. These smart filters can perform tasks like skin smoothing, colorization of black and white photos, style transfer, and even depth adjustments, significantly streamlining the editing process for certain tasks.
Color Correct with One Click | 1-Minute Photoshop (Ep. 5)
Understanding Resolution and File Formats
When preparing images for different outputs, understanding resolution and file formats is crucial.
Resolution for Print and Web
Resolution, measured in pixels per inch (PPI), determines the detail and quality of an image. For web use, a resolution of 72 PPI is generally sufficient. However, for printing, higher resolutions, typically 300 PPI, are required to ensure sharp and detailed prints. Photoshop's Image > Image Size menu allows you to check and adjust the resolution of your image.
Saving Your Work: PSD, JPEG, PNG, and TIFF
Photoshop offers various saving options, each suited for different purposes.
- PSD (Photoshop Document): This is Photoshop's native format and preserves all layers, masks, and editing information, making it ideal for ongoing work.
- JPEG (Joint Photographic Experts Group): A widely used format for photographs, offering good compression for smaller file sizes, suitable for web and sharing. However, it is a "lossy" format, meaning some quality is lost with each save.
- PNG (Portable Network Graphics): Supports transparency and is a lossless format, making it excellent for graphics with sharp edges or transparent backgrounds.
- TIFF (Tagged Image File Format): A high-quality, lossless format often used for professional printing and archiving, as it can retain layers and is suitable for high-resolution images.
When saving, it's often beneficial to save a master PSD file for future edits and then export copies in formats like JPEG or PNG for specific uses.
Workflow and Shortcuts for Efficiency
Developing an efficient workflow and mastering keyboard shortcuts can significantly speed up your editing process.
A Sample Workflow
A common and effective workflow involves the following steps:
- Import and Assess: Open your image in Photoshop.
- Compositional Adjustments: Use the Crop tool for framing and the Straightening tool to level horizons. Perform any necessary retouching or object removal at this stage.
- Exposure and Tone: Utilize adjustment layers (Levels, Curves, Exposure) and dodge/burn techniques to establish the correct brightness and contrast.
- Color Correction: Employ Hue/Saturation, Vibrance, or Color Balance adjustment layers to refine colors.
- Detail Refinement: Sharpen the image and perform any final local adjustments.
- Save: Save your work in a layered PSD format and export for intended use.
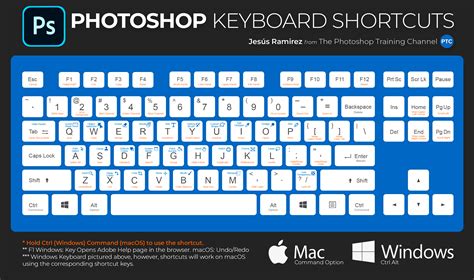
Essential Keyboard Shortcuts
Memorizing key shortcuts can dramatically improve your speed:
- Ctrl/Cmd + Z: Undo (toggle between last two states)
- Ctrl/Cmd + Alt/Option + Z: Step Backward (undo multiple steps in older versions, though newer versions have a History panel for this)
- B: Brush Tool
- V: Move Tool
- Ctrl/Cmd + T: Free Transform
- Ctrl/Cmd + J: Duplicate Layer
- Ctrl/Cmd + Shift + I: Inverse Selection
- Ctrl/Cmd + D: Deselect
Beyond the Basics: Continued Learning
Photoshop is a vast and evolving software, offering endless possibilities for creative expression. The techniques outlined here provide a strong foundation, but continued exploration is key to mastering its capabilities. Experimenting with different tools, exploring advanced tutorials on topics like compositing, creating cinemagraphs, or adding bokeh effects, and even delving into companion software like Adobe Lightroom, will further enhance your photographic artistry. Remember that patience and consistent practice are the most valuable assets in your Photoshop learning journey. The Creative Cloud Photography plan offers access to both Photoshop and Lightroom, ensuring you always have the latest features at your fingertips, whether on a computer or an iPad. While numerous alternatives exist, Adobe Photoshop remains the industry standard for a reason, providing a comprehensive and powerful suite for photographers of all levels. For those seeking a free entry point, the Photoshop Express app offers a streamlined mobile editing experience.