Layers in Adobe Photoshop are akin to transparent sheets, allowing for intricate editing and creative layering over an image or background. Among the most fundamental yet powerful transformations available is the ability to flip or mirror a layer. This technique is not merely for aesthetic purposes; it serves as a crucial tool for achieving a multitude of design objectives, from creating realistic reflections to establishing perfect symmetry. Understanding how to flip a layer in Photoshop is essential for any designer aiming to realize their ideas swiftly and effectively. This guide delves into the subtleties of these transformative techniques, exploring how to mirror a layer in Photoshop with finesse, and even how to reverse a selection for precision editing. Mastering these basic skills unlocks a vast potential for crafting mesmerizing compositions, symmetrical designs, and exciting visual effects.
Understanding the Concept: What Does it Mean to Flip a Layer in Photoshop?
At its core, flipping a layer in Photoshop is a transformative technique that mirrors or reverses the content of a specific layer either horizontally or vertically. This action fundamentally alters the orientation of the pixels within that layer.
When you perform a horizontal transformation, you effectively create a mirrored version of the layer's contents, as if viewing it in a reflection. This is particularly useful for achieving symmetrical compositions, correcting visual imbalances, or generating engaging visual effects that rely on duality. For instance, if you have a character facing left and need them to face right for a design, a horizontal flip is the direct solution.
Conversely, a vertical transformation produces an inverted version of the content, akin to turning it upside down. This can be incredibly useful for artistic projects and editing tasks, such as adjusting perspectives, crafting captivating compositions that play with gravity, or simulating water reflections.
Simply put, flipping a layer in Photoshop is a versatile tool that elevates your creative work, enabling exploration, experimentation, and the generation of fresh design possibilities. It's a foundational skill that, once mastered, allows for a deeper understanding of image manipulation and a more efficient workflow.
Step-by-Step Tutorial on How to Flip a Layer in Photoshop
The process of flipping a layer in Photoshop is straightforward and can be accomplished through a few intuitive steps.
Step 1: Locating the Layers Panel
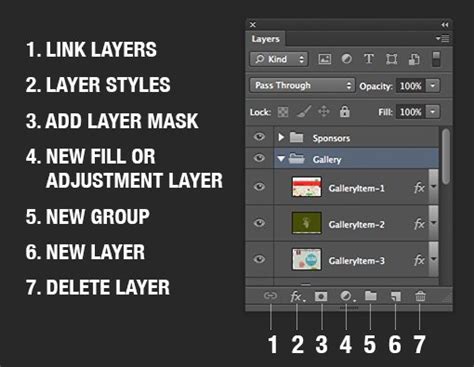
To begin, open your project in Photoshop. The Layers panel is your primary interface for managing individual layers. It is typically located on the right side of your screen. If it's not visible, you can access it by navigating to the Window menu and selecting Layers. This panel displays all the layers in your document, allowing you to select, organize, and edit them individually.
Step 2: Preparing the Layer for Flipping
In the Layers panel, it is crucial to select the specific layer you intend to flip. Ensure that the active layer contains the element or image you wish to mirror. A selected layer will be highlighted, indicating that any subsequent transformations will be applied solely to its contents.
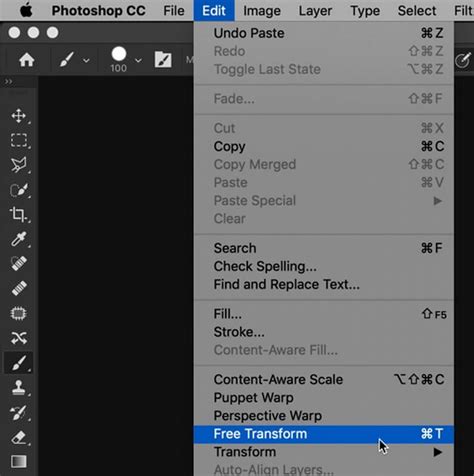
Step 3: Utilizing the Free Transform Tool to Mirror the Layer
The Free Transform tool is a versatile command that allows for a range of modifications, including flipping. With the desired layer selected, navigate to the Edit menu, then select Transform. Within this submenu, you will find options for flipping.
The two primary methods for flipping a layer are:
Flipping a Layer Horizontally: To achieve this, after selecting the layer and navigating to Edit > Transform, choose Flip Horizontally. The selected layer will immediately be flipped along its vertical axis, creating a mirror image as if reflected in a mirror placed vertically.
Flipping a Layer Vertically: Similarly, to flip a layer vertically, after selecting the layer and navigating to Edit > Transform, choose Flip Vertically. This action will flip the selected layer along its horizontal axis, effectively turning it upside down.
These methods provide the flexibility to precisely control the flipping and mirroring of layers, allowing you to create visually appealing compositions and enhance your digital artwork with ease.
Advanced Layer Transformation Techniques in Photoshop
Beyond simple flipping, Photoshop offers a suite of advanced layer transformation tools that provide granular control over your compositions. These tools allow for more complex manipulations, opening up a world of creative possibilities.
Scale: Adjusting the Size of the Layer
The Scale tool, accessible through Edit > Free Transform, allows you to resize a layer proportionally. You can scale it up or down while maintaining its original aspect ratio by dragging the corner handles. This is perfect for adding detail, reducing the prominence of certain elements in your composition, or ensuring elements fit harmoniously within the overall design. You can also enter specific percentage values for precise scaling.
Skew: Tilting the Layer to Create a Slanted Effect
The Skew tool enables you to tilt a layer along its horizontal or vertical axis, creating a skewed or warped appearance. This feature is ideal for simulating perspective changes, achieving dynamic angles, or adding a sense of motion and depth to your design. You can drag the side handles of the bounding box to apply the skew transformation.
Distort: Modifying the Shape of the Layer for Unique Effects
The Distort tool is even more powerful, allowing you to deform a layer by bending and shaping it into a desired form. Unlike Skew, which applies a uniform slant, Distort allows for non-uniform manipulation. You can create surreal or abstract effects by pulling on the corners and edges of the bounding box to manipulate the layer's geometry freely. This is excellent for creating organic shapes or highly stylized elements.
Perspective: Altering the Layer’s View for a Three-Dimensional Effect
The Perspective tool (often grouped with or accessible through Free Transform) allows you to adjust the perspective of a layer as if it were viewed from a different angle. This tool is indispensable for adding depth and a sense of three-dimensionality to your compositions, making flat images appear to recede into space or project forward. By dragging the corner handles inwards or outwards, you can simulate the effects of converging lines and vanishing points.
Manual Rotation and Transformation: Taking Full Control of Layer Adjustments
For maximum precision, you can manually rotate, resize, and transform each layer by entering specific values or by dragging control points directly. This level of control allows for incredibly nuanced adjustments. Changing the orientation or scale of a layer can dramatically alter the mood and feel of an image. For instance, creating a mirrored version that conveys a different emotional tone or perspective can add depth and intrigue to your visual narrative.
How to Transform Selections in Photoshop
Practical Applications of Flipping Layers
The ability to flip and transform layers is not just an academic exercise; it has numerous practical applications in graphic design and photo editing.
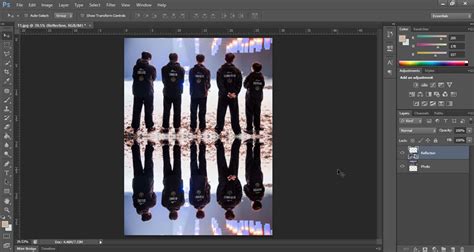
Creating Realistic Reflections
One of the most common and visually striking uses of flipping is to simulate the look of a reflection. By duplicating a layer and then flipping it vertically (or horizontally, depending on the desired effect), you can create a mirrored image that appears to be reflected in water, glass, or another surface. This adds authenticity and depth to compositions, making them more believable and engaging.
Adjusting the Composition of Your Image
Flipping and transforming tools are invaluable for improving the overall composition of an image. You can use them to reposition or balance visual elements, correct asymmetry, enhance symmetry, or simply experiment with different arrangements for a more harmonious and visually appealing result. For example, if a subject is looking too far out of the frame, flipping them can reposition their gaze to be more central or directed into the composition.
Creating Patterns and Symmetrical Designs
Flipping is fundamental to creating intricate patterns and symmetrical designs. By duplicating and flipping layers multiple times, and arranging them strategically, you can generate complex kaleidoscopic effects or perfectly balanced symmetrical layouts. This is particularly useful for creating backgrounds, textures, or graphic elements for branding and web design.
Correcting Imperfections and Optical Illusions
Sometimes, an image might be captured with a camera that was inadvertently mirrored (e.g., a selfie taken in a mirror). Flipping the layer correctly restores the intended orientation. Furthermore, flipping can be used creatively to introduce optical illusions or to make a viewer question their perception of space and form.
Creating a Mirror Image Effect: A Deeper Dive
To create a mirror image effect, beyond a simple flip, often involves duplicating the layer and then applying transformations.
- Duplicate the Layer: First, ensure your original photo is a layer (if it's a background, double-click it in the Layers panel and rename it to unlock it). Then, duplicate this layer. This creates an identical copy that you can manipulate without affecting the original.
- Apply the Flip: Select the duplicate layer. To create a reflection, you will typically want to flip it vertically. Go to Edit > Transform > Flip Vertical.
- Position the Reflection: Move the flipped layer beneath the original layer. You can adjust its position to simulate a reflection on a surface.
- Refine the Reflection: To make the reflection more believable, you can apply several adjustments to the flipped layer:
- Add Blur: A slight Gaussian blur can soften the reflection, making it appear less sharp than the original object.
- Adjust Opacity: Reducing the opacity of the reflection layer makes it appear more translucent, as reflections are rarely as solid as the original.
- Introduce Distortion: For reflections on water or uneven surfaces, subtle distortion effects can be applied to mimic ripples or warping. The Liquify filter or Displacement Maps can be useful here.
- Color Adjustments: Reflections might have slightly different color tones due to the reflective surface or lighting conditions. Adjusting the hue, saturation, or brightness can enhance realism.
Expanding the Canvas for Mirror Effects
When aiming for more complex mirror effects, such as creating a four-way mirrored pattern or a kaleidoscopic design, you will often need to expand your canvas.
- Expand Canvas: Go to Image > Canvas Size. Change the units to Percent and set both the Width and Height to 200%. This effectively doubles the canvas size in both directions, creating space for mirrored elements.
- Position and Duplicate: Select your original layer. Drag it to one of the four corners of the expanded canvas. Then, duplicate this layer.
- Flip and Position: Select the duplicate layer. Flip it appropriately (e.g., horizontally if the original was in the top-left and you want a mirror in the top-right). Position it on the canvas.
- Repeat for Other Halves: Continue duplicating and flipping layers to fill the remaining quadrants of the canvas, creating a symmetrical pattern.
This method allows for the creation of intricate, repeating patterns by leveraging the fundamental flip transformations.
Automating Transformations with Actions
For repetitive tasks, such as frequently flipping layers for a specific design style, Photoshop Actions can be a powerful time-saver.
- Open the Actions Panel: Navigate to Window > Actions.
- Create a New Action: Click on the "Create New Action" button. Give your action a descriptive name (e.g., "Flip Horizontal Layer").
- Start Recording: Click the "Record" button. Now, every step you take in Photoshop will be recorded as part of this action.
- Perform the Transformation: With a layer selected, perform the desired flip (e.g., Edit > Transform > Flip Horizontally).
- Stop Recording: Click the "Stop Playing/Recording" button.
Now, you can select any layer and play this action from the Actions panel to instantly apply the recorded flip transformation. This is incredibly useful for batch processing or for ensuring consistency in your workflow.
Photoshop vs. Luminar Neo: A Comparative Look at Layer Editing
While Adobe Photoshop has long been the industry standard for layer editing and image manipulation, other software like Luminar Neo are emerging as strong contenders, particularly in layer-based editing.
Luminar Neo's Approach to Layers
Luminar Neo offers a simplified and often more intuitive approach to layer management. Its interface is designed with layer editing in mind, aiming for a smooth workflow. For users who find Photoshop's extensive features overwhelming, Luminar Neo's streamlined interface and AI-powered tools can be highly appealing.
Key Advantages of Luminar Neo:
- Simplicity and Accessibility: Luminar Neo boasts a user-friendly interface, making it accessible to both beginners and experienced editors. Its learning curve is generally shorter than Photoshop's.
- Advanced AI-Powered Features: Luminar Neo leverages powerful AI tools, such as AI Sky Replacement and AI Augmented Sky, which simplify complex editing tasks. An AI-driven Layer Mask can assist in flipping elements with impressive results in a single click.
- Non-Destructive Editing: Luminar Neo strongly supports non-destructive editing. This means users can make adjustments without altering the original image or layers, allowing for extensive experimentation while preserving the integrity of the original work.
When to Choose Luminar Neo Over Photoshop
For tasks that heavily rely on quick, AI-assisted enhancements or for users who prioritize a less complex workflow, Luminar Neo can be an excellent choice. Its ability to perform sophisticated edits, including layer-based manipulations, with user-friendly tools makes it a formidable alternative. For instance, achieving a mirrored effect with AI assistance might be significantly faster in Luminar Neo for some users.
However, Photoshop's unparalleled depth of features, extensive plugin support, and industry-wide adoption mean it remains the go-to for many professional workflows, especially those requiring highly detailed manual control and complex compositing.
Conclusion: Mastering the Mirror
Mastering the ability to flip and mirror layers in Photoshop is a fundamental skill that significantly expands your creative toolkit. Whether you're aiming to create realistic reflections, balance compositions, generate intricate patterns, or simply correct an image, these transformation techniques are indispensable. By understanding the nuances of horizontal and vertical flips, and by exploring advanced tools like Skew and Distort, you can elevate your digital artwork to new heights. Remember to utilize layer duplication for reflections and consider the power of Actions for streamlining repetitive tasks. As you continue to explore Photoshop's capabilities, the ability to manipulate layers with precision will undoubtedly lead to more dynamic, engaging, and visually compelling designs.