DaVinci Resolve, a powerhouse in post-production, offers robust tools for visual effects and color grading, with keyframing being a fundamental aspect of animating parameters. However, users have encountered specific challenges and expressed desires for enhanced functionality, particularly concerning the precise placement and management of keyframes. This article delves into the intricacies of moving keyframes in DaVinci Resolve, addressing common user experiences and exploring best practices for achieving desired animation outcomes, from the initial frame to complex sequences.
The Nuances of Keyframe Placement: From First Frame to Second
A recurring point of discussion among DaVinci Resolve users revolves around the precise placement of keyframes, especially when aiming for the very first frame of a clip. Historically, in earlier versions like Resolve 8, users reported the ability to seamlessly drag keyframes to the initial frame. However, a common observation in subsequent versions, such as Resolve 9, is that this direct placement can be elusive, with dragging actions often resulting in the keyframe settling on the second frame instead of the absolute first.
This subtle, yet significant, difference can impact the intended animation's start. For instance, if a dissolve effect is intended to begin precisely at the clip's inception, a keyframe on the second frame might introduce a slight, unintended delay. Understanding the software's behavior in this regard is crucial. While the exact reasons for this shift in behavior can be attributed to software updates and refinements in the user interface's interaction model, the practical implication remains: achieving that precise first-frame keyframe often requires a more deliberate approach.
To overcome this, users often resort to alternative methods. One approach involves zooming in extremely close on the timeline to ensure the most granular control during the drag-and-drop operation. Another strategy might involve creating the keyframe at a slightly later point and then meticulously nudging it back, frame by frame, until it aligns with the desired starting point. This highlights a broader sentiment that while Resolve offers powerful animation capabilities, the user experience around fundamental actions like keyframe placement could benefit from greater intuitiveness and predictability.
Enhancing Keyframe Functionality: Addressing User Feedback
The desire for improved keyframe functionality in DaVinci Resolve extends beyond just initial placement. Users frequently voice that the overall keyframe management system can be significantly enhanced. One particular area of concern is the "dynamics timeline," which some find to be too small and cumbersome to work with effectively, especially when dealing with intricate animations or lengthy sequences. A more expansive or customizable timeline view could provide a clearer overview and more precise control over multiple keyframes.
The phenomenon of "magically inserted keyframes" at the beginning of some shots is another point of user frustration. This unexpected behavior can disrupt carefully crafted animations and lead to confusion, prompting questions about whether these are intentional features or unintended bugs. Such occurrences underscore the need for greater transparency and control over how and when keyframes are generated within the software.
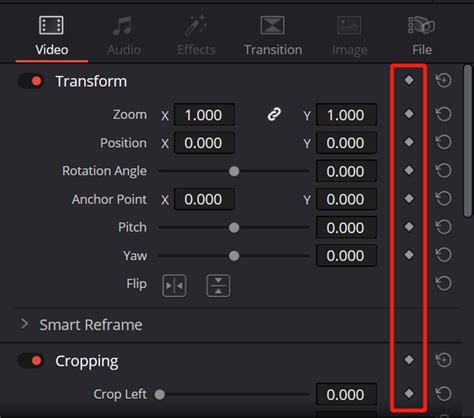
Furthermore, the granularity of keyframing is an area ripe for improvement. The current system, while capable of keyframing many parameters, sometimes lacks specificity. For example, the ability to keyframe a circular window's opacity or position is available, but the specific feathering of that window might not be directly controllable with its own dedicated keyframes. This limitation can restrict the nuanced control needed for sophisticated visual effects. Users desire the ability to isolate and animate more specific attributes of effects, rather than relying on broader parameter controls that might influence unintended aspects of the effect.
The "Delete All Keyframes" Conundrum: An Unexpected Persistence
A particularly perplexing issue that users encounter relates to the "delete all keyframes" function. It has been observed that this command, intended to clear all keyframes within a selected range or for a specific parameter, often fails to remove keyframes located on the very first frame of a clip. This persistent keyframe can interfere with the intended reset of an animation or effect, leading to unexpected visual results.
This behavior, occurring on random clips, raises questions about its origin: is it a deliberate design choice, a bug within the software's logic, or a misunderstanding of the command's scope? Regardless of the cause, the practical outcome is a lack of complete control, forcing users to manually delete these lingering first-frame keyframes. This adds an extra, often tedious, step to the workflow and detracts from the efficiency that users expect from professional software. Addressing this would involve a review of the keyframe deletion algorithms to ensure complete removal as per user intent.
Strategies for Effective Keyframe Management
Given these challenges, adopting strategic approaches to keyframe management in DaVinci Resolve is essential. When precise first-frame animation is critical, meticulous zooming and careful dragging are paramount. For complex animations, consider utilizing the Fusion page, which offers a node-based workflow that can provide more explicit control over animation and effect parameters, potentially circumventing some of the timeline-based limitations.
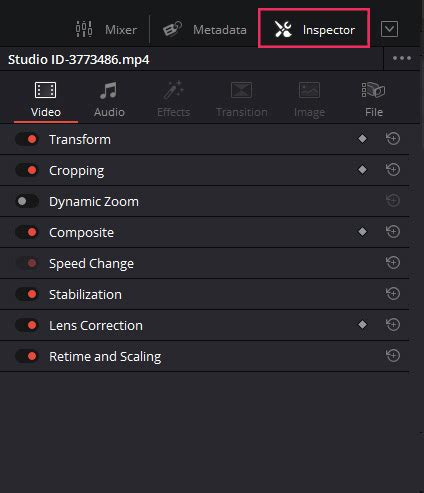
For users encountering unexpected keyframes, a thorough review of the timeline and inspector panel for each clip is advisable. Understanding which parameters are being animated and how they are being controlled can help identify the source of these "magically inserted" keyframes. Often, these can be the result of accidentally hitting a keyframe shortcut or inadvertently adjusting a parameter while the record button is active.
The desire for more specific keyframing, such as controlling feathering independently of a window's position, points towards the potential for future software development. In the meantime, users might need to explore workarounds, such as duplicating effects or using multiple instances to achieve the desired level of control.
The 5 Levels of Animation That Every Editor Must Master (DaVinci Resolve)
Understanding the Underlying Principles: Why These Issues Arise
The challenges encountered with keyframe manipulation in DaVinci Resolve can be understood by considering the fundamental principles of animation software design and the complexities of user interface development.
Firstly, the concept of "first frame" itself can be interpreted differently by software. In some contexts, the first frame might be considered the absolute start of the clip's data, while in others, it might refer to the first frame where an animation parameter is actively being changed. The observed behavior of keyframes landing on the second frame suggests that the software might be defaulting to the first frame where a change occurs, rather than the absolute temporal beginning of the asset. This is a common design pattern in animation software to ensure that effects don't prematurely begin before any user-defined action.
Secondly, the dynamics timeline's size and usability are often a trade-off between screen real estate and the depth of information displayed. As projects become more complex, the need for a more sophisticated and perhaps scalable timeline interface becomes apparent. The current design might be optimized for simpler animations, but struggles to accommodate the detailed control required for intricate motion graphics.
Thirdly, the "delete all keyframes" issue, where first-frame keyframes persist, could stem from how keyframes are stored and referenced. A keyframe at the absolute beginning of a clip might be treated as a baseline or default state, which the "delete all" command is programmed to ignore to preserve the clip's fundamental properties. This is not necessarily a bug but could be a feature with unintended consequences for user workflows. A more robust implementation would involve a clear distinction between default states and user-created keyframes, allowing for the complete removal of the latter.
The generality of keyframing, where one might keyframe a window but not its specific feathering, relates to the hierarchical structure of effects and parameters within DaVinci Resolve. Effects are often composed of multiple sub-parameters. While Resolve allows keyframing of top-level parameters, granular control over every single sub-parameter might not always be exposed directly in the main inspector panel. Advanced users might find more detailed control within the Fusion page, where effects are built from individual nodes, each with its own set of animatable properties. This separation allows for a more modular and precise approach to effect design and animation.
Towards a More Intuitive Animation Workflow
The ongoing dialogue among DaVinci Resolve users regarding keyframe functionality is a testament to the software's widespread adoption and the community's desire for continuous improvement. While DaVinci Resolve offers a powerful suite of tools for motion graphics and animation, addressing these specific pain points can significantly enhance the user experience.
The ability to reliably and intuitively place keyframes on the very first frame of a clip, a more responsive and expansive dynamics timeline, the elimination of unexpected keyframe insertions, and finer-grained control over effect parameters are all areas that could benefit from further development. By listening to user feedback and iteratively refining these core functionalities, Blackmagic Design can ensure that DaVinci Resolve remains at the forefront of creative post-production, empowering users to bring their visions to life with greater ease and precision. The journey towards perfect keyframe control is an ongoing one, and user input is invaluable in shaping the future of this essential feature.