In an era of increasingly powerful computing, the allure of Windows XP, a once-ubiquitous operating system, might seem like a relic of the past. However, for specific use cases, particularly with older hardware or systems requiring minimal resources, running Windows XP from a bootable USB drive can offer a surprisingly viable and often noticeable performance improvement. This guide explores the methods and considerations for achieving this, focusing on making an installed and fully operational Windows XP system accessible from a USB flash drive, a process that can breathe new life into computers with limited memory, processing power, or lacking optical drives.
The Challenge of Running XP from a USB
It's crucial to address a common misconception upfront: directly running a fully installed Windows XP operating system from a USB drive is not a straightforward process that is natively supported by XP. Unlike modern operating systems, Windows XP was not designed with the robust capabilities for seamless booting and operation from external flash media. This means that simply copying XP files onto a USB drive will not suffice. Significant modifications to the operating system and specific tools are required to achieve this functionality. Furthermore, success can be hardware-dependent, and even a successfully transferred installation might encounter issues with updates or driver compatibility over time.
Preparing Your Windows XP Installation for USB Transfer
Before embarking on the process of creating a bootable XP USB, it's essential to have a functional Windows XP installation ready. This could be an existing installation on a hard drive or a freshly installed system. The goal is to "transplant" this working environment onto a USB drive. For this purpose, a USB flash drive with at least 1GB of storage, and preferably up to 2GB, is recommended.
Method 1: Utilizing USB_MultiBoot and PeToUSB
One of the commonly cited methods involves a combination of tools, including USB_MultiBoot and PeToUSB. This approach aims to prepare the USB drive to accept and boot an XP installation.
- Obtain and Unpack USBMultiBoot: Download the USBMultiBoot tool (version 10 is mentioned) and unpack its contents using a utility like 7-Zip.
- Launch the Batch Script: Connect your USB flash drive to your computer. Navigate to the extracted USB_MultiBoot folder and double-click the
USB_MultiBoot_10.cmdfile. You will be prompted to press any key to continue. - Select the PeToUSB Method: The script will present formatting options. Choose the "PeToUSB" method by pressing 'p' and then 'Enter'.
- Configure PeToUSB: The PeToUSB application will launch. It is generally advised to use the default settings and click the 'Start' button. You will likely encounter prompts asking for confirmation; select 'Yes' to proceed. After the process, click 'OK' and then 'Close'.
- Point to XP Files: Back in the USB_MultiBoot interface, press '1' and then 'Enter' to specify the location of your Windows XP installation files. This is the folder containing the extracted XP installation or an ISO image that has been mounted. For instance, the path might be
D:\Windows_XP_Professional_SP3_En. Confirm your selection by clicking 'OK'. - Add XP Setup Information: Choose 'Yes' to add basic information to the Windows XP setup. You will be prompted for a product key. If you are using an OEM version, the key is typically found on a sticker on your computer. If you used a retail copy, it will be in the box.
- Select the USB Drive: Press '2' and then 'Enter' to select your USB drive as the target. It will be listed with its drive letter, for example, 'Removable Disk (U)'. Confirm your choice by clicking 'OK'.
Addressing Windows 7 Compatibility Issues
A common hurdle when running this script on Windows 7 or later versions is an error message indicating that the flash drive has an incorrect format. To overcome this, you need to edit a configuration file within the USB_MultiBoot folder.
- Locate the
USB_MultiBoot_10.cmdfile (or a similar configuration file if using a different version of the tool). - Right-click on it and select 'Edit'.
- At the very top of the file, find a line similar to
VER | find "6.0." > nul. - Change this line to
VER | find "6.1." > nul. - Save the changes and close the file. This modification tricks the script into believing it's running on an older Windows version, allowing it to proceed. Alternatively, a pre-edited file might be available for download from the source where you obtained the tool.
Method 2: Using WinSetupFromUSB
WinSetupFromUSB is a highly recommended and versatile tool that simplifies the process of creating bootable USB drives for various Windows versions, including Windows 2000, XP, and later.
- Download and Run WinSetupFromUSB: Obtain the WinSetupFromUSB utility. It is designed to auto-detect your connected USB flash drive.
- Select Windows XP Source: Under the "Add to USB disk" section, locate and select the option for "Windows 2000/XP/2003 Setup."
- Browse for XP Files: Click the button to browse and select the folder containing your Windows XP installation files.
- Copy Additional Files (Optional): You can also copy any other necessary files, such as drivers, utilities, or games, onto the USB stick at this stage.
- Start the Process: Once configured, initiate the process of creating the bootable USB drive.
- Install XP from USB: After the USB drive is prepared, insert it into the target computer and power it on. The PC should boot from the USB drive, presenting you with the WinSetupFromUSB menu. Follow the on-screen prompts to configure the Windows XP installation.
- First Boot: After a final reboot, Windows XP should load for the first time from your USB drive.
How to Install Windows XP from USB Flash Drive with WinSetupFromUSB
Considerations for Performance and Compatibility
While these methods enable booting Windows XP from a USB drive, the performance will heavily depend on the speed of the USB drive itself and the USB port version (USB 2.0 vs. USB 3.0). A faster USB 3.0 drive in a compatible port will yield significantly better results than a slower USB 2.0 drive.
The user experience with running XP from a USB can be varied. Some users report a noticeable difference in performance on older machines, especially those with limited RAM. Others have encountered lag, even on faster drives, suggesting that the inherent limitations of XP and the complexities of running an OS from flash memory can still present challenges.
Alternative Approaches and Troubleshooting
For those who have faced difficulties with the direct transfer of an installed XP, or for users looking for alternative solutions, other strategies exist, though they often involve more complex modifications or may not yield the desired results.
- Cloning to SD Cards: Some users have attempted to clone their XP installations to SD cards using tools like Ghost. However, this method can be fraught with issues, including the inability to detect the target drive during the cloning process or encountering blue screen errors upon booting from the SD card. Using an external SD card reader might sometimes improve detection but doesn't guarantee a successful boot.
- Linux Alternatives: In cases where the goal is to run a lightweight operating system on older hardware, users have found success by installing a small Linux distribution, such as Ubuntu. This is often a more stable and supported option for reviving older machines.
- Drive Formatting and Partitioning: If encountering issues during the setup process, especially related to drive detection, reformatting the target drive (whether USB or internal) using tools like GParted from a Linux Live environment can sometimes resolve problems. It's important to remember that Windows XP does not support GPT partitions, and a standard MBR partition scheme is required.
Advanced Techniques and Potential Pitfalls
Creating a truly portable and reliably bootable Windows XP installation from a USB drive can involve more advanced techniques that modify the core Windows XP system files to better handle the relocation. This might include adjusting registry settings related to drive letters and device paths, as well as ensuring that essential boot-time drivers for the USB controller are included in the installation.
However, it's crucial to acknowledge the significant invasiveness of such modifications. Applying them to an existing XP installation can be complex, and there's no guarantee of stability or continued functionality, especially after Windows XP installs updates or hotfixes, which can alter the system's configuration and break the custom boot setup. The process is also highly dependent on the specific hardware of the computer from which the XP installation is being transferred and the hardware of the computer it will be run on.
The Command Prompt and Diskpart
When dealing with drive preparation and partitioning, the command line can be a powerful tool. For instance, the diskpart utility can be used to manage disks and partitions.
To use diskpart:
- Open a Command Prompt window.
- Type
diskpartand press Enter. - To select the desired disk (e.g., your USB drive), type
select disk X, where 'X' is the disk number. Be extremely careful to select the correct disk, as all data on it will be destroyed. - To clean the disk (remove all partitions and formatting), type
clean. - To create a primary partition, type
create partition primary. - To make the partition active, type
active. - To format the partition as NTFS, type
format fs=ntfs quick. - To assign a drive letter, type
assign. - Finally, type
exitto leavediskpart.
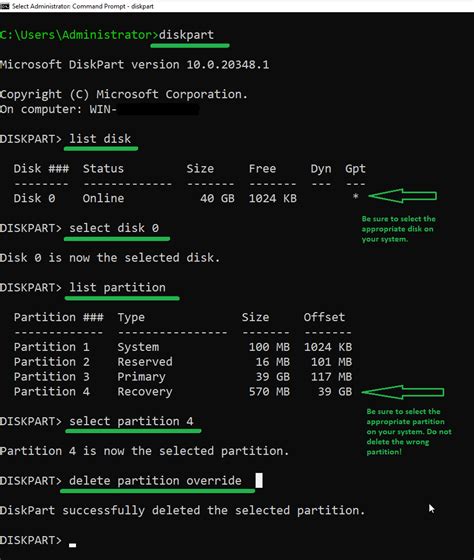
This manual approach offers granular control but requires a thorough understanding of disk management commands.
Conclusion: A Niche Solution for Specific Needs
Installing and running Windows XP from a USB drive is not a mainstream operation and comes with inherent challenges. It's a solution best suited for those who specifically need to run XP on older or resource-constrained hardware, where the benefits of a portable XP environment outweigh the complexities and potential instability. While tools like WinSetupFromUSB and the PeToUSB method offer pathways to achieve this, users should be prepared for troubleshooting and potential hardware compatibility issues. For many modern computing needs, exploring lightweight Linux distributions or considering more contemporary operating systems remains a more practical and supported path.