In the realm of digital design, achieving pixel-perfect alignment and maintaining visual harmony are paramount. Adobe Photoshop offers a suite of powerful tools designed to assist in this endeavor: Guides, Grids, and Smart Guides. These non-printing visual aids are indispensable for anyone looking to position elements with precision, create symmetrical layouts, and ensure consistent spacing across their projects. Understanding how to effectively utilize and manage these tools can significantly elevate the quality and professionalism of your work.
The Foundation of Precision: Understanding Guides
Guides in Photoshop manifest as non-printing lines that float over your image. They serve as invisible rulers, allowing you to align objects with remarkable accuracy. The flexibility of guides lies in their dynamic nature; they can be easily moved, repositioned, or removed as your design evolves. This adaptability makes them ideal for a wide range of tasks, from aligning text blocks to ensuring the perfect placement of photographic elements.
Creating and Manipulating Individual Guides
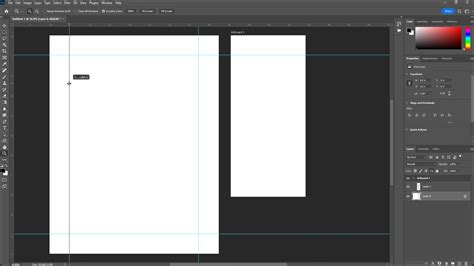
The creation of guides in Photoshop can be achieved through several intuitive methods. For a single guide at a specific location, the View > New Guide command is your go-to option. This allows you to precisely define the position of a horizontal or vertical guide by entering numerical values.
Alternatively, if you have your rulers visible (View > Rulers), a more direct approach is to simply click within the ruler area and drag the resulting guide into your document. This method offers a more tactile and visual way to place guides, especially when you have a general idea of the desired position.
Create PERFECT Grids and Guides in Photoshop
Removing individual guides is equally straightforward. A quick way to delete a guide is to Option-click (Mac) or Alt-click (Win) on the guide itself. Another method involves dragging the guide back over the ruler area; releasing it there will make it disappear. If you find yourself needing to adjust a guide's position, the Move tool is your ally. Simply position the Move tool directly on top of the guide, and you can then drag it to a new location. For even finer control, Shift-dragging a guide will snap it to the nearest ruler tic marks, ensuring perfect alignment with your document's established grid system.
Double-clicking on an existing guide will bring up the Guides, Grid, & Slices Preferences dialog box, offering a central hub for managing your visual aids. This is particularly useful for making quick adjustments to guide properties without needing to navigate through multiple menus.
Advanced Guide Management: New Guide Layout and Multiple Guides
For more complex layouts, Photoshop provides the View > New Guide Layout command. This powerful feature allows you to add multiple guides simultaneously, saving considerable time and effort. Within this dialog box, you can define various parameters:
- Target: Choose whether the guide layout applies to the entire Canvas, a specific Artboard, or Selected Artboards.
- Guide Color: Customize the color of your guides to enhance visibility against your artwork.
- Columns and Rows: Specify the number of columns and rows to create a structured grid.
- Width, Height, and Gutters: Define the dimensions of your columns and rows, along with the spacing (gutters) between them.
- Margin: Set the margins for your layout, providing a buffer around the content.
- Center Columns: An option to center the defined columns within the layout.
- Clear Existing Guides: A crucial checkbox that will remove any pre-existing guides before applying the new layout.
Furthermore, you can save your custom guide layouts as Presets for future use, ensuring consistency across projects. This is invaluable for maintaining brand guidelines or adhering to specific design templates.
To select multiple guides at once, you can use the keyboard modifiers Option + Shift-click (Mac) or Alt + Shift-click (Win). Once multiple guides are selected, you can then use the same modifier keys while dragging to reposition them all simultaneously. This is a significant time-saver when making global adjustments to your layout.
Guides from Shapes and Layers
Photoshop's versatility extends to creating guides directly from your existing artwork. The View > New Guide From Shape command allows you to generate guides that precisely match the boundaries of selected shape layers. This is incredibly useful for aligning elements to the exact dimensions of other objects. The power doesn't stop at shapes; you can also create guides from Type layers and even pixel-based layers, providing unparalleled flexibility in defining your design space.
Grids: The Backbone of Symmetrical Design
While individual guides offer precise placement for specific elements, Grids provide a consistent pattern of lines that form the foundation for symmetrical and balanced layouts. They are particularly effective when creating designs that require a high degree of order and visual rhythm.
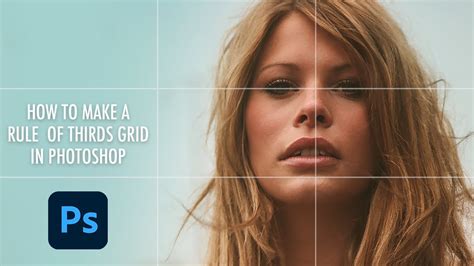
The Rule of Thirds and Custom Grids
A classic application of grids is to create an overlay that displays the "Rule of Thirds." This compositional guideline suggests dividing an image into nine equal parts by two horizontal and two vertical lines. Placing key elements along these lines or at their intersections often results in more dynamic and visually appealing compositions. To implement this, you can navigate to Preferences > Guides, Grid & Slices and configure the grid settings accordingly.
Beyond the Rule of Thirds, the Guides, Grid & Slices Preferences dialog box allows for extensive customization of your grid. You can define the number of divisions, their size, color, and style, tailoring the grid to the specific needs of your project.
Smart Guides: Intelligent Alignment Assistance
Smart Guides are a dynamic and often overlooked feature that can dramatically speed up your workflow. They appear automatically as you create shapes, selections, or move objects, offering contextual alignment and spacing suggestions. These guides are context-aware, meaning they adapt to your actions, providing real-time feedback on how elements align with each other and with the document boundaries.
Smart Guides are tremendously helpful for aligning and determining distances between multiple layers as they are being repositioned within a document. They display pink lines to indicate alignment with other objects or the center of the document, and they can also show the distance between objects, helping you maintain consistent spacing.
Leveraging Smart Guides for Pixel-Perfect Alignment
When working with vector shapes or precise pixel-based elements, the Snap Vector Tools and Transforms to Pixel Grid preference can be a game-changer. Located within Preferences > General, enabling this setting ensures that your vector tools and transformations snap to the underlying pixel grid.
- With the preference turned ON: Shapes are drawn and transformed with their edges precisely aligned to pixels, preventing anti-aliasing artifacts on the edges of shapes and resulting in sharper, cleaner graphics.
- With the preference turned OFF: Vector tools and transformations operate more freely, which can be useful for organic designs but can lead to slightly blurred edges if not managed carefully.
Even if "Snap Vector Tools and Transforms to Pixel Grid" is turned off, you can still achieve pixel-perfect alignment using the Align Edges option available in the Options bar for shape layers. Enabling this option after drawing a shape will "jump" the shape's fill to the nearest pixel grid, even if the original path itself isn't perfectly aligned. This provides a way to force alignment and achieve crisp edges when needed.
Enhancing Visibility and Control
Visibility of guides can sometimes be an issue, especially on high-resolution monitors where anti-aliasing can make them appear faint. To address this, you can adjust the Anti-alias Guides and Paths setting. In Preferences > Performance, under Graphics Processor Settings, click Advanced Settings and uncheck Anti-alias Guides and Paths. This will make the guides appear thicker and more distinct.
Locking and Unlocking Guides
For crucial design stages where accidental movement of guides could be detrimental, locking guides is essential. You can lock or unlock all guides by using the keyboard shortcut Command + Option + ; (Mac) or Control + Alt + ; (Win), or by navigating to View > Lock Guides. It's important to remember to unlock guides when you need to resize the document or reposition them proportionally.
Changing Guide Colors
Personalizing the appearance of your guides can significantly improve workflow. To change the color of selected guides, first select the guides you wish to modify, then go to View > Edit Selected Guides and utilize the Color options to choose your preferred hue. This allows you to use different colors for different types of guides or to simply make them more visible against your specific artwork.
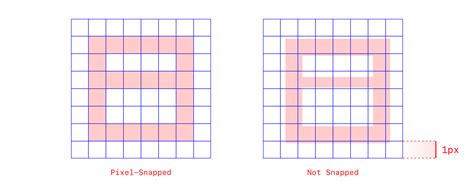
The Pixel Grid: A Deeper Level of Precision
When you Zoom into an image above 500%, a Pixel Grid becomes visible on top of your image. This detailed grid is invaluable for extremely precise work, particularly when aligning shapes like rectangles so that they begin and end on a full pixel. This meticulous alignment is crucial for avoiding anti-aliased edges and ensuring the sharpest possible output, especially for web graphics or interface elements.
Clearing and Removing Guides
If your document becomes cluttered with guides, or if you need a clean slate, Photoshop offers simple ways to clear them. You can select Clear Guides from the View menu. If you have rulers visible, you can also select and drag individual guides over top of the ruler to effectively remove them. To remove any guide from Photoshop, ensure that View > Lock Guides is deselected. Then, select the Move Tool, click and drag any guide, and drag it anywhere past the canvas in a direction perpendicular to the guide, then release to delete it.
A helpful tip for placing guides accurately: while dragging a horizontal guide from the ruler, press and hold the 'Alt' key (Win) or 'Option' key (Mac). This action will toggle the guide between horizontal and vertical orientation, allowing you to place it at the precise angle you need without switching tools.
By mastering the use of Guides, Grids, and Smart Guides, along with understanding the underlying Pixel Grid, designers can achieve a new level of precision and control in their Photoshop projects, leading to cleaner, more professional, and visually impactful results.