In the age of digital imagery and social media, the pursuit of a flawless appearance is a common aspiration. While diet and exercise are the cornerstones of a healthy physique, Photoshop offers a swift and effective means to refine portraiture, addressing concerns such as the appearance of a double chin. This tutorial delves into various Photoshop techniques, from quick fixes to more intricate methods, empowering users to achieve desired aesthetic outcomes in their photographs.
Understanding the Appeal of Digital Retouching
The desire to look fit and healthy is universal. Consequently, many individuals seek ways to enhance their photographs, aiming for a polished and idealized representation. This often includes addressing perceived imperfections like pimples, dark circles, dark spots, and the prominence of a double chin. While these concerns can be tackled through lifestyle changes, the immediate gratification offered by digital editing tools like Photoshop is undeniable. Photoshop acts as a potent tool, capable of transforming images to closely match imagined ideals. It allows for meticulous editing and retouching, providing a pathway to achieving a desired look within minutes, even if it doesn't equate to actual weight loss.

The Allure of Photoshop: A Magic Box for Image Enhancement
Photoshop is frequently described as a "magic box" due to its ability to create images that align remarkably with our imagination. Beyond creation, it excels in editing and retouching existing photographs, offering a spectrum of possibilities for image enhancement. For those looking to refine their portraits, specifically to address the appearance of a double chin, Photoshop provides a suite of tools and techniques. The process, when approached with the right methods, can be surprisingly straightforward and time-efficient, often achievable in a matter of minutes.
A Swift Approach: The Liquify Tool Method
One of the most expedient methods for removing a double chin in Photoshop involves the Liquify tool. This technique can be mastered in under five minutes, making it ideal for quick touch-ups.
The Discovery of an Efficient Workflow
This particular method is not the conventional approach but was discovered serendipitously. It emerged when excessive application of the Liquify tool in Photoshop led to an unintended outcome. Rather than starting the retouching process anew, an attempt was made to rectify the photo using the History Brush tool. This led to the realization that a more direct and efficient workflow for double chin removal was possible.
Step-by-Step Guide to the Liquify Method
- Open Your Image: Begin by opening the photograph from which you wish to remove the double chin in Adobe Photoshop.
- Duplicate the Background Layer: To ensure the original image remains untouched, create a duplicate of the background layer. This can be done by pressing
Ctrl+J(Windows) orCmd+J(Mac). - Access the Liquify Filter: Navigate to
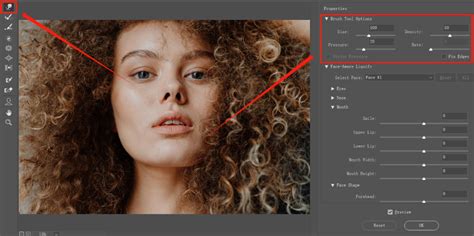
Filter > Liquify. This will open the Liquify dialog box. - Utilize the Forward Warp Tool: Select the "Forward Warp" tool (W) from the toolbar on the left. This tool allows you to push and manipulate pixels.
- Adjust Brush Size and Pressure: Set the brush size appropriately to cover the area of the double chin. A smaller brush size offers more control for subtle adjustments. Adjust the pressure to a moderate level to avoid over-manipulation.
- Gently Reshape the Chin Area: Carefully use the Forward Warp tool to push the lower chin area upwards and inwards, subtly refining the jawline. The goal is to create a smoother, more defined contour without making the alteration obvious. Focus on tucking the excess area upwards, as if hiding it behind the upper chin.
- Observe and Refine: Continuously observe the changes in the preview window. Zoom in to ensure the adjustments blend seamlessly with the rest of the face and neck. Avoid creating an unnatural or overly sharp jawline, as this can draw attention to the edited area.
- Commit to Changes: Once satisfied with the result, click "OK" in the Liquify dialog box to apply the changes.
An Alternative: The Path and Transform Method
For those who prefer a more deliberate and controlled approach, a method involving paths and transformation tools can be highly effective. This technique, while potentially taking a bit longer than the Liquify method, offers precise control over the reshaping process.
The Foundation: Selecting and Isolating the Chin Area
This method hinges on carefully selecting and isolating the portion of the chin that needs adjustment.
- Select the Pen Tool: Choose the Pen Tool (P) from the toolbar.
- Trace the Upper Jawline: Begin by tracing the upper or front part of the jawline, which you intend to keep. Click to create anchor points and drag to shape the curves, following the natural line of the jaw. Imagine you are defining a new, more refined jawline.
- Create the Path: Continue clicking and dragging to create a complete path around the area of the double chin that needs to be addressed. Ensure the path encompasses the excess skin or fat that creates the double chin.
- Close the Path: Bring the path back to the starting anchor point to close the selection.
- Refine the Path (Optional but Recommended): If needed, refine the curves of the path by dragging the individual handlebars. For Macs, hold down the
Commandkey, and for Windows, hold down theCtrlkey, then drag the anchor point downwards or upwards to adjust the curve. The aim is to create a smooth, natural-looking line. - Create a Selection from the Path: With the path complete, navigate to the Paths panel. Right-click on the work path and select "Make Selection."
- Feather the Selection: In the "Make Selection" dialog box, set the "Feather Radius" to a small value, such as 1 pixel. This will soften the edges of the selection, preventing a harsh, unrealistic cut-out. Avoid setting it too high, as this can also look unnatural.
- Duplicate the Selected Area: Press
Ctrl+J(Windows) orCmd+J(Mac) to duplicate the selected portion of the chin onto a new layer. This layer will contain the part of the chin you want to retain.
Reshaping with Warp Transform
Once the relevant part of the chin is isolated on its own layer, the Warp Transform tool can be employed for precise reshaping.
- Select the New Chin Layer: Ensure the newly created layer containing the chin selection is active in the Layers panel.
- Invert the Selection: Press
Shift+Ctrl+I(Windows) orShift+Cmd+I(Mac) to invert the selection. This will now select everything except the part of the chin you duplicated. - Free Transform: With the inverted selection active, press
Ctrl+T(Windows) orCmd+T(Mac) to activate Free Transform. - Engage Warp Transform: Right-click within the bounding box of the Free Transform and select "Warp." This will overlay a grid onto your selection.
- Adjust the Grid: Set the grid to a finer resolution, such as 5x5, for more granular control.
- Tuck and Reshape: Zoom in on the lower chin area. Select the grid points or segments that cover the double chin and drag them upwards. The goal is to tuck this area underneath the upper jawline, effectively reducing the visible prominence of the double chin.
- Commit Transformations: Once you are satisfied with the sculpted jawline, click the checkmark icon in the top option bar to commit the transformations.

Refining the Edges and Blending
After reshaping, some refinement might be necessary to ensure a seamless blend.
- Hide Excess Areas: You may need to delete excess areas from the transformed chin layer. Select the eraser tool with a soft, feathered brush. Gently erase any parts of the newly transformed chin that extend beyond the original jawline or look unnatural.
- Consider Masking: As an alternative to erasing, you can create a layer mask. Select the layer mask icon in the Layers panel. Then, using a soft black brush on the mask, paint over the areas you wish to conceal. This non-destructive method allows for easy adjustments later.
- Check for Consistency: Zoom out and examine the entire image to ensure the edited chin blends harmoniously with the rest of the neck and face. Look for any unnatural lines or distortions.
Advanced Options and Professional Services
While the techniques described above offer effective solutions for many users, Photoshop also provides advanced tools and professional services for more complex retouching needs.
The Generative Fill Tool
For exceptionally quick and often impressive results, Photoshop's Generative Fill tool can be a powerful ally.
- Select the Area: Use any selection tool to outline the double chin area.
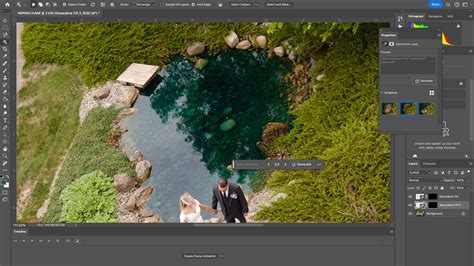
- Prompt Generative Fill: Click on the "Generative Fill" button in the contextual taskbar.
- Enter a Prompt: Type a simple prompt like "remove double chin" or "smooth jawline."
- Generate Results: Photoshop will generate several variations. Choose the one that best suits your needs. This AI-powered feature can intelligently reconstruct the area, often achieving remarkable results with minimal user input.
Professional Photo Retouching Services
For those who require consistently high-quality results or handle a large volume of images, professional photo retouching services are an excellent option. Experts in the field possess the skills and experience to deliver polished, natural-looking edits.
- Headshot Retouching Service: These services specialize in refining portraits, from head to shoulder. They can expertly address issues like double chins, skin blemishes, and uneven lighting, providing professional-grade images suitable for portfolios, official documents, or online profiles.
- Bulk Image Editing: If you have a substantial number of photos that need double chin removal, professional services can handle the workload efficiently, ensuring quality and consistency across all images.
The 3 Steps to High-End Skin Retouching in Photoshop!
Considerations for Digital Alteration
The ability to alter one's appearance in photographs raises important considerations about beauty standards and self-perception.
The Pursuit of Perfection and Social Media
In the current social media landscape, there's a pervasive drive for perfection. This can influence individuals to conform to perceived beauty standards, sometimes leading to unhealthy comparisons and self-esteem issues. While Photoshop can be a tool for self-expression and confidence-building, it's crucial to maintain a balanced perspective.
Motivation for Change
If digital retouching motivates you to adopt healthier habits like exercise and a balanced diet, then it can serve a positive purpose. However, it's important to distinguish between using editing tools for aesthetic refinement and relying on them to mask deeper insecurities. Ultimately, the decision to edit one's photos is a personal one. If you feel more comfortable and confident with a refined image, then pursuing that goal through tools like Photoshop is a valid choice.
Professionalism and Authenticity
For professional purposes, such as corporate headshots or passport photos, a polished and refined image is often expected. Professional retouching services can ensure that these images meet the required standards while maintaining a sense of authenticity.
Conclusion: Empowering Your Image with Photoshop
Photoshop offers a versatile and accessible platform for addressing common aesthetic concerns in portrait photography, including the appearance of a double chin. Whether you opt for the swift efficiency of the Liquify tool, the precise control of the Warp Transform method, or the AI-powered capabilities of Generative Fill, the tool empowers you to achieve your desired results. For unparalleled perfection and efficiency, professional retouching services remain a valuable resource. By understanding the tools and techniques available, individuals can confidently enhance their photographs, aligning their digital presence with their personal aesthetic aspirations.