Printing a booklet using Adobe InDesign can appear to be a challenging endeavor if you are not familiar with the printing process. However, it can transform into a hassle-free experience with the correct knowledge and consistent practice. This step-by-step guide is designed to equip you with the confidence and the essential know-how to print a booklet from InDesign like a seasoned professional. We will meticulously explore the intricacies of setting up your InDesign document specifically for booklet printing, fine-tuning text frames and images, selecting the 'Print Booklet' option from the file menu, and much more. Furthermore, you will gain valuable insights into effectively handling common hurdles that might arise during the printing process, such as paper jams or color issues, thereby ensuring the entire experience is smooth and productive. Regardless of whether you are a novice taking your first steps or a seasoned professional seeking to refine your skills, this comprehensive guide will furnish you with the fundamental skills necessary for a seamless booklet printing operation.
Printing a booklet from Adobe InDesign is a process that involves a series of sequential steps. These include the initial setup of your InDesign document with a standard layout spread, the meticulous preparation of your content for professional printing, the precise configuration of the print settings, which encompasses the creation of a printer spread, and finally, the actual printing of the booklet in its correct sequential order. Let's embark on a detailed walkthrough of these crucial steps, providing valuable insights on how to effectively troubleshoot any issues that may emerge during the procedure. Ultimately, the entire process begins with the creation of a new document or the utilization of an existing one that precisely meets your specific requirements. For those looking to explore or acquire Adobe InDesign, consulting a guide on the best software for artwork and layout can be a beneficial starting point.
Phase 01: Setting Up Your InDesign Document for Booklet Printing
The foundational step towards successfully printing your booklet involves the proper imposition and meticulous setup of your InDesign document. This critical aspect encompasses several key components, including the creation of a new document, the precise definition of the page size, the establishment of appropriate margins, and the inclusion of bleed. It also involves the strategic application of master pages and styles to ensure absolute uniformity and consistency across all the pages of your booklet. Let's delve deeper into each of these individual steps to foster a more profound understanding of how to execute them effectively.
Create a New Document
Kicking off the entire process begins with the straightforward creation of a new document within Adobe InDesign. If you are embarking on this project with a fresh start, navigate to File -> New -> Document. Within this dialog box, you will need to specify the total number of pages required for your booklet, the desired orientation (portrait or landscape), and other essential details based on your project's specific requirements. For the creation of a booklet, it is imperative to ensure that you have an even number of pages. Additionally, selecting the 'Facing Pages' option is highly recommended, as it provides a more accurate and intuitive visual representation of your layout, mimicking how the pages will appear when bound.
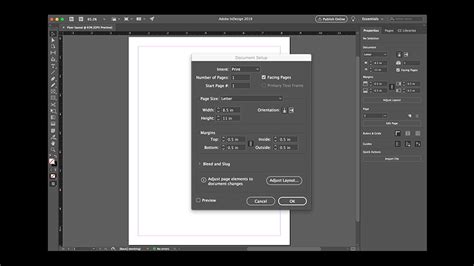
Set Up Page Size, Margins, and Bleed
After the initial creation of your document, the subsequent crucial step involves the precise setup of the page size, margins, and bleed. The page size will be dictated by the final intended dimensions of your booklet. You can define this under File -> Document Setup. Margins should be carefully considered to provide adequate visual breathing room for your content without making the page appear crowded or cramped. It is a standard professional practice to always supply artwork with a minimum of 3mm bleed on each edge. Bleed refers to the extra area beyond your defined page size, which is essential to accommodate minor variances during the trimming process and to ensure that your images or background colors extend seamlessly all the way to the very edge of your printed page. To further understand the importance and application of bleed, consider viewing a video guide on why bleed is necessary and how to effectively add it.
Apply Master Pages and Styles
Master pages in InDesign function as powerful templates, playing a vital role in maintaining visual consistency and uniformity across all the pages of your booklet. They contain the layout elements that you intend to repeat on multiple pages, such as page numbers, headers, or footers. You can apply master pages by navigating to the Window -> Pages panel and then dragging the desired master page onto your document pages. Styles, on the other hand, are instrumental in ensuring uniformity in text formatting throughout your entire booklet. InDesign offers two primary types of styles: Paragraph styles and Character styles. These can be conveniently applied through the Window -> Styles -> Paragraph Styles or Character Styles options. Our experience suggests that mastering the use of these Master pages can indeed take a considerable amount of time and practice. We have found that they are not always as intuitive as one might expect or hope for.
Phase 02: Prepare Your Content for Print
Once your InDesign document has been meticulously set up, the next phase of the process revolves around the thorough preparation of your content specifically for the printing stage. This critical phase involves carefully adjusting text frames and images to your pre-decided specifications, and importantly, checking for any potential print errors using the powerful Preflight tool integrated within InDesign. Implementing these steps diligently ensures that your final printed booklet will exhibit a professional appearance and be completely free of any formatting mishaps or inconsistencies. Let's break down these essential steps in more detail.
Adjust Text Frames and Images
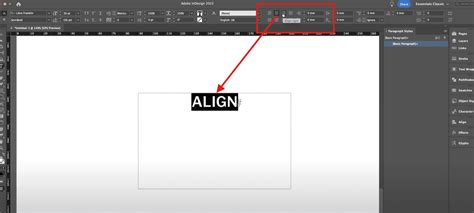
Properly aligned text frames and images are absolutely essential for creating a professional-looking and aesthetically pleasing booklet. To adjust text frames, you will first need to select the Text Tool from the toolbox. Then, simply click on the text box you wish to modify and drag its corners to resize it as needed. Resizing images is a similar process: select the image using the Selection Tool and then drag its corners while holding down the Shift key to maintain its original proportions and avoid distortion. It is also crucial to ensure there is appropriate spacing between your text elements and images to achieve a clean and uncluttered visual layout.
Check for Print Errors with the Preflight Tool
Before you proceed with the actual printing of your booklet, it is highly advisable to run your document through InDesign's built-in Preflight Tool. This invaluable tool is designed to meticulously check for potential issues that could negatively impact your final print output. These common issues include missing fonts, overset text (text that doesn't fit within its frame), low-resolution images, and many others that could potentially disrupt your final print. You can typically find the Preflight option in the bottom panel of your InDesign screen. It is usually indicated by a green dot if no errors have been detected, or a red dot if the tool has found errors. By clicking on this indicator, you will be presented with a detailed error report, allowing you to identify and rectify any problems before you proceed to create your print-ready files.
Phase 03: Configure Print Settings
After diligently preparing your content, the next pivotal step is to accurately configure the print settings within Adobe InDesign. This crucial stage ensures that your document is printed correctly and precisely according to your predefined specifications. The entire process involves selecting the 'Print Booklet' option from the File Menu, customizing the print settings to align with your specific printer's capabilities, and meticulously adjusting the print preview to achieve the desired final layout. These steps are absolutely critical to prevent any potential printing mishaps and ensure a high-quality output. Let's delve further into the specifics of these important steps.
Select 'Print Booklet' from the File Menu
To initiate the booklet printing settings in InDesign, navigate to File -> Print Booklet. Within this dialog box, you will encounter various options for selecting the type of booklet you are creating. If you are producing a standard booklet, choosing the '2-up Saddle Stitch' option will most likely serve your needs effectively. Alternatively, if you are designing a fold-out brochure or a pamphlet that requires a different binding method, selecting the 'Consecutive' type might be more appropriate. It is essential to carefully select the option that best suits your specific design and project requirements.
Configure Print Settings and Choose Printer
Next, within the 'Print Booklet' dialog box, click on the 'Print Settings' button. Here, you can select the specific printer you intend to use from the 'Printer' dropdown menu. You will also need to decide on the orientation (portrait or landscape) and the paper size, ensuring these settings align with your design specifications, under the 'Setup' tab. It is vital to confirm that these settings precisely match your printer's capabilities and the paper you will be using. You also have the option to select necessary print marks, such as crop marks, under the 'Marks and Bleed' section, if your project requires them. It is strongly recommended to thoroughly preview your settings before confirming them.
Adjust the Print Preview for Desired Layout
While you are still within the 'Print Booklet' dialog box, you can preview the final imposition of your booklet by clicking on the 'Preview' tab. This feature will display small page thumbnails, visually representing how your pages will appear when printed and subsequently assembled and folded. You can meticulously scroll through these pages to meticulously check if everything appears correct and in the intended order. This preview step is invaluable for spotting any potential layout mismatches, imposition errors, or other visual discrepancies before you commit to printing, thereby saving you significant time and resources.
How To Print Booklet Adobe InDesign Tutorial
Phase 04: Printing the Booklet
After meticulously reviewing the print preview and confirming that all details are accurate, including the front and back cover pages, it is finally time to proceed with printing your booklet. The final steps involve a thorough review and confirmation of all the print settings displayed in the left column of the dialog box, followed by initiating the actual printing process. These decisive steps will bring your InDesign document to life in a tangible, physical form, representing the culmination of your design project.
Review and Confirm Printing Settings
Before you click the 'Print' button, it is paramount to meticulously review and confirm all the configured print settings. Click on the "Preview" tab located on the left side of the dialog box. This action will display a visual layout preview of your imposed pages. Critically, the very first sheet in this preview should contain your inside front cover and, correspondingly, your inside back cover. Carefully cross-check the page size, orientation, printer selection, and any other settings you have previously configured. Exercise particular caution regarding paper quality and color settings, especially if these aspects are of critical importance to your project's final outcome.
Click 'Print' to Start the Process
Once you are completely satisfied with all the settings and the preview accurately reflects your desired outcome, it's time to click the 'Print' button and set the entire process in motion. Your meticulously prepared document will then be processed by InDesign, and the printing process will commence. The actual printing time can vary significantly depending on the total number of pages in your booklet and your printer's operational capacity. Patience is key during this stage; simply wait for your newly printed, professional-looking booklet to emerge from the printer!
Phase 05: Troubleshooting Common Printing Issues
Despite meticulous planning and careful execution of every step, you might occasionally encounter some common printing issues. These problems can range from frustrating paper jams or misalignments to unexpected color discrepancies or font inconsistencies. Instead of panicking, it is essential to approach and resolve these issues in a systematic and logical manner. In this section, we will cover two of the most prevalent printing-related problems and offer potential solutions to help you overcome them.
Addressing Paper Jams or Misalignment
Paper jams or misalignment issues can unexpectedly halt your printing process, causing frustration and delays. If a paper jam occurs, carefully and gently remove the jammed papers from the printer without causing any damage to the printer's internal mechanisms. For issues related to paper misalignment, ensure that the paper tray is loaded correctly and that the printer settings precisely match the actual paper size you are using. Consulting your printer's specific manual can often provide tailored solutions and troubleshooting steps for your particular printer model.
Fixing Colour and Font Issues
Color discrepancies can arise due to inconsistencies between your computer screen's display and the actual output from your printer. To mitigate this, always ensure that you are working in the appropriate color mode suitable for professional printing, which is typically CMYK, and that your printer's color settings are correctly configured. For font-related issues, it is crucial to verify that all the fonts used within your InDesign document are properly installed on the system you are printing from and that they have been correctly embedded within your InDesign file during the export process.
Elevating Your Designs with Expert Solutions
While Adobe InDesign provides a powerful suite of tools and features for creating and printing booklets, there might be instances where a project demands a more professional touch or specialized expertise. This is precisely where the experts at Ex Why Zed can offer invaluable assistance. With their extensive experience and robust solutions, even the most complex design projects can be brought to life with remarkable ease and efficiency. Whether you are dealing with portfolio booklet printing or undertaking a large-scale printing job, partnering with Ex Why Zed can significantly elevate your designs to the next level. Do not hesitate to contact them to initiate a conversation about your specific booklet printing needs today.
Frequently Asked Questions
Can I print double-sided booklets in InDesign?
Yes, absolutely. Adobe InDesign is equipped with functionalities that facilitate double-sided, or duplex, printing. To achieve this, navigate to the 'Printer' settings within the print dialog and select 'Two-Sided.' Subsequently, choose 'Short-Edge binding' during the print settings configuration. This setting will ensure your booklet is printed correctly on both sides of the paper.
How do I make an A4 booklet in InDesign?
Creating an A4 booklet in InDesign follows the same fundamental steps as creating any other booklet. The primary difference lies in setting the page size. When creating your new document, simply choose the 'A4' size from the available options in the 'Document Setup' menu. The remaining steps, as outlined in this guide, remain consistent.
What do I do if my printer isn't supported in InDesign?
In such a scenario, a highly effective workaround is to export your InDesign document as a PDF file. Once exported, you can then print the PDF directly using your printer's dedicated software. Utilizing a PDF also provides you with a portable and versatile version of your booklet that can be easily shared or printed at any time, on any compatible device.
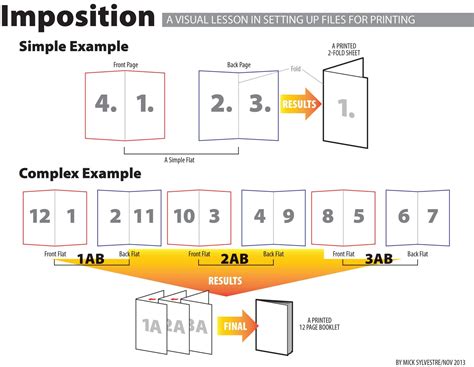
The Print Booklet feature within Adobe InDesign is instrumental in creating what are professionally known as 'printer spreads.' For instance, if you are meticulously working on an 8-page booklet, the pages will naturally appear in sequential order within your InDesign layout window. However, in the context of printer spreads, page 2 is strategically positioned next to page 7, page 3 next to page 6, and so on. This arrangement ensures that when the two pages are printed on the same sheet of paper, subsequently folded, and collated, they will naturally fall into the correct reading order.
Before you commence printing your work, it is vital to carefully consider the paper size that you will be utilizing. For example, a double-page spread of an A5 booklet will naturally result in an A4-sized print area. This, however, does not account for the printer's margins â the essential area around the edge of the paper that the printer is physically unable to print on. When printing double-sided documents, the artwork on the back of the sheet is unlikely to align perfectly with the front without careful consideration.
Under the 'Setup' menu, ensure you select the appropriate paper size. The orientation should typically be set to landscape for booklet imposition. Within the 'Marks and Bleed' section, you may consider adding crop marks, especially if your booklet features a significant amount of white space, as these marks will greatly assist when trimming the printed pages down to their final size. After configuring these settings, click 'OK.'
Returning to the 'Print Booklet' dialog box, you can then click on the 'Preview' area. This allows you to review color thumbnails of the imposed printer spreads. The Print Booklet feature is designed to create printer spreads specifically for professional printing workflows. For example, if you are editing an 8-page booklet, the pages are displayed in sequential order in the layout window. The process of transforming these layout spreads into printer spreads is known as imposition. During the imposition process, you have the flexibility to adjust various settings, including the spacing between pages, margins, bleed, and creep. Crucially, the layout of your original InDesign document remains entirely unaffected, as the imposition process is handled entirely within the print stream. You cannot create a new document directly based on the imposed pages.
From the 'Print Preset' menu, you can select predefined settings. Nonadjacent page numbers can be grouped together for printing. To output your work, click 'Print Settings.' This option creates two-page, side-by-side printer spreads. This is essential for processes like folding and stapling. The final document is assembled based on these imposed pages. The 'Booklet' option imposes pages based on the selected 'Binding' setting. This ensures the pages are arranged correctly for the chosen binding method. This function creates two-page, side-by-side printer spreads that are designed to fit within a specified signature size. These printer spreads are particularly suitable for double-sided printing, followed by cutting and binding to a cover with adhesive. If your booklet features a color cover but black-and-white interiors, you can effectively create two distinct impositions from the same InDesign document: one for the cover pages (front cover, inside front cover, inside back cover, and back cover) and another for the 24 internal pages of the booklet. To produce the color signature, navigate to the 'Pages' area within the 'Setup' section, click 'Range,' and then enter the relevant page numbers, for example, '1-2, 27-28.'
A represents a color signature for the cover, while B illustrates a foldout booklet or brochure. The 'Signature Size' options are typically dimmed when a 'Consecutive' option is selected. For a six-panel, trifold brochure, selecting '3-up Consecutive' is the appropriate choice. This setting allows for multiple pages per sheet, arranged in columns. The 'Booklet' dialog box provides granular control over these settings. The 'Between Pages' value is applicable for all booklet types except 'Saddle Stitch.' The 'Creep' value is essential for compensating for paper thickness and folding in 'Perfect Bound' documents. InDesign interprets the 'cover' of the final printed piece as the outermost printer spread, while the 'centerfold' represents the innermost printer spread. The term 'sheet' in this context refers to two printer spreads: the front of the sheet and the back of the sheet. When you input a positive creep value, the centerfold remains unadjusted, but the pages on the outer sheets are moved away from the spine. For instance, a 16-page InDesign document could yield eight printer spreads, equivalent to four sheets. If the creep value in this example is set to 24 points (an exaggerated amount for illustrative purposes), the creep increment is 8 points per sheet (24 divided by 3). The amount of creep applied to the innermost sheet is 24 points, the creep applied to the third sheet is 16 points, and the creep applied to the second sheet is 8 points. The amount of creep for each successive sheet is progressively decreased by the creep increment.
You can also utilize the scroll box to navigate through the printer spreads. The 'Summary' area within the dialog box provides a concise overview of the current booklet settings. Any conflicting settings will be highlighted at the bottom of the 'Summary' area. You have the option to insert blank pages in the middle of your document to ensure there are sufficient pages for each printer spread. However, it's important to note that if these added pages contain no text or objects, they may not be recognized by InDesign, and additional blank pages might be automatically added at the end of the document. This process can be performed using Adobe Acrobat or InDesign.
To successfully create a booklet in InDesign, a fundamental understanding of how to create a printer spread for professional printing is also essential. For example, when creating an 8-page booklet, the pages appear in sequential order within the InDesign layout window. However, when printed as a printer spread, page 1 is positioned adjacent to page 8, page 2 is positioned adjacent to page 7, and so forth. This arrangement ensures that when the pages are printed on the same sheet of paper, folded, and collated, they all end up in the correct reading order. The following instructions detail how to create an 8-page booklet, printing double-sided on 8.5Ã11â paper in InDesign. In this specific example, each 'page' effectively occupies half of the letter-sized paper.
To initiate the creation of a new booklet:
- After opening InDesign, navigate to
File -> New -> Document. Specify the desired 'Number of Pages.' - Next, select the 'Facing Pages' option. This crucial step will present you with both left-hand and right-hand pages within your InDesign document.
- Choose your page size. For this particular project, we will be using 'Letter â Half (5.5Ã8.5â)' for your 'Page Size.' To correctly set up the page orientation, set the orientation to 'Portrait.'
- It is now time to set your margins.
- Under 'Number of Columns,' select '1.'
- You are now ready to begin designing your InDesign booklet! Click 'Create' to finalize the InDesign booklet setup and commence working on your document.
Now that you have successfully created your InDesign booklet, it is time to proceed with printing. The subsequent instructions explain the process of printing as a booklet after you have meticulously set up and worked on your layout spread.
To print a booklet:
- Open your document in InDesign and, under the
Filemenu, choosePrint Booklet. - Under the 'Print Preset' dropdown menu, select 'Default.' Choose your 'Booklet Type.' We strongly recommend '2-up Saddle Stitch' for most standard booklets.
- At the bottom of the window, select 'Print Settings.' Click on the 'Setup' menu from the left-hand column. Carefully check your paper size and page orientation.
- OPTIONAL: Select the 'Marks and Bleed' menu. You may choose to uncheck marks and bleeds unless you specifically plan to trim your printed booklet.
- Click 'Printer' at the bottom of the window. Select 'Show Details' and then choose 'Two-Sided.' Next, select 'Layout' and choose 'Short Edge Binding.'
- Click 'OK' from the second print window to finalize the application of your setting changes (note: this will not yet send the job to print!).
- From the 'Print Booklet' window, select 'Preview' in the left column to meticulously check the formatting and imposition.
- Double-check that your preview accurately reflects how you want your booklet to print. Once you are completely satisfied, click 'Print.'
Have you ever desired to create a booklet or zine but were unsure of where to begin? Adobe InDesign provides a powerful solution!
- Open InDesign and select
File -> New. - Choose your paper size. The initial decision you'll need to make is the page size. Consider the size of the paper you'll be printing on. For smaller booklets, choose the "half-letter" option. For standard-sized booklets, choose the "letter" option. This setup allows you to print multiple pages of your booklet on each side of a single sheet of paper, facilitating easy folding. This is the page that typically appears (as shown below). When adding pages, ensure the total page count is a multiple of 4.
- Print booklet. Once you have completed the design of your booklet, it's time to print! You can either print directly to your computer or, if your printer supports it, send the file to a professional printer. I always utilize the "2-up Saddle Stitch" type. In the 'Preview' button on the side, you can verify that your layout appears correct. If you have "PostScript File" selected as your printer, click 'Print.'
- You can then use a saddle stapler or manually stitch the pages together.
Making and Ordering a Booklet/Saddle Stitch Book
So, you have an InDesign document that you would like to print out and bind like a magazine or booklet. You have the option to print booklets yourself on any of our on-campus color or BW laser printers, OR submit your files to the SB (Student Business Center) and have our staff print them for you! Jump HERE for DIY instructions. The cost of Booklet/Saddle stitch binding is typically included in the cost of any prints made for the booklets (additional fees may apply if the size of your booklet necessitates hand folding/stapling). Make an appointment with us to discuss your project!
For Full Service Booklet Orders:All booklet orders should be submitted at least 24 hours in advance.
A) DesignDesign your book. Booklets need to have a page count that is a multiple of 4 (e.g., 12, 16, 32, etc.). In a booklet, the first page will serve as your front cover and the last page as your back cover. Download and use our 16-page BOOKLET TEMPLATE for reference or as a guide. Lay out your book, preferably in InDesign with facing pages enabled. If you use another application for layout, you can send us a PDF. Keep important content at least ¼â away from the edge of pages to prevent it from being trimmed. For content that needs to bleed off the edge, ensure you include AT LEAST â
â of bleed. Proof your document on screen or as a black-and-white print. Catch your mistakes now! Package your InDesign file (File > Package) or save or export your pages as a PDF if using another application.
B) Submit a Book Binding order form
C) What we do:Confirm order with an estimate. Confirm all needed elements are present and files are set up correctly. Print booklet, carefully confirming front/back alignment and registration. Bind book. Trim book, if requested. Charge your PaperCut account. You pick up your book!
DIY Booklet Printing Instructions
Ensure your document layout has a page count that is a multiple of 4 (like 8, 16, 20, etc.). This is because when you output the spreads correctly, there will be 4 pages per sheet (2 on one side, 2 on the other). In InDesign, go to File > Print Booklet. The default settings in this window should generally work fine, particularly '2-up Saddle Stitch'. Click on 'Print Settings.' This action opens the standard InDesign print window. Check the box under 'Options' to 'Print Blank Pages.' In the 'Setup' tab (on the left), you can choose the page orientation and scale to fit the page if necessary. Leave the 'Paper size' as 'Defined by Driver.' Click on the 'Page Setup…' button to choose your paper size. Be sure to select 'Format For' the printer you are sending the job to, as each printer has different margins, and this will significantly affect the front-to-back alignment. You can choose your page orientation here as well. If you're printing to any public black-and-white or color laser printer, you'll need to set up duplexing (double-sided printing). Click on the 'Printer…' button. (For the 3rd/4th floor copiers, navigate to 'Finishing' from 'Layout'). Check the box for 'Two-Sided,' and you'll want to choose 'Short-Edge binding' (for a standard booklet). Click 'Print.' You will then be back in the InDesign print window. Turn on any other output options you desire (like 'Crop Marks' or 'Bleeds'). Click 'OK.' This action brings you back to the 'Print Booklet' window. Click on the 'Preview' tab on the left side. You will see a preview layout of your imposed pages. The first sheet should contain your front and back page/covers. If you move the slider all the way to the right, the last spread should contain your middle two pages.