In the realm of digital imaging, the desire to enlarge images while maintaining or even improving their visual quality is a common pursuit. Whether for print, web, or digital display, increasing an image's resolution can be crucial. This process, often referred to as upsampling, involves adding pixels to an image to make it larger. While historically this could lead to a noticeable degradation in quality, modern software like Adobe Photoshop and Adobe Lightroom, powered by advancements in artificial intelligence (AI) and machine learning (ML), offer sophisticated tools to achieve remarkable results.
Understanding Image Resampling: Upsampling vs. Downsampling
Every digital image is composed of a grid of pixels. The resolution of an image is determined by the number of pixels it contains. When we talk about changing the size of an image, we're essentially talking about altering this pixel count.
- Downsampling is the process of decreasing the number of pixels in an image. This is typically done to reduce file size, speed up load times for online content, or to prepare an image for a smaller output. Downsampling involves removing data from the image.
- Upsampling, conversely, is the process of increasing the number of pixels in an image. This is done to make an image larger, either for printing at a larger size or for display on a higher-resolution screen. Upsampling involves adding data to the image.

The challenge with upsampling has always been that the software must create new pixels and determine their color values to fill the added space. This process, known as interpolation, can easily lead to a "guessing game" where the added pixels don't accurately represent the original detail, resulting in blurriness, pixelation, and a loss of sharpness. This is why the adage "you can't make a silk purse out of a sow's ear" often applied to upsampling - you couldn't magically create detail that wasn't there. However, with the advent of AI and ML, this paradigm is rapidly changing.
The Power of AI and Machine Learning in Upsampling
Artificial intelligence and machine learning have revolutionized image upsampling. Instead of simply interpolating based on surrounding pixels, AI algorithms are trained on vast datasets of images. This training allows them to "learn" what details, textures, and patterns typically look like and how to best reconstruct them when an image is enlarged.
- Super Resolution in Adobe Lightroom: Lightroom's Super Resolution feature is a prime example of AI-powered upsampling. With a single click, it can double an image's linear dimensions, quadrupling the total pixel count. This isn't just about adding more pixels; it's about adding better pixels. Lightroom analyzes the context of the image and intelligently selects or generates the most appropriate pixels to maintain and enhance visual quality. This feature is particularly useful for photographers who need to crop into a photo and enlarge a section for a new headshot, or for those looking to achieve high-quality prints from images that might otherwise be too small.
- Photoshop's Advanced Upscaling: Adobe Photoshop also leverages AI for upsampling, most notably with its "Preserve Details 2.0" algorithm. Introduced in Photoshop CC 2018, this technology uses deep learning to detect and maintain important image details without introducing excessive sharpening or artifacts. It represents a significant leap forward from older methods like Bicubic Smoother, which tended to either over-smooth details or introduce unwanted sharpening.
These AI-driven tools can take an image and enlarge it by 200% or even 400% with remarkably little loss of perceived quality, often making it difficult to discern that the image has been upscaled at all. This capability is especially valuable for photographers who might have captured a great shot but need it to be larger than initially planned, or for enhancing older digital photos that were taken with lower-resolution cameras.
Step-by-Step: Upsampling in Photoshop
Photoshop offers multiple ways to control image resolution, catering to different needs and levels of control.
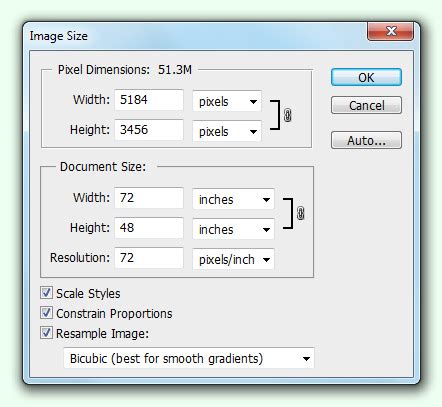
Method 1: Using the Image Size Dialog with Resampling
This method provides direct control over the image's dimensions, resolution, and the resampling algorithm used.
- Open the Image: Launch Adobe Photoshop and open the image you wish to upscale by going to
File > Openor using the shortcutCTRL+O(Windows) /Cmd+O(Mac). - Access Image Size: Navigate to
Image > Image Size. - Enable Resampling and Choose Algorithm:
- Ensure the Resample box is checked. This tells Photoshop you want to change the total number of pixels.
- If you are enlarging the image, select Preserve Details 2.0 from the "Resample" dropdown menu for the best quality. For general enlargement, "Bicubic Smoother (enlargement)" is also a good option.
- Make sure the chain link icon between Width and Height is activated to maintain the aspect ratio and avoid distortions.
- Enter New Dimensions: Input your desired values for Width and Height. You can specify these in pixels, percentages, inches, or centimeters, depending on your needs.
- Scale Styles (if applicable): If your image has layers with applied styles, click the gear icon next to "Resample" and select Scale Styles to ensure these effects are scaled appropriately.
- Preview and Apply: Observe the preview window to see how the upscaled image will look. Zoom in to 100% to check for detail and potential artifacts. Click OK to apply the changes.
Method 2: Leveraging Preserve Details 2.0 (AI-Based)
This method is specifically designed for achieving the highest quality when upscaling photographic images, using AI to maintain detail and reduce blur.
- Enable Preserve Details 2.0:
- Go to
Edit > Preferences(Windows) orPhotoshop CC > Preferences(Mac). - Navigate to the Technology Previews section.
- In the resizing options, ensure Resample is selected.
- Look for and enable Preserve Details 2.0 (it might be listed under "Experimental Features" or similar depending on your Photoshop version). Click OK.
- Go to
- Open the Image: As described in Method 1.
- Access Image Size:
Image > Image Size. - Configure Resampling:
- Check the Resample box.
- Ensure the aspect ratio is linked.
- From the resampling method dropdown, select Preserve Details 2.0.
- Enter your desired dimensions. For significant enlargements, a factor of 1.5x to 2x is often a good starting point for achieving the best quality.
- Apply: Click OK to apply the upscaling. The preview will update to show the enhanced result.
Method 3: Smart Object + Free Transform (Non-Destructive Upscaling)
This method allows for non-destructive resizing, meaning you can re-edit the transformation later without losing quality.
- Open the Image: As described previously.
- Convert Layer to Smart Object: In the Layers panel, right-click on your image layer and select Convert to Smart Object. A small icon will appear on the layer thumbnail, indicating it's a Smart Object.
- Activate Free Transform: Go to
Edit > Free Transformor use the shortcutCTRL+T(Windows) /Cmd+T(Mac). - Upscale Non-Destructively: Drag the corner handles outwards to enlarge the image. Hold
Alt(Windows) /Option(Mac) while dragging to scale from the center. The image might appear pixelated during this live transformation. - Commit Transformation: Click the checkmark in the options bar or press
Enter(Windows) /Return(Mac) to commit the transformation. Photoshop will use its default resampling technique, or you can choose a specific one beforehand if you access the "Image Size" dialog before Free Transform.
Method 4: Neural Filters (Enhancement, Not Direct Upscaling)
While not a direct upscaling tool for changing dimensions, Photoshop's Neural Filters can enhance perceived image quality, which complements upscaling efforts.
- Super Zoom: Within the Neural Filters, the "Super Zoom" option can help to magnify parts of an image and attempt to reconstruct detail. However, it's important to note that this is more of an enhancement tool rather than a method for fundamentally increasing the image's pixel dimensions. It can be useful for recovering detail in specific areas after an initial upscaling.
Method 5: Camera Raw Filter Upscale
The Adobe Camera Raw (ACR) filter offers a powerful "Enhance" feature that includes "Super Resolution," which is excellent for low-quality images.
- Open the Image: As described previously.
- Convert to Smart Object: Right-click the layer in the Layers panel and select Convert to Smart Object. This allows you to apply the Camera Raw filter non-destructively.
- Activate Camera Raw Filter: Go to
Filter > Camera Raw Filter. - Enhance Image:
- Within the Camera Raw interface, click on the Enhance button (it looks like two overlapping circles or a sparkle icon).
- Check the Super Resolution option. This feature doubles the linear resolution, quadrupling the pixel count.
- Click Enhance. ACR will process the image and create a new DNG file with the increased resolution.
- Preview and Apply: You can preview the changes. After enhancing, click OK to apply the filter to your Smart Object layer. You may then want to apply further sharpening or noise reduction.
How to use the Super Resolution feature in Photoshop
Upsampling for Print vs. Screen
It's important to distinguish between upsampling for print and for screen display.
- Print: For printing, resolution is typically measured in Pixels Per Inch (PPI). A common standard for high-quality prints is 300 PPI. If you have an image that is too small to print at 300 PPI at your desired physical dimensions, upsampling can help you reach that target. However, it's crucial to understand that upsampling doesn't create new information; it interpolates existing data. While modern AI methods are excellent at minimizing artifacts, an image upsampled from a very low resolution will still have limitations.
- Screen: For screen display, resolution is less about PPI and more about the total pixel dimensions. An image that looks good on a high-resolution monitor might appear pixelated if enlarged significantly. AI upscaling can still be beneficial here to ensure smooth lines and details on larger displays.
Considerations and Limitations
While AI upscaling has made incredible strides, it's not a magic bullet.
- Starting Quality Matters: The better the original image quality, the better the upscaled result will be. Upsampling a heavily compressed JPEG with significant artifacts will likely exaggerate those flaws. High-quality RAW files or TIFFs will yield the best results.
- No True Detail Creation: Upsampling adds pixels based on educated guesses. It cannot invent details that were never captured. The goal is to make the existing detail appear larger and smoother, not to reveal entirely new information.
- Interpolation Methods: When not using AI-specific tools, the choice of interpolation method in Photoshop's Image Size dialog (e.g., Bicubic Smoother, Nearest Neighbor) can significantly impact the outcome. Bicubic Smoother is generally good for enlargements, while Nearest Neighbor is best for hard edges and pixel art.
- External AI Upscalers: Beyond Adobe products, dedicated AI upscaling software and online tools like Topaz Gigapixel AI, Upscale.media, and DeepImage offer specialized algorithms for image enlargement, often with impressive results.
Conclusion
Upsampling an image in Photoshop or Lightroom has evolved from a process fraught with quality compromises to a sophisticated technique capable of producing stunning results. By understanding the principles of pixel resampling and leveraging the power of AI-driven features like Super Resolution and Preserve Details 2.0, photographers and designers can confidently enlarge their images, ensuring clarity and detail for both print and digital applications. While the fundamental limitation of not being able to create information that isn't there remains, modern tools allow us to push the boundaries of image enlargement further than ever before, transforming potentially pixelated enlargements into sharp, visually appealing visuals. Experimentation with these tools will reveal the best approach for your specific images and desired outcomes.