Opacity is a fundamental concept in Adobe Photoshop, offering users a powerful means to control the visibility and interaction of layers and design elements. Understanding and effectively manipulating opacity is crucial for achieving a wide range of visual effects, from subtle blending to dramatic transformations. This article will explore the multifaceted nature of opacity in Photoshop, delving into its core principles, practical applications, and advanced techniques.
Understanding the Core Concept of Opacity
At its heart, opacity in Photoshop refers to the degree of transparency or opaqueness of an image or a layer. It dictates how much of the underlying layers or image will be visible when multiple layers are combined. The opacity scale ranges from 0% to 100%. At 0% opacity, a layer is completely transparent, meaning it reveals everything beneath it. Conversely, at 100% opacity, a layer is entirely opaque, completely obscuring any content in the layers below.
The visual distinction between opaque and transparent areas is often represented by a checkerboard pattern in Photoshop, clearly indicating where a layer is transparent and therefore allowing the pixels in layers beneath it to show through.
Opacity vs. Fill Opacity: A Crucial Distinction
While often used interchangeably in casual conversation, opacity and fill opacity in Photoshop are distinct settings with different functionalities.
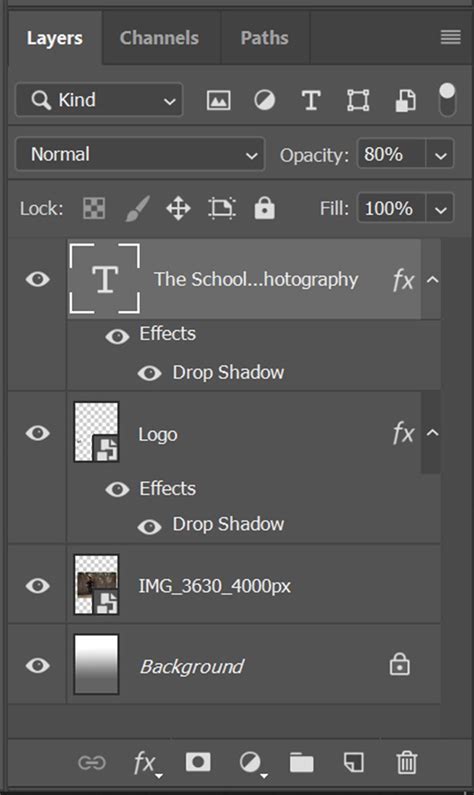
- Opacity: This setting controls the transparency of the entire layer. This includes the layer's content, any effects applied (such as drop shadows, strokes, or bevels), and layer styles. When you adjust the main opacity slider, everything on that layer becomes more or less transparent.
- Fill Opacity: This setting affects only the actual content of the layer, excluding any applied layer styles or effects. This means that if you have a drop shadow on a layer and reduce its fill opacity, the drop shadow will remain fully visible while the content of the layer itself becomes more transparent. This distinction is vital for creating specific visual effects where you want to alter the transparency of the layer's core elements without diminishing the impact of its applied styles.
For instance, imagine text with a stroke and a drop shadow. If you reduce the layer's overall opacity, both the text, the stroke, and the drop shadow will become more transparent. However, if you reduce only the fill opacity, the text itself will fade, while the stroke and drop shadow will remain solid. This capability allows for nuanced control over how elements appear in your composition.
Adjusting Layer Opacity: The Primary Method
The most common way to reduce opacity in Photoshop is by using the Opacity slider located in the Layers panel.
- Locate the Layers Panel: Ensure your Layers panel is visible. If not, go to
Window > Layers. - Select the Target Layer: Click on the specific layer you wish to adjust. You'll see its name highlighted in the panel.
- Adjust the Opacity Slider: At the top of the Layers panel, you'll find an "Opacity" setting, typically displayed as a percentage. Click and drag the slider to the left to decrease opacity (increase transparency) or to the right to increase opacity (decrease transparency). You can also click directly on the percentage number and type in a specific value.
Locked Layers and Opacity
There are instances where the Opacity options might be grayed out, preventing you from making adjustments. This typically occurs with locked layers. A padlock icon next to the layer name in the Layers panel indicates that the layer is locked. To adjust the opacity of a locked layer, you will first need to unlock it by clicking on the padlock icon. Background layers are often locked by default.
Opacity and Brush Tools
Opacity is not exclusive to layers; it also plays a significant role in controlling the behavior of various Photoshop tools, most notably the brush tool.
- Brush Opacity: When using the brush tool, you can adjust its opacity directly from the Options bar at the top of the screen. This setting determines the transparency of each individual brush stroke as you apply it. A lower brush opacity will result in more subtle and gradual strokes, allowing the underlying colors to show through more prominently. This is invaluable for creating soft gradients, delicate shading, and realistic painting effects.
- Keyboard Shortcuts for Brush Opacity: For quick adjustments to brush opacity while using the brush tool, you can use the number keys on your keyboard. Pressing a number from 1 to 9 will set the brush opacity to that percentage (e.g., pressing '2' sets it to 20% opacity, '8' to 80%). Pressing '0' will set the opacity to 100%. If you press two numbers in rapid succession, you can set a specific two-digit percentage (e.g., pressing '5' then '0' will set it to 50%).
Blending Modes: A Powerful Partnership with Opacity
Blending modes are a sophisticated set of tools that determine how pixels from one layer interact with pixels from the layers beneath it. When used in conjunction with opacity, blending modes unlock a vast array of creative possibilities.
- How Blending Modes Work: Each blending mode offers a unique algorithm for combining the color information of the active layer with the underlying layers. This can result in effects ranging from lightening and darkening to color manipulation and complex textural overlays.
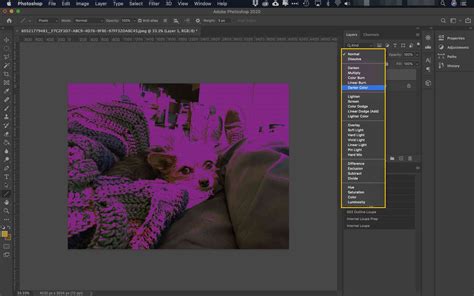
- Real-time Previews: Photoshop provides an intuitive way to experiment with blending modes. When you hover your mouse cursor over different blending mode options in the Layers panel's Blend Mode pop-up menu, the image updates in real-time to show a preview of how that mode will affect your selected layer and the layers below. This instant visual feedback removes much of the guesswork, making it significantly easier to select the most appropriate effect.
- Common Blending Modes and Opacity:
- Normal: This is the default mode. It applies the layer's opacity directly without any special blending. A Normal mode layer at 50% opacity will simply show 50% of its content, with the other 50% revealing the layer beneath.
- Multiply: This mode darkens the image by multiplying the color values of the active layer with the underlying layers. It's excellent for creating shadows or darkening effects.
- Screen: This mode lightens the image by combining the color values. It's the inverse of Multiply and is often used for creating highlights or glowing effects.
- Overlay: This mode blends the layers by either multiplying or screening them, depending on the underlying color. It preserves the highlights and shadows of the underlying layers while applying the color and contrast of the top layer.
- Soft Light/Hard Light: These modes mimic the effect of a harsh or soft spotlight on the image, increasing or decreasing contrast.
The blending mode of a layer decides how pixels blend in an image, and its interaction with opacity allows for precise control over the intensity and appearance of these blends.
Advanced Opacity Techniques and Considerations
Beyond the basic slider, Photoshop offers several advanced techniques and considerations for manipulating opacity.
Clipping Masks and Opacity
A clipping mask is a powerful tool that allows you to use the content of one layer to mask, or reveal, the content of the layers directly beneath it. When working with clipping masks, you can control the opacity of individual layers within the masked group, further refining the overall effect.
- Clipping Mask Basics: To create a clipping mask, you typically place the masking layer above the layer(s) you want to affect. Then, you can either
Alt-click (Windows) orOption-click (Mac) between the two layers in the Layers panel, or right-click the top layer and select "Create Clipping Mask." - Blend Clipped Layers As Group: By default, layers in a clipping mask are blended with the underlying layers using the blending mode of the bottommost layer in the group. However, you can choose to have the blending mode of the bottommost layer apply only to that layer, allowing you to preserve the original blending appearance of the clipped layers. This option, "Select Blend Clipped Layers As Group," can be found within the Blending Options.
Adjustment Layers and Opacity
Adjustment layers are non-destructive layers that allow you to apply color and tonal adjustments to your image without permanently altering the original pixel data. Crucially, adjustment layers also have their own opacity settings, enabling you to control the intensity of the applied adjustment.
For example, you could add a Hue/Saturation adjustment layer to desaturate an image. By then reducing the opacity of this adjustment layer, you can achieve a subtle desaturation effect rather than a complete removal of color. This non-destructive workflow is highly recommended for maintaining flexibility in your editing process.
Layer Styles and Opacity
Layer styles, such as drop shadows, strokes, outer glows, and bevels, are effects applied to layers that can significantly enhance their appearance. Each of these layer styles often has its own individual opacity settings, providing granular control over their intensity.
- Adjusting Layer Style Opacity: When you double-click a layer to open its Blending Options, you'll find individual opacity controls for each applied style. This allows you to, for instance, have a solid drop shadow while the layer content itself is semi-transparent, or vice-versa.
- Opacity in Blending Options: Within the Blending Options dialog box, you'll also find sliders for "This Layer" and "Underlying Layer." These sliders allow you to control the range of pixels on the active layer and the underlying visible layers, respectively, that will blend and appear in the final image. Dragging the white slider (for "This Layer") to the left, for example, will make darker pixels in the active layer more transparent. Conversely, dragging the "Underlying Layer" sliders can make brighter or darker pixels from the layers below more or less visible.
Transparency Shapes Layers
The "Transparency Shapes Layers" option within the Blending Options allows you to restrict layer effects and knockouts to only the opaque areas of the layer. This means that any transparent regions of the layer will not interact with the layer styles or be affected by knockout settings.
Dealing with Specific Scenarios
The "Partial Delete" Question
A common question arises regarding the ability to perform a "partial delete" directly within a selection, effectively reducing the opacity of only the selected pixels. While Photoshop doesn't offer a direct "partial delete" command that pops up a dialog box for this specific purpose, the desired effect can be achieved through other means:
- Fill with Opacity: You can create a new layer, make your selection, and then use the "Fill" command (
Edit > Fill). Within the Fill dialog, you can choose a color and then set the opacity for that fill. However, this is a destructive edit to the new layer. - Masks and Additional Layers: As mentioned in the provided text, using masks and additional layers is a common and non-destructive way to achieve this effect. You can fill a selection on a layer and then apply a layer mask to control its transparency.
- Brush Tool with Opacity: A more direct approach to a "partial delete" effect within a selection is to use the Eraser tool or Brush tool set to erase, with a reduced opacity. With the selection active, you can then "erase" portions of the layer, and the opacity setting of the eraser will determine how much is removed.
While a dedicated "partial delete" dialog might be a useful feature, the existing tools in Photoshop provide ample flexibility to achieve this outcome.
Working with Locked or Background Layers
As noted, background layers or other locked layers often prevent direct opacity adjustments. To work around this:
- Duplicate the Layer: The most straightforward method is to duplicate the locked layer (
Layer > Duplicate LayerorCtrl/Cmd + J). The duplicated layer will be unlocked and its opacity can be adjusted freely. - Convert to Smart Object: You can convert a locked layer into a Smart Object. Smart Objects preserve the original image data and allow for non-destructive transformations, including opacity adjustments.
- Use Adjustment Layers: As mentioned earlier, adjustment layers can control the opacity of multiple layers simultaneously or be used to modify the appearance of even locked layers indirectly.
Opacity in Different Color Modes
It's worth noting that certain blending modes are unavailable for specific color modes. For instance, in Lab color mode, options like Color Dodge, Color Burn, Darken, Lighten, Difference, Exclusion, Subtract, and Divide are not available. Understanding these limitations is important when working with advanced color spaces.
The Impact of Opacity on Image Editing and Photography
In digital photography and image editing, opacity is a cornerstone for achieving professional results.
- Creating Subtle Fades: A common technique involves adding a solid white layer above an image and then reducing its opacity. This creates a subtle, faded, or vintage look by gently lightening and desaturating the underlying image.
- Type Layer Transparency: Adjusting the opacity of type layers allows text to blend more harmoniously with backgrounds, creating visual depth and hierarchy.
- Compositing and Special Effects: Opacity is fundamental to compositing different images together. By carefully adjusting the opacity of various elements, you can seamlessly blend them to create entirely new scenes or special effects.
- Photography Workflow: Whether working in Photoshop or Lightroom, understanding how opacity affects transparency is crucial. It dictates how elements interact, from text overlays to the intensity of photographic filters.
Saving Files and Opacity
While not directly an editing technique, it's worth considering that opacity settings can influence the final appearance and, in some cases, the file size of your saved images, especially when dealing with complex layer structures or specific file formats like TIFF or PNG that support transparency.
Conclusion: Embracing Opacity for Enhanced Creativity
Mastering opacity in Adobe Photoshop is not merely about adjusting a slider; it's about understanding how transparency impacts the interplay of elements within a design. By leveraging opacity in conjunction with blending modes, clipping masks, adjustment layers, and layer styles, designers and photographers gain powerful tools to refine their work, create sophisticated visual effects, and elevate their creative output. Whether you're aiming for subtle enhancements or dramatic transformations, a deep understanding of opacity is indispensable for producing visually appealing and highly polished work.