Photoshop's Smart Objects are a fundamental feature for maintaining non-destructive workflows and maximizing flexibility in your creative projects. They act as intelligent containers for your layers, offering a powerful way to edit, transform, and manage content without compromising original image quality. This tutorial will guide you through the creation, manipulation, and various applications of Smart Objects, from basic conversions to advanced integration with other Adobe applications.
Understanding the Core Concept of Smart Objects
At its heart, a Smart Object is a container that holds the contents of a layer. This container protects the contents inside it from harm, meaning that any transformations or filter applications applied to a Smart Object are non-destructive. This is a significant advantage over standard raster layers, where resizing or applying filters permanently alters the pixel data, leading to potential quality degradation.
The key benefit of Smart Objects lies in their ability to preserve the original source content. You can make multiple copies of a Smart Object, all displaying the same content. When you edit or replace the content within one Smart Object, your changes instantly appear in each and every copy. This characteristic makes Smart Objects perfect for creating reusable templates, design systems, or mockups where a single change needs to propagate across numerous instances.
Creating Smart Objects in Photoshop
There are several straightforward methods to create a Smart Object in Photoshop, catering to different starting points in your workflow.
Converting Existing Layers to Smart Objects
One of the most common ways to utilize Smart Objects is by converting an existing layer. This is particularly useful when you've already added content to your document and want to ensure its editability.
- From the Layers Panel Menu: In the Layers panel, locate the layer you wish to convert. Right-click (Windows) or Control-click (Mac) directly on the layer. From the contextual menu that appears, select "Convert to Smart Object."
- From the Menu Bar: Alternatively, with the desired layer selected in the Layers panel, navigate to
Layer > Smart Objects > Convert To Smart Object.
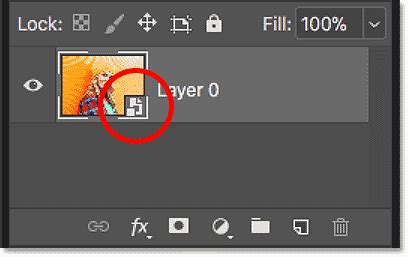
Upon conversion, you'll notice a small Smart Object icon appear in the lower-right corner of the layer's preview thumbnail in the Layers panel. This icon is Photoshop's visual indicator that the layer is now a Smart Object. While it might not look like anything has happened to the image itself, the underlying data is now protected.
Opening Images Directly as Smart Objects
Photoshop allows you to open various file types directly as Smart Objects, bypassing the need to convert them after opening.
- Standard Image Files: When you navigate to and open a standard image file (like a JPEG or PNG) through
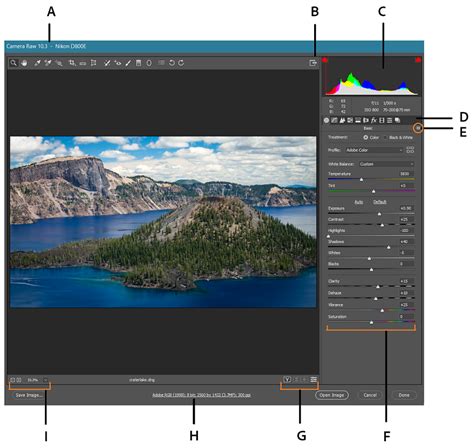
File > Open, it will typically open as a regular raster layer. However, you can achieve the same result as converting an existing layer by using the "Place Embedded" command. - Raw Files: The benefit of opening a raw file as a Smart Object is that a copy of the raw file itself will be embedded into the Photoshop file. This allows you to reopen it in Adobe Camera Raw at any time, make extensive edits, and have your changes instantly reflected in the document.
- To open a raw file as a Smart Object, navigate to the raw file on your computer. Click on the file to select it, and then click "Open." In the Camera Raw dialog box, instead of clicking the standard "Open Image" button, press and hold the Shift key on your keyboard. The "Open Image" button will transform into "Open Object." Clicking this will open the raw file as a Smart Object.
- You can also achieve this from Adobe Lightroom. In Lightroom, go to the
Photomenu, chooseEdit In, and then selectOpen as Smart Object in Photoshop. Be aware that double-clicking the thumbnail of such an opened image in Photoshop's Layers panel will open it in Camera Raw, not Lightroom.
Placing Files as Smart Objects
The "Place" command is a versatile tool for bringing external content into your existing Photoshop document as Smart Objects.
- Place Embedded (Photoshop CC and later): Go to
File > Place Embedded. This command embeds the selected file directly into your Photoshop document as a Smart Object. - Place (Photoshop CS6): In older versions like CS6, use
File > Place.
When you use "Place Embedded" or "Place," Photoshop first presents you with the Free Transform handles, allowing you to scale, rotate, and position the incoming content before committing it. This is an opportune moment to resize and transform the Smart Object layer to your liking. For instance, to scale a texture image to cover the entire canvas while maintaining its aspect ratio and centering it, you can hold down Alt (Windows) / Option (Mac) while dragging a corner handle. Pressing Enter (Windows) / Return (Mac) commits the transformation. The placed image will then appear in your Layers panel as a Smart Object.
How to Crop an Embedded Image in Adobe Photoshop
Pasting Adobe Illustrator Files as Smart Objects
Seamlessly integrating vector artwork from Adobe Illustrator into Photoshop is a significant advantage of using Smart Objects.
- In Illustrator, select the vector artwork you wish to copy.
- Go to
Edit > Copy. - Switch to your Photoshop document.
- Go to
Edit > Paste. Photoshop will present you with pasting options. Choose "Smart Object."
The Illustrator artwork will be pasted into your Photoshop document as a vector Smart Object. This means you can scale and resize it as much as you need within Photoshop without any loss in vector quality. Double-clicking the Smart Object's thumbnail will open the artwork back in Illustrator, allowing you to make any necessary changes.
Working with Smart Objects: Editing and Transformations
Once you have a Smart Object, its true power is revealed in how you can interact with its contents non-destructively.
Editing Smart Object Contents
To modify the contents of a Smart Object, you essentially edit the source content within its container.
- Manual Editing: Double-click the Smart Object layer in the Layers panel. This will open the Smart Object's contents in a new tab or window, depending on the original content type (e.g., a new Photoshop document for a Photoshop Smart Object, or Illustrator for a pasted Illustrator file). You can then place your desired image or make your edits at the top of the layer stack. Save this tab/window (
File > Save) to update the Smart Object in your main document. - Batch Replacement: If you're performing a large number of Smart Object replacements, such as when creating mockup images for multiple products, automating this process can save significant time. Plugins like "Batch-Replace Smart Objects" allow you to specify a Photoshop Document to use, an input folder containing your replacement images, and an output folder to save the results. Clicking "Run" will automate the creation of all your required mockups.
Non-Destructive Transformations
A core benefit of Smart Objects is their ability to undergo transformations without degrading quality.
- Resizing and Repositioning: You can resize, reposition, and otherwise transform a Smart Object layer to your liking using the Free Transform tool (
Edit > Free TransformorCtrl+T / Cmd+T). Unlike raster layers, which lose fidelity when scaled up after being scaled down, Smart Objects can be scaled up and down multiple times without losing quality. Photoshop essentially re-renders the content from its original source data each time. - Distorting and Warping: You can also apply more complex transformations like distorting, skewing, and warping to Smart Objects. These operations remain non-destructive, allowing you to revert or modify them later.
Applying Smart Filters
Filters applied to Smart Objects become "Smart Filters." This means they are non-destructive and can be re-edited, toggled on/off, or deleted at any time.
- Ensure your Smart Object layer is selected in the Layers panel.
- Go to the
Filtermenu and choose your desired filter (e.g.,Camera Raw Filter,Blur,Sharpen). - Photoshop will prompt you to convert the layer to a Smart Object if it isn't already. Confirm this.
- Apply your filter settings in the respective dialog box.
The filter will appear under the Smart Object layer in the Layers panel, often labeled as "Smart Filter." You can double-click on the filter name to re-open its settings and make adjustments. You can also right-click on the Smart Filter to access options like deleting it, disabling it, or applying it to a specific area using a layer mask.
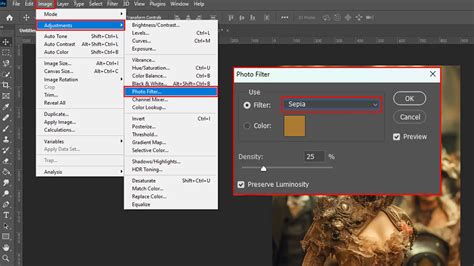
For example, converting a color image to grayscale using the Camera Raw Filter on a Smart Object is a perfect use case. You can easily revert to the color version by simply turning off the Camera Raw smart filter.
Advanced Smart Object Workflows
Smart Objects integrate powerfully with other Adobe applications and enable complex, non-destructive workflows.
Combining Layers into a Smart Object
You can group multiple layers and then convert that group into a single Smart Object. This is incredibly useful for managing complex compositions or applying global adjustments to a set of layers.
- In the Layers panel, select the layers you want to group.
- Right-click (Windows) or Control-click (Mac) on the selected layers and choose "Convert to Smart Object."
This action encapsulates all the selected layers into one Smart Object layer. You can then apply Smart Filters to this combined Smart Object, affecting all the layers within it simultaneously and non-destructively. Double-clicking this combined Smart Object will reopen it as a separate Photoshop document, allowing you to edit the individual layers within.
Smart Objects and Layer Masks
Smart Objects can be combined with layer masks just like any other layer. This allows you to selectively reveal or conceal parts of the Smart Object's content. When you apply a filter to a Smart Object that has a mask, the filter will only affect the visible areas of the Smart Object as defined by the mask.
Smart Objects vs. Linked Smart Objects
Photoshop offers two primary types of Smart Objects:
- Embedded Smart Objects: These are self-contained within the Photoshop document. When you place a file using "Place Embedded," it becomes an embedded Smart Object.
- Linked Smart Objects: These are linked to an external file. When you use
File > Place Linked, Photoshop creates a link to the original file. The advantage here is that if you update the external linked file (e.g., in Illustrator or as a raw file), the Smart Object in your Photoshop PSD will automatically update to match. This is extremely useful for projects that use the same asset (like a logo) in multiple places, as a single update to the source file propagates everywhere.
The primary difference lies in how the source data is managed. Embedded Smart Objects increase the size of your PSD file but ensure all data is within one package. Linked Smart Objects keep your PSD file smaller and facilitate easier asset management across multiple projects, but they rely on the external file remaining accessible.
Practical Applications and Benefits
The versatility of Smart Objects makes them indispensable for a wide range of tasks:
- Mockup Creation: As mentioned, creating mockups for websites, app interfaces, or product designs is vastly simplified. You can create a template with Smart Objects for each screen or product variant, then easily update the content by replacing the Smart Object's source.
- Template Design: For recurring design elements or layouts, Smart Objects ensure consistency and efficiency.
- Non-Destructive Editing: This is the overarching benefit. Whether it's scaling, transforming, or applying filters, Smart Objects allow you to experiment and refine your work without fear of permanently damaging your original assets.
- Vector Integration: Bringing vector graphics from Illustrator into Photoshop as Smart Objects preserves their scalability and crispness.
- Raw File Editing: The ability to re-edit raw files within Camera Raw directly from a Smart Object provides unparalleled control over your image capture data.
By mastering the use of Smart Objects, you elevate your Photoshop workflow from a series of destructive edits to a flexible, iterative, and professional process. They are a cornerstone of modern, non-destructive digital imaging and graphic design.