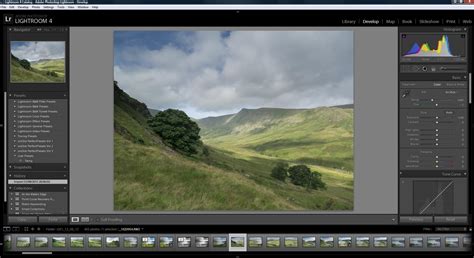
Adobe Lightroom is an incredibly powerful tool for photographers, offering a vast array of features to elevate your images. However, navigating its capabilities can seem daunting at first glance, especially for those new to the world of digital post-processing. The key to unlocking Lightroom's full potential lies in understanding efficient workflows and mastering specific techniques. This article aims to guide beginners through essential editing tips that can significantly speed up your workflow, enhance your creativity, and ultimately lead to better results. While the fundamentals of each slider are not covered here, these tips are designed to help you become more efficient from the outset, or to refine your existing skills if you already have a grasp of the basics. For those who don't yet have Lightroom, a free trial is available to get you started.
The Crucial First Step: Culling Your Photos
One of the most common and time-consuming mistakes beginners make in Lightroom is editing too many photos. This includes editing photos that will never be used or delivered. The process of selecting which photos to edit is known as culling, and it is an absolutely essential step that should be performed before you begin any significant editing work.
When I first started editing, I made this mistake all. the. time. I even continued this habit after I started working on professional photo shoots! If this sounds like you, I totally understand, but please stop immediately. You will save an immense amount of time in the long run if you force yourself to make these crucial decisions first. Culling ensures that you are not wasting precious editing time on images that won't make the final cut.
There are various methods for culling your photos. You can do it directly within Lightroom, or you can utilize dedicated software such as Photo Mechanic or Aftershoot AI. Regardless of the tool you choose, the most challenging aspect remains making those difficult decisions.
My advice when culling is to look beyond simply deleting the obvious "no" photos. Try not to get too bogged down by the "maybe" photos either. Instead, focus on identifying the images you are most proud of, the ones you genuinely want to keep, display on your wall, deliver to a client, or share online. In this scenario, the principle of "out of sight, out of mind" can be incredibly beneficial. Once you've made your selections, resist the urge to revisit the nearly-as-good photos that didn't make the cut, and definitely do not edit them. It's acceptable to have a few images you're still unsure about, but avoid starting the editing process for over 100 photos if you only plan to keep or deliver around 30. You won't realistically use 10 nearly identical photos for every single shot, and editing them all is a significant waste of time when that energy could be directed elsewhere. Trust your instincts as much as possible, as early as possible.
For those looking to delve deeper into culling strategies, further resources on efficient culling approaches are available.
Organizing for Efficiency: Collections and Collection Sets
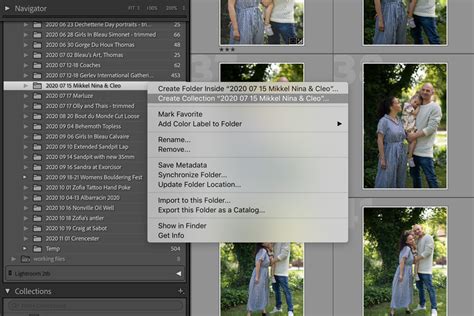
Once you have culled your photos and decided which ones to edit, organizing them effectively is the next step towards a streamlined workflow. Lightroom's "Collections" and "Collection Sets" are invaluable tools for this purpose. Grouping photos by location, lighting conditions, or time of day can dramatically speed up your batch editing process. For instance, you can create a collection for all your sunny outdoor shots, another for those taken in the shade, and a separate one for indoor images. This logical grouping allows you to apply similar editing styles and settings to a batch of photos that share common characteristics, making the editing process much more efficient.
The Magic of "Match Total Exposure"
A feature that can be a true game-changer, especially for those using zoom lenses with variable apertures, is "Match Total Exposure." I discovered this option relatively recently and wish I had known about it much, much earlier! If you have a series of similar photos taken under similar lighting conditions but with slightly different exposures, you can perfect the exposure on one image and then apply that setting to the others.
This is particularly helpful if you use a lens like a 70-300mm that has an aperture changing from f/4 to f/5.6 as you zoom. Previously, it would take an eternity to manually adjust the exposure on every photo to match those taken at f/5.6 with those at f/4. Now, you can simply select all the relevant photos and click one button. This single function has saved me an incredible amount of time and frustration.
Harnessing the Power of Batch Editing
Batch editing is a fundamental technique for accelerating your editing workflow in Lightroom. If you utilize presets, you can apply them to a group of photos all at once. Furthermore, you can apply any basic edits that you believe are suitable for most of the images in a shoot. After this initial pass, you can then go through each photo individually. When you achieve the desired look for a particular image, you can copy and paste those edits to the next photo or any other similar image.
It is highly recommended to carefully review the checkboxes that appear when copying edits, ensuring you only select the elements you actually want to transfer. While you can fine-tune this extensively, for similar photos, I generally select all options except for local adjustments like gradient filters, spot removal, crop, and perspective shifts. Depending on the specific photo, I might also choose to include or exclude exposure and white balance adjustments. This selective copying ensures that you maintain control over your edits while still benefiting from the speed of applying common adjustments.
The Indispensable Role of Presets
If you are not already using presets in Lightroom, you should seriously consider starting. Presets are essentially saved editing settings that can be applied to your photos with a single click. You don't necessarily need to buy them; you can easily create your own.
To begin creating your own Lightroom presets, pay attention to the types of edits you find yourself making repeatedly. Do you consistently increase the exposure on your images? (Many photographers, myself included, tend to underexpose!). Do you frequently adjust highlights and shadows, or manipulate the tone curve? The next time you are editing a photo, pause after you've made those fundamental edits and save them as a preset before diving into more intricate adjustments. It's a good practice to review the checkboxes before saving. Any category that is checked within a preset will overwrite existing edits in that category. Therefore, it's safest to only check the boxes for the adjustments you have actually made. Save the preset, and you've just saved your future self a significant amount of time and effort.
Create Your First Preset Quickly! Lightroom Tutorial.
Advanced Techniques for Power Users
For photographers who spend a substantial amount of time editing in Lightroom and are willing to invest in further speeding up their workflow, there are additional advanced strategies to consider.
Keyboard Shortcuts and Mapping for Ergonomics and Speed
Within Lightroom, I heavily rely on keyboard shortcuts, and I've taken this a step further with keyboard mapping. Keyboard mapping involves assigning shortcuts to every Lightroom option you use frequently. This allows you to perform edits by typing commands rather than constantly reaching for the mouse.
Initially, I adopted this practice for ergonomic reasons. Clicking and dragging for extended periods on a laptop can be detrimental to your wrists. However, I've also found that it dramatically accelerates my editing process. It has become second nature to me now.
There are numerous ways to implement keyboard mapping. Personally, I have mapped all my basic, go-to sliders to the left side of my keyboard. For example, typing 'Q' and 'W' might increase or decrease the temperature of a photo, while 'E' and 'R' control the tint. This frees up my right hand to operate the trackpad or, more commonly, my editing tablet for quick cropping or retouching tasks.
For keyboard mapping, I utilize a subscription software called Power Keys, which I find to be the most seamless and bug-free option available. It has proven to be exceptionally worthwhile for me.
Some photographers opt for additional control surfaces like the Loupedeck or even video game controllers. While I haven't had the opportunity or the desk space to experiment with these yet, the potential for increased efficiency and a more intuitive workflow is significant.
Leveraging AI Editing Tools
For high-volume photographers, or those utilizing services like Aftershoot for culling, Artificial Intelligence (AI) editing is becoming an increasingly powerful and sophisticated option. While I would never advocate for simply hitting a button and considering the job done â as this bypasses artistic creativity and enjoyment â AI can elevate the concept of presets to a new level, providing an excellent starting point for your edits.
I have begun experimenting with AI editing, and the time saved, even just by straightening photos alone, is substantial. Aftershoot Edits is currently a favorite. They offer AI-assisted presets that can provide a solid foundation for basic adjustments like white balance, exposure, and straightening right out of the box. However, to maximize its benefits, it's ideal to have a large library (thousands) of images you've already edited in Lightroom. This allows you to train your own AI editing preset, enabling the software to mimic your personal style.
Crucially, it's important to reiterate that you should not solely rely on AI for your final edits, especially when working with clients who expect professional polish. AI editing should be viewed as a tool to enhance your work and efficiency, not as a replacement for your artistic judgment and skill.
Foundational Editing Principles for Beginners
Beyond the workflow-centric tips, understanding some core editing concepts is crucial for beginners. Mastering these foundational elements will build a solid base for more advanced techniques.
Basic Exposure Corrections
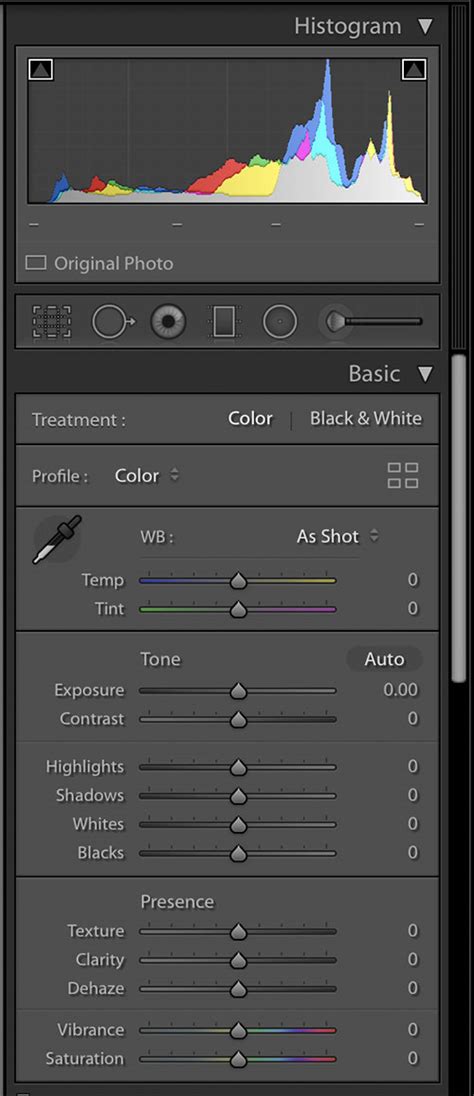
The first step in making any image spectacular involves correcting basic exposure. In this panel, you can adjust the overall brightness of your image. While toggling the "Whites" and "Blacks" sliders can further refine your image by making true whites brighter or true blacks darker, I generally advise beginners to focus on the primary exposure controls first. These will help you achieve a balanced image, which is the essential starting point before any more elaborate color grading.
Achieving Accurate White Balance
Accurate white balance is critical for creating a well-balanced image. The camera's Auto White Balance (AWB) doesn't always get it right. Lightroom's White Balance tools allow you to adjust the color temperature from cooler (left) to warmer (right) until you achieve "true white." This can be a fun process once mastered, as you can later experiment with unconventional color casts to create different moods for your photos, once you have a good understanding of color theory.
Mastering the Tone Curve
The Tone Curve is a far superior tool for contrast adjustments compared to the basic contrast slider, and here's why: it allows you to pinpoint exact points in the shadows (bottom left) and highlights (top right) on a diagonal line and move them independently. The bottom left of the curve represents the darkest points of the image, and the top right represents the lightest. Selecting any point along this line will adjust different tones of the image, with the middle representing mid-tones.
In contrast, the standard contrast slider in the basic exposure corrections moves both shadows and highlights simultaneously. This lack of independent control can lead to areas becoming too dark or highlights being blown out. The Tone Curve, however, allows you to select multiple points and adjust them independently, giving you much greater specificity over the areas you want to brighten or darken. This is an excellent editing tip for beginners to fine-tune their images.
Beyond Saturation: The HSL Slider Tab
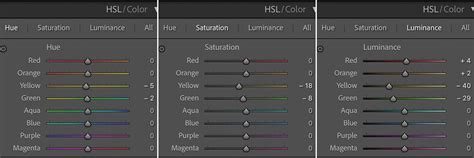
A common beginner mistake is over-relying on the saturation slider. Instead, leverage Lightroom's HSL (Hue, Saturation, Luminance) Slider tab for more nuanced color control. This tab allows for:
- Changing the Hue of a Color Independently: This means shifting a color to a slightly different shade. For instance, you could alter the hue of purple leaf petals to a slightly different shade of purple or even a related color.
- Adjusting Saturation: This controls the intensity of a color. You can make colors more vibrant or more muted.
- Modifying Luminance: This shifts the brightness of a selected color. For example, if you want to make someone's red lipstick brighter without affecting other colors, you can adjust the luminance of the red channel.
This simple editing tip can have a profound impact on your images, allowing for creative color choices and a more sophisticated look. Experimenting with these sliders will help you discover what works best for different images.
Essential Cropping and Transformation
While seemingly simple, the crop and rotate tool is a vital part of creating any beautiful image. Sometimes, we don't capture the perfect framing in-camera, and that's perfectly normal. Lightroom's crop tool, accessible via a little dotted square icon, allows you to crop and rotate your image.
This tool is a lifesaver for scenarios where your horizon line isn't perfectly straight, or when your Rule of Thirds composition didn't quite line up as intended. These subtle imperfections can significantly impact the quality of your image, and the crop/rotate tool provides an easy way to correct them.
Embracing the Journey of Learning
Don't let the editing process overwhelm you or discourage you from continuing your photography journey. Lightroom is intended to be a creative tool, not a source of anxiety. It's perfectly okay if you're not comfortable with every single slider initially, or if you feel slow at first. The key is to keep learning and experimenting with new techniques whenever you can. Even incorporating just one new tip can make the process more enjoyable.
My hope is that these Lightroom tips will help make your editing faster, more efficient, and ultimately, more enjoyable, allowing you to focus more on your creativity and achieve better results. For those interested in further photography tips and resources, additional guides are available. Lightroom remains the primary program I use for editing photos, and its advanced capabilities significantly save me time, allowing me to spend more of my precious moments behind the camera capturing what brings me joy, rather than being tied to my computer screen for countless hours. Editing is often not the favorite task for many photographers; our passion lies in capturing moments of love, joy, and connection. Finding ways to streamline editing allows us to dedicate more time to our true calling. These Lightroom tips are designed to ensure you can edit your photos efficiently and to your impeccable standards.
Range Masking for Precision
A relatively recent addition to Lightroom, Luminance and Color Range Masking, has been a significant time-saver for many photographers. This feature allows you to select and limit the area of your image that is affected by local adjustments based on a specific range of colors or tones within the image. This offers a level of precision that was previously much more time-consuming to achieve.
Smart Previews for Editing on the Go
For photographers who travel frequently or work in various locations, Smart Previews can be a revolutionary feature. When using Smart Previews, you can edit your files in the Develop module even when the hard drive containing the original files is disconnected from Lightroom. Once you reconnect the drive with the original files, Lightroom automatically updates them with your edits. This capability made working in airports or cafes in Europe accessible, allowing me to edit on the go without needing my primary hard drive constantly connected.
Applying Settings on Import
As you become more familiar with Lightroom, you'll likely realize there are certain edits you consistently make to every single image you import. Lightroom offers the ability to create default settings that are applied upon import. This means those minor, repetitive edits can be automatically applied to all your images as they are brought into the program, saving you considerable time and ensuring a consistent starting point.
Creating Custom Profiles
While presets offer a broad range of adjustments, understanding and utilizing custom camera profiles can also be highly beneficial. Profiles are applied on the backend of Lightroom and provide options to maximize color, dynamic range, and contrast, often mimicking your camera's native rendering or offering unique creative looks. Familiarizing yourself with different profiles and setting your preferred one as a default can be a powerful step in establishing your unique editing style.
Understanding the Develop Module's Structure
When you begin editing, importing files into Lightroom is the first step, usually under the Library tab. Once your files are imported and organized, you move to the Develop module. Here, you'll find the Basic panel, where fundamental settings like White Balance and Exposure are adjusted. It's crucial to master these before moving to more advanced areas like Color/HSL or Details. A common mistake is to start with Color/HSL before setting your camera calibration, as calibration affects the entire RGB spectrum. The Color/HSL panel offers granular control over individual colors, and the Color Grading panel allows for further adjustments to shadows, midtones, and highlights. After color adjustments, you move to the Details panel. Lens Corrections and the Transform panel address perspective and lens-related issues. Finally, tools like Spot Removal and the Masking tool allow for precise local adjustments and retouching.
Virtual Copies for Experimentation
If you love an edit and want to explore variations without altering the original, creating Virtual Copies is an excellent option. By right-clicking an image and selecting "Create Virtual Copy," you can then apply different edits to this copy, allowing for experimentation without duplicating your original files. This is particularly useful when deciding on export settings or presenting different options to a client.
Remember, the goal is to use Lightroom as a tool to enhance your vision and streamline your workflow. By embracing these tips and continuing to learn, you'll find that editing becomes not only more efficient but also a more creative and enjoyable part of your photographic journey.