Knowing how to mirror in Procreate is a very useful bit of knowledge to have, empowering artists to achieve perfect symmetry and efficiently duplicate elements within their digital artwork. Mirroring reflects your design on the opposite side, a technique applicable to both purchased images and your own original drawings. This tutorial will delve into two primary methods for achieving mirrored effects in Procreate: flipping existing designs and utilizing the built-in Symmetry Tool for real-time mirroring as you draw.
Method 1: Flipping Your Design in Procreate
This method is the quickest and most straightforward way to mirror an existing design or a completed artwork. It is particularly effective when working with imported images or elements that you wish to duplicate and flip.
Step 1: Create or Import Your Design
To begin, you'll either create a new canvas in Procreate or import a pre-existing design. For this example, we will be importing a ready-made unicorn SVG bundle featuring a monogram design. If you prefer to create your own design from scratch, start by creating a new canvas. A suitable canvas dimension for this tutorial is 2300 x 3000 pixels.
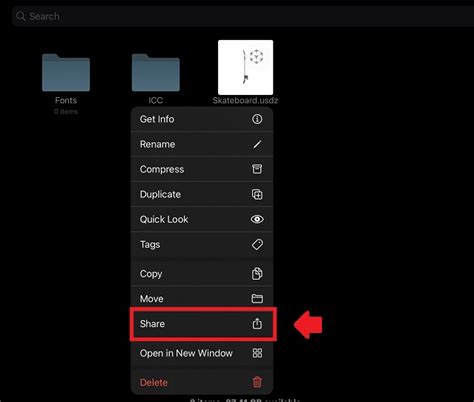
Once your canvas is ready, tap on the wrench icon, which represents the Actions menu. From the options presented, select "Insert a File." Navigate to the location where your file is stored and tap on it to open.
Upon importing the image, you will notice that the Selection tool, indicated by an arrow icon at the top of the interface, becomes active. With "Uniform" selected within the Selection tool's options, you can tap and drag a corner node inward to resize the image. In our case, the unicorn is facing left, so we have shifted the image slightly over to the right to better position it for mirroring.
Step 2: Mirror the Image in Procreate
With your design placed on the canvas, navigate to the Layers Panel. Swipe the layer containing your image to the left. From the revealed options, tap "Duplicate" to create an exact copy of your layer.
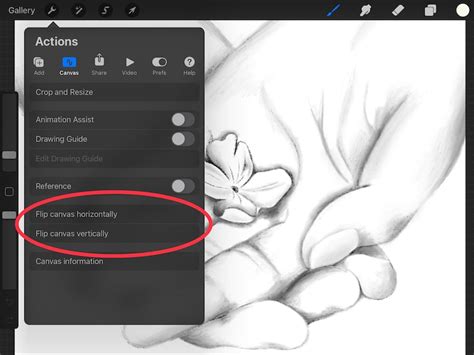
Now, using the Selection tool again, ensure that "Uniform" is selected. You will see two options for flipping: "Flip Vertical" and "Flip Horizontal." For mirroring your design to the opposite side, you will typically choose "Flip Horizontal." You can also choose to flip vertically if your design requires it.
After flipping, it is highly recommended to enable the Snapping icon. Make sure "Snapping" is turned on. This feature will greatly assist in precise positioning by automatically aligning elements to guides and the canvas boundaries.
Now, carefully move this flipped image to the left side of your canvas. As you drag the image, guidelines will appear, helping you to accurately place it alongside the original. You can reposition the image as desired or follow the placement shown in the example.
Once you are satisfied with the positioning of the mirrored image, tap on the Selection tool menu again to deselect it. At this stage, if you wish to combine the original and mirrored layers into a single layer for easier management, you can merge them.
From this point onward, you can proceed to add and edit text, incorporate other design elements, or refine your artwork further. Adjusting colors is simple using the Color Palette.
Method 2: Mirroring with the Symmetry Tool
The second method is ideal for ongoing projects and for creating designs that require perfect symmetry from the outset. The Symmetry Tool allows Procreate to mirror your strokes in real-time as you draw, utilizing either horizontal or vertical lines, or even more complex quadrant and radial divisions. This is particularly helpful for intricate designs such as mandalas, symmetrical patterns, or drawing faces and figures where balance is crucial. For this method, a square canvas size of 2500 x 2500 pixels is recommended.
Step 1: Set Up the Symmetry Guide
To activate the Symmetry Guide, tap on the Actions icon (the wrench tool). Locate the "Drawing Guide" slider and tap it so that it turns blue, indicating it is active. Next, tap on "Edit Drawing Guide."
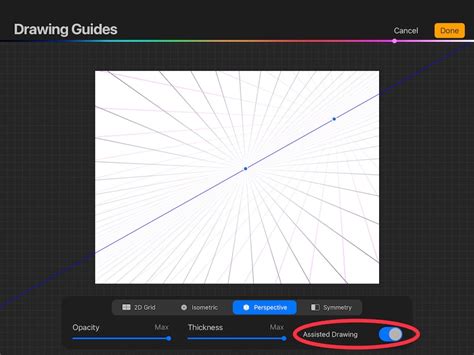
The Drawing Guide menu will appear at the bottom of your screen. Here, you will find several options for symmetry: "2D Grid," "Isometric," "Perspective," and "Symmetry." Select "Symmetry." By default, a single vertical line will appear through the middle of your canvas, dividing it into two equal halves.
Within this menu, you can adjust the color of the guidelines by moving the circular slider at the top. The "Opacity" and "Thickness" of the lines can also be edited to your preference. Once you have configured these settings, tap "Done" in the top right corner.
Understanding Symmetry Options
Procreate offers a robust set of symmetry options within the "Edit Drawing Guide" menu, accessible by tapping the "Options" button after selecting "Symmetry."
- Vertical: This is the default mode, placing a single vertical guideline down the center of your canvas. Strokes made on one side are mirrored to the other.
- Horizontal: This mode places a horizontal guideline across the middle of your canvas, mirroring strokes above and below the line.
- Quadrant: This option divides your canvas into four equal quadrants using both a horizontal and a vertical guideline. Drawing in one quadrant will mirror your strokes across the other three.
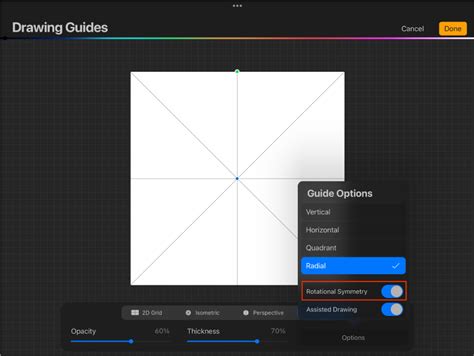
- Radial: This mode splits your canvas into eight segments using horizontal, vertical, and diagonal guidelines. It is exceptionally useful for creating radial patterns like mandalas. Your stroke is reflected across all eight segments.
- Rotational Symmetry: When activated in conjunction with other modes, Rotational Symmetry causes your stroke to not only reflect but also rotate around the center point, creating intricate spiral and circular patterns.
Experimenting with these different modes is key to understanding their unique effects. You can also adjust the position of the central axis by dragging the blue dot that appears on the canvas.
Step 2: Draw Your Design Using Symmetry
With the Symmetry Guide activated, choose a side of the canvas to begin drawing. For instance, if you are using Vertical Symmetry, start drawing on the right side. As you draw, Procreate will automatically mirror your strokes in real-time to the opposite side of the guideline.
This live mirroring capability ensures that your design remains perfectly symmetrical as you create it. Once your drawing is complete, you can proceed to fill it with color or add further details.
An important feature to note is "Assisted Drawing." When a drawing guide is active, Procreate automatically enables Assisted Drawing on that layer. You will see an "Assisted" inscription under the layer name in the Layers Panel, indicating that drawing on this layer will be affected by the symmetry guide. This ensures that your strokes are perfectly aligned with the mirroring or symmetry rules you have set.
How to Use the Symmetry Tool in Procreate to Draw Easy Digital Doodles
Beyond Basic Mirroring: Advanced Symmetry and Mirroring Techniques
Procreate's mirroring and symmetry features extend beyond simple flipping and vertical/horizontal lines. Understanding these advanced options can unlock a new level of creative potential.
Horizontal Symmetry for Balanced Designs
While Vertical Symmetry is often the default, Horizontal Symmetry offers a different approach to mirroring. To activate it, navigate back to Actions > Canvas > Edit Drawing Guide. Ensure the "Symmetry" button is already activated, then click the "Options" button and select "Horizontal." With Assisted Drawing active, anything you draw on the bottom of the canvas will be reflected on the top, and vice versa. This is excellent for designs that require top-to-bottom balance, such as certain emblems or architectural elements.
Quadrant Symmetry for Complex Patterns
The Quadrant Symmetry Tool is a powerful asset for creating more complex symmetrical designs. Access it by going to Actions > Canvas > Edit Drawing Guide, clicking "Options," and choosing "Quadrant." With Assisted Drawing active, drawing in one-quarter of the canvas will mirror your artwork into the other three-quarters simultaneously. This is fantastic for developing intricate patterns or detailed illustrations where all four sections need to be identical.
Radial Symmetry for Mandalas and Spirals
As mentioned, Radial Symmetry is perhaps the most intuitive tool for creating mandalas and other circular, radiating designs. By selecting "Radial" from the "Options" within the Symmetry settings, your drawing on one segment of the canvas is mirrored across all eight segments, effectively creating a full circle of your design with a single stroke. This tool works like magic for achieving perfect rotational balance, making mandala creation significantly more accessible.
Rotational Symmetry: Adding Dynamic Movement
The final advanced option is Rotational Symmetry. This can be activated alongside other symmetry modes. By enabling "Rotational Symmetry" in the "Guide Options," your strokes are not only reflected but also rotated around the center point of the canvas. This creates dynamic, spiraling patterns and is ideal for highly stylized or abstract artwork. Experimenting with Rotational Symmetry can lead to unexpected and beautiful results.
Disabling Mirroring and Symmetry Guides
Once you have finished your symmetrical drawing, you may wish to disable the guide. This can sometimes be a little tricky. To disable the Symmetry Guide entirely, navigate back to Actions > Canvas > Edit Drawing Guide. Simply tap the "Drawing Guide" slider to turn it off (it will turn grey). While mirroring will no longer work, the visual guide lines might persist on your canvas for a short while. To fully remove them, you may need to deselect the "Assisted Drawing" option on the affected layers if it remains active after disabling the guide, or simply proceed with your work as the visual overlay will disappear once you exit the editing menu.
Procreate makes drawing with a tablet and stylus pen a breeze, and its robust symmetry and mirroring tools are a testament to this. Knowing how to mirror in Procreate is simply a matter of navigating through the menu system and enabling the appropriate options. Whether you are flipping a completed design or building a symmetrical masterpiece stroke by stroke, Procreate provides the tools to achieve professional results with ease.