The digital art landscape offers a vast array of tools for creators, and within Adobe Photoshop, brushes stand out as fundamental instruments for achieving diverse artistic effects. Among these, watercolor brushes hold a special allure, capable of imbuing digital artwork with the organic, fluid, and often serendipitous qualities of traditional watercolor painting. This tutorial delves into the process of creating and utilizing watercolor brushes within Photoshop, catering to both those who wish to craft their own unique brush elements from scanned artwork and those seeking ready-made professional solutions.
Crafting Your Own Watercolor Brushes from Scanned Strokes
One of the most authentic ways to develop a distinctive watercolor brush in Photoshop is to translate actual physical brushstrokes into digital assets. This method ensures a unique texture and character that is difficult to replicate with purely digital means. The process begins with the physical act of painting.
Preparing and Scanning Your Artwork
Before you can bring your watercolor strokes into Photoshop, meticulous preparation is key. This involves not only the act of painting but also ensuring your scanning equipment is optimized for the best possible results.
The Importance of Naming Conventions
A crucial best practice, often overlooked, is the diligent naming of all your digital assets. When working with multiple files, whether they are scanned images or created brush elements, clear and descriptive naming conventions are vital. This prevents confusion and saves considerable time when you need to reference or recall specific files later. For instance, instead of generic names like "scan001.jpg," opt for names that indicate content and purpose, such as "watercolorstroke01.png" or "leafbrushtexture.psd."
Setting Up Your Scanner
To avoid the intrusion of unwanted elements like stains or smudges onto your digital brush, it is essential to prepare your scanner glass. A clean surface is paramount. Furthermore, configuring your scanner preferences correctly will yield superior results. For watercolor brush creation, it is recommended to set the scanner to an A4 paper size and a resolution of 300 dpi. This resolution is generally sufficient for capturing the fine details and textures of watercolor strokes without creating excessively large files. Once these settings are in place, you can proceed with scanning your painted elements.

Importing and Preparing Scanned Images in Photoshop
After successfully scanning your watercolor strokes, the next step is to import these images into Photoshop and prepare them for brush conversion. This stage involves isolating the desired brush element and refining its characteristics.
Initial Import and Layer Management
Begin by opening your scanned image in Photoshop. If you have scanned multiple strokes, it is advisable to work with each stroke on its own layer. This allows for independent manipulation and editing. For example, you might have scanned a particular watercolor texture or a distinct brushstroke.
Isolating the Brush Stroke
A common technique for isolating a specific element from a scanned image is by using the Magic Wand Tool. After selecting the Magic Wand Tool, you can click on the white background area of your scanned watercolor stroke. This will create a selection around the non-white parts of your image. It is often beneficial to apply a slight feathering to this selection, perhaps around 25 pixels, to ensure a smoother transition when the brush is applied later. This feathered selection can then be copied and pasted onto a new, appropriately sized canvas. For brush creation, a canvas size of 5000 by 5000 pixels is often suitable, with a resolution of 600 dpi and RGB color mode.
Alternatively, a more precise method for selecting the white background involves using the "Color Range" feature. With your scanned image layer selected, navigate to Select > Color Range. Click on the white area of your image. This command will generate a selection of all pixels that match the color you clicked on, effectively selecting the background.
Refining the Brush Appearance
Once your watercolor stroke is on a new layer, you may need to adjust its tonal values to optimize it for brush creation. This can involve enhancing the contrast. For instance, you might want to deepen the blacks to ensure they render as solid brush marks and subtly lighten the whites to prevent them from obscuring the texture. Finding the right balance here is key to achieving a visually appealing brush.
Sharpening the image can also be beneficial. Using Photoshop's "Smart Sharpen" filter can enhance the fine details of the watercolor texture without introducing undesirable artifacts.
Converting Your Artwork into a Photoshop Brush
With your isolated and refined watercolor stroke prepared, the final step in this creation process is to convert it into a usable Photoshop brush preset.
Understanding Brush Dynamics: Black on White
It is critical to understand how Photoshop brushes function: they are defined by black and white values. A black area in your image will translate to a solid, opaque mark when the brush is applied, while white areas will be transparent. If you were to use your current scanned image directly as a brush, where the stroke is black on a white background, it would result in a large black square being pasted repeatedly, which is not the desired effect for a watercolor brush.
Inverting for Brush Creation
To rectify this, you must invert the colors of your image. This is typically done by going to Image > Adjustments > Invert (or using the keyboard shortcut Ctrl+I on Windows or Cmd+I on Mac). After inverting, your watercolor stroke will appear in white against a black background. This inverted image is now correctly formatted to be defined as a brush.
Defining the Brush Preset
With the inverted image active, navigate to Edit > Define Brush Preset. A dialog box will appear, prompting you to name your new brush. It is highly recommended to use a descriptive name, such as "Watercolor Stroke 1" or "Organic Wash Brush." Once you confirm, this custom brush will be added to your Photoshop brush library.
Utilizing and Enhancing Your Watercolor Brushes
Once you have created or acquired watercolor brushes, the real creative work begins. Understanding how to apply them effectively and further refine their behavior within Photoshop is crucial for achieving authentic-looking watercolor effects.
Applying Custom Brushes
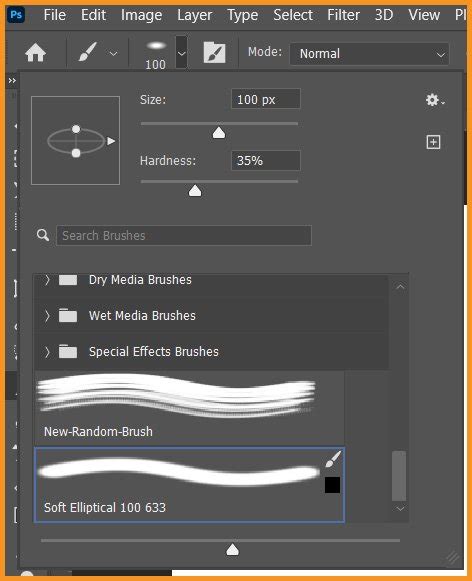
To use your newly created brush, select the Brush Tool in Photoshop. Open the Brush Settings panel (Window > Brush Settings). Here, you can select your custom watercolor brush from the list. You can then adjust its size using the bracket keys ([ and ]) and its opacity or flow to control the intensity of the stroke.
When working with a layer mask, for instance, you can use your watercolor brush with black as the foreground color to paint away parts of a layer, creating subtle reveals or textured edges. Experimenting with different brush sizes and opacities will allow for finer control over the application.
Exploring Advanced Brush Settings: Dual Brushes
Photoshop's brush engine offers advanced features that can significantly enhance the look and feel of watercolor brushes. One such feature is the "Dual Brush" setting. This allows you to combine two different brush tips, creating more complex and nuanced textures.
To utilize this, open the Brush Settings panel and navigate to the "Dual Brush" section. Here, you can select your primary watercolor brush and then choose a secondary brush from the dropdown menu. You can then adjust parameters like Size, Spacing, Scatter, and Count for the secondary brush. Furthermore, the "Blend Mode" option within Dual Brush allows you to control how the two brush tips interact, offering a wide range of textural possibilities. For example, selecting your primary watercolor brush and then applying a secondary brush with a different texture can create a richer, more layered watercolor effect.
Dual Brushes In Photoshop | How To Tutorial | Settings | Graphicxtras
Integrating Photoshop Brushes with Other Software
While Photoshop is a powerhouse for digital art, some artists may prefer to work with Adobe Illustrator for certain tasks, particularly vector-based work. Fortunately, the versatility of Photoshop brushes extends to Illustrator. Many professional watercolor brush sets are designed to be compatible with both applications, allowing for a seamless workflow regardless of your preferred software.
Ready-Made Watercolor Brush Solutions
While creating custom brushes from scanned artwork offers a unique artistic signature, there are also numerous high-quality, pre-made watercolor brush packs available. These packs are often developed by professional artists and can save significant time, providing immediate access to a diverse range of authentic watercolor textures and styles.
Subscription-Based Resources
Platforms like Envato Elements offer a compelling solution for artists seeking a vast library of digital assets. For a low monthly fee, subscribers gain unlimited access to a wide array of professional watercolor brushes for Photoshop. This subscription model also extends to other valuable resources, including premium fonts, graphic templates, actions, and presets, making it a cost-effective option for prolific creators.
Curated Watercolor Brush Packs
Within these platforms, you can find meticulously curated watercolor brush sets designed for various artistic needs:
- Comprehensive Watercolor Sets: These packs often contain a large number of unique brushes, categorized for versatility. For instance, a set might include over 200 unique brushes, with a significant portion dedicated to abstract forms, floral elements, and general-purpose watercolor textures.
- All-in-One Toolkits: Designed for digital artists, these toolkits provide everything necessary for authentic watercolor creations. Their compatibility with both Photoshop and Illustrator ensures flexibility in workflow.
- Themed Brush Packs: For artists focusing on specific aesthetics, themed sets are invaluable. A tropical-themed watercolor brush set, for example, can instantly bring a vibrant, sun-drenched feel to illustrations and paintings.
- Focused Brush Packs: Other packs might offer a more concentrated selection of unique brushes, perhaps around 50, focusing on specific styles or effects that can be highly impactful for particular projects.
Individual Purchase Options
For artists who prefer to acquire assets on a per-project basis rather than through a subscription, marketplaces like GraphicRiver offer an alternative. Here, you can purchase individual watercolor brush Photoshop packs without the commitment of a recurring fee. This allows for targeted acquisition of specific brush styles as needed.

Embracing the Watercolor Aesthetic in Digital Art
Whether you choose to meticulously craft your own watercolor brushes from scanned strokes or leverage the convenience of professional pre-made packs, the goal remains the same: to infuse your digital creations with the captivating essence of watercolor. The flexibility of Photoshop's brush engine, combined with the rich textures of watercolor, opens up a world of creative possibilities.
Simplifying Complex Effects
The power of well-designed watercolor brushes in Photoshop lies in their ability to simplify complex artistic effects. For instance, you can achieve the appearance of delicate flowers or flowing vines for digital designs like cards or invitations without needing extensive traditional painting skills. By understanding and manipulating brush settings, such as the "fade" parameter to control leaf length, artists can create intricate natural elements with ease.
Experimentation and Discovery
The journey of mastering watercolor brushes in Photoshop is one of continuous experimentation. Artists are encouraged to study the available brush settings, adjust parameters, and explore the myriad of effects that can be achieved. Mixing colors and blending modes further expands the creative palette, allowing for unique and personalized watercolor looks. These tutorial projects, shared through various platforms, are designed to guide artists in harnessing the most powerful aspects of design software, one step at a time.
The use of a drawing tablet is highly recommended for a more intuitive and responsive watercolor brush experience in Photoshop. Even inexpensive tablets can make a significant difference in control and expressiveness, mimicking the feel of traditional brushwork more closely. By combining the power of Photoshop's tools with the timeless beauty of watercolor, artists can unlock new levels of creativity and produce stunning digital artwork.

tags: #watercolor #paint #brush #photoshop