In the realm of digital photography, achieving the perfect shot often involves more than just capturing a moment; it requires meticulous refinement. Unwanted elements, whether they are unsightly trash cans cluttering a scenic landscape, distracting tourists photobombing a cherished portrait, or even stray power lines marring an otherwise pristine sky, can detract from the intended narrative of an image. Fortunately, modern photo editing software, particularly Adobe Photoshop, offers powerful tools that allow creators to eliminate these distractions with remarkable ease and precision. This article delves into various methods for removing unwanted objects from photographs, focusing on both intuitive AI-driven solutions and more controlled, manual techniques.
The Rise of AI-Powered Object Removal
The advent of artificial intelligence has revolutionized photo editing, making complex tasks accessible to a wider audience. Tools like Adobe Firefly's Generative Remove leverage AI to intelligently analyze an image and seamlessly fill in areas where objects have been removed. The process is remarkably straightforward: users simply paint over the object they wish to eliminate with a brush, and with a single click of the "Generate" button, the AI works to reconstruct the background, preserving the authenticity of the surrounding details. This technology is a game-changer for removing anything that pulls focus away from your subject, from power lines and wires to street signs and random logos. Even stubborn watermarks or stray text can be brushed away in seconds, ensuring that nothing ruins an otherwise perfect photo.
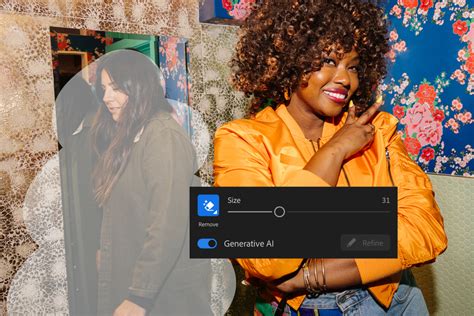
To utilize Generative Remove in Adobe Firefly, users can log in with their Adobe ID or create a free account. The workflow involves brushing over the area or object intended for removal, with the toolbar offering options to adjust brush size and hardness for greater precision. Once the object is masked, clicking "Generate" initiates the AI process. Firefly automatically fills the selected area with natural-looking results, ensuring the visuals remain clean, polished, and true to their original creative intent. Upon completion, the edited image can be downloaded, copied to a clipboard, or shared directly.
Generative AI models, such as those powering Firefly, are commercially safe, having been trained on licensed content like Adobe Stock and public domain material. This allows creators to confidently use these tools without concerns about copyright infringement. The best remove object AI tools empower creators to move from a prompt to a polished image rapidly, all while maintaining significant creative control. For instance, you can easily select and erase an unwanted person from a busy background or remove text from a photo by selecting it with the object removal brush and clicking "Generate." The most efficient way to remove objects in Firefly involves navigating to the Firefly image editor, selecting "Generative Remove" from the Quick Actions Menu, using the brush tool to highlight the unwanted object, and then clicking "Generate." Importantly, no specialized design skills are required to achieve professional results with Firefly's Generative Remove.
Traditional Photoshop Techniques: Precision and Control
While AI offers speed and convenience, Photoshop also provides a suite of powerful manual tools that offer a higher degree of control, especially for complex removals. These tools work by sampling pixels from other parts of the image to reconstruct the area where the unwanted object was located.
The Spot Removal Tool in Lightroom
For users who prefer Adobe Lightroom, the Spot Removal tool is a primary instrument for eliminating minor blemishes. In its healing mode, this tool overlays an area with a sampled texture, attempting to blend it seamlessly with the surrounding background. However, as its name suggests, the Spot Removal tool is quite limited and is best suited for removing small spots, such as dust or sensor marks, rather than larger, more complex objects.
Photoshop's Healing Brush and Clone Stamp Tools
Photoshop offers more robust solutions. The Healing Brush Tool functions similarly to Lightroom's Spot Removal tool but provides more refined control. It samples pixels from a designated area and blends them with the texture, color, and luminosity of the target area. The Clone Stamp Tool, on the other hand, is a more direct approach. It allows you to sample pixels from one part of an image and directly paint them onto another. This tool is invaluable when precise replication of textures or patterns is required.
A common workflow involves using the Clone Stamp tool first to establish a base reconstruction, followed by the Healing Brush tool to refine the blend and ensure a natural appearance. For both these tools, several settings on the top toolbar are crucial. The brush settings allow you to choose between a soft or hard round brush, which is essential for matching edges and blending. The "Sample" setting is particularly important:
- "Current & Below": This samples from the current layer and all layers beneath it. This is useful when you have multiple layers of adjustments or textures.
- "Current Only": Samples only from the active layer.
- "All Layers": Samples from all visible layers.
- "Current & Below" is often the default and a good starting point.
The "Aligned" setting determines whether the sampling point moves relative to your brush strokes. When aligned, the sampling point moves as you paint. When unaligned, the sampling point remains fixed, allowing you to repeatedly sample from the same source area.
The Patch Tool is another powerful option. It allows you to select an unwanted object, and then drag that selection to a clean area of the image from which Photoshop will sample to fill the selected region. This tool can be particularly effective for larger areas.
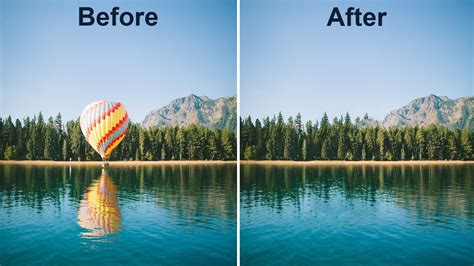
Content-Aware Fill: A Powerful Automated Solution
Perhaps one of the most celebrated tools for object removal in Photoshop is Content-Aware Fill. This feature analyzes the surrounding pixels of a selected area and intelligently generates content to fill the gap, aiming to match the texture, lighting, and patterns of the original image.
The process for using Content-Aware Fill typically involves these steps:
- Open your image in Photoshop.
- Select the Lasso Tool (or any selection tool like the Quick Selection Tool or Pen Tool).
- Draw a rough selection around the object you want to remove. It's important to include a small buffer of the background around the object.
- Navigate to Edit > Fill.
- In the Fill dialog box, choose "Content-Aware" from the "Contents" dropdown menu.
- Click "OK." Photoshop will then process the selection and fill the area.
- Deselect your selection by pressing Command+D (Mac) or Control+D (Windows).
- Save your image.
The Content-Aware Fill workspace offers even more advanced options. After making a selection and going to Edit > Content-Aware Fill, a dedicated window appears. Here, you can refine the sampling area (the green overlay indicates where Photoshop is sampling from) and see a real-time preview of the result. Options like "Scale" can help adjust the size of sampled elements to better match the area being filled, while "Color Adaptation" allows you to control how closely the fill matches the color and brightness of the surrounding pixels, offering a behavior akin to the Clone Stamp or Healing Brush.
Practical Applications and Considerations
Knowing how to remove unwanted objects is not merely an aesthetic pursuit; it's a fundamental skill that enhances creative freedom. For photographers, it means being able to capture a shot with confidence, understanding that minor imperfections can be corrected in post-production. This allows for greater flexibility in composition and location scouting. For instance, if a stunning beach backdrop is marred by unsightly orange ropes marking off protected dunes, being able to remove them in Photoshop means the photographer doesn't have to abandon that perfect location or compromise the shot.
How to Remove People from photo with Photoshop
The ability to remove distracting elements is particularly crucial in various photographic genres:
- Portrait Photography: Removing photobombers, distracting signs, or litter from the background can significantly improve the focus on the subject.
- Landscape Photography: Eliminating power lines, trash cans, or intrusive man-made structures can help preserve the natural beauty of a scene.
- Product Photography: Removing imperfections, stray hairs, or unwanted reflections can lead to a cleaner, more professional presentation of a product.
- Real Estate Photography: Removing clutter, personal items, or even temporary structures can make properties appear more appealing to potential buyers.
While AI tools offer speed and ease of use, and manual tools provide unparalleled control, the underlying principle remains the same: to enhance the visual narrative by removing elements that detract from the photographer's intent. As technology continues to evolve, the capabilities for object removal will undoubtedly become even more sophisticated, empowering creators to achieve their artistic visions with greater efficiency and precision. Whether you're a seasoned professional or an enthusiastic amateur, mastering these techniques will undoubtedly elevate your photographic work.