In the realm of digital photography and photo manipulation, achieving the perfect shot can often feel like a delicate dance with fate. We’ve all been there: capturing a group photo where one person sports a fleeting, less-than-ideal expression, or a series of candid moments where the ideal smile from one individual is captured in a frame where another’s is less than stellar. While orchestrating simultaneous perfect smiles from multiple subjects can be a daily challenge, Photoshop offers a powerful solution for those moments when perfection seems just out of reach. This guide will walk you through the intricate process of how to replace a face in Photoshop, transforming potentially disappointing images into cherished memories.

The art of the face swap in Photoshop is not merely a trick for correcting minor photographic flaws; it’s a versatile tool that can be leveraged for creative expression, marketing endeavors, and even personal storytelling. Whether you're a professional photographer aiming to elevate your product photography, a social media enthusiast looking to create engaging content, or simply someone wanting to salvage a beloved family portrait, understanding Photoshop's face-swapping capabilities opens a world of possibilities. While novelty face swap apps abound, they often lack the realism and control that professional-grade software like Photoshop provides. This tutorial aims to equip you with the knowledge to achieve a convincing and seamlessly integrated face swap, making it difficult for anyone to discern that the original expression wasn't quite right.
The Foundation: Selecting and Preparing Your Images
The success of any Photoshop face swap hinges on the careful selection and preparation of your source images. For the most natural and convincing results, it is highly recommended to choose images that were taken at approximately the same time and under similar lighting conditions. This foresight significantly reduces the post-processing work required, particularly when it comes to matching color temperatures, shadow details, and overall exposure. While it is possible to use photos from different times, the discrepancies in lighting will almost certainly be apparent and will necessitate more advanced Photoshop techniques to rectify.
When you embark on this process, the primary objective is to have two images: one that serves as your base or "body" image, where everything else is perfect except for the face, and a second image containing the desired face you wish to transplant.
Initial Image Preparation
- Open Your Images: Begin by opening both the "body" image and the "face" image in Photoshop. You can do this by navigating to
File > Openor by using the keyboard shortcutCtrl+O(Windows) orCommand+O(macOS). - Identify Your Layers: In the Layers panel (if you don’t see it, go to
Window > Layers), you’ll want to clearly distinguish between your two images. For clarity, it's often helpful to rename them. Let's refer to the image with the desired body as the "Body" image and the image with the face to be swapped as the "Face" image. If you are working with a JPEG, the file is typically flattened, and you'll be on the correct layer by default. However, if your source files are layered Photoshop documents, ensure you are on the correct layer for each image.
The Core Technique: Layering and Initial Placement
Once your images are open and organized, the next step involves bringing the desired face into the primary image and aligning it. This stage is about establishing the basic composition before diving into the finer details of blending.
Isolating and Transferring the Face
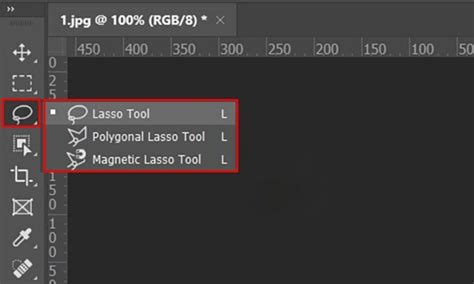
- Select the Face: Navigate to the "Face" image. Using a selection tool, such as the Lasso Tool, Polygonal Lasso Tool, or Magnetic Lasso Tool, carefully draw a selection around the face you intend to use. It’s crucial to select all the essential features-eyes, nose, mouth, and even prominent cheekbones or moles-but avoid including any of the surrounding hair. The Lasso Tool can be found in the Toolbar on the left side of the application window; if you don't see it directly, it might be hidden behind other lasso tools.
- Copy the Selection: With the face selected, copy it to your clipboard. You can do this by going to
Edit > Copyor using the shortcutCtrl+C(Windows) orCommand+C(macOS). - Paste into the Body Image: Switch to your "Body" image and paste the copied face. Go to
Edit > Pasteor useCtrl+V(Windows) orCommand+V(macOS). This will create a new layer containing just the face, positioned over your "Body" image. - Initial Alignment: Select the Move Tool from the Toolbar. Drag the newly pasted face so that it roughly covers the face you intend to replace in the "Body" image.
Refining the Fit: Resizing and Positioning
At this juncture, the pasted face will likely be the wrong size and orientation. This is where precision comes into play, ensuring the new face integrates harmoniously with the existing head structure.
Scaling and Rotating for Accuracy
- Adjust Layer Opacity: In the Layers panel, select the layer containing the new face. Reduce its opacity to around 50% (you can do this using the Opacity slider at the top of the Layers panel). This transparency will allow you to see the original face underneath, making alignment much easier.
- Transform and Scale: With the face layer still selected, go to
Edit > Transform > Scale. A bounding box will appear around the face. Place your cursor at one of the corners of this box, hold down theSHIFTkey (to maintain aspect ratio), and drag the corner until the new face is approximately the same size as the original face. As you resize, use the visible underlying features (eyes, nose, mouth) as guides to line up the features as closely as possible. PressENTER(orRETURNon macOS) when you are satisfied with the scaling.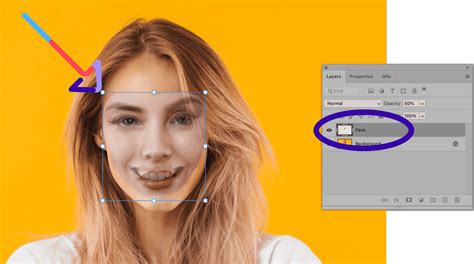
- Rotate if Necessary: If the angle of the new face doesn't quite match the original, you may need to rotate it. Select
Edit > Transform > Rotate. Carefully rotate the face until it aligns better with the head's orientation. Again, pressENTERorRETURNto confirm the transformation. - Reset Opacity: Once you are happy with the size and rotation, reset the opacity of the face layer back to 100%.
Blending Techniques: Making the Swap Seamless
Simply placing one face over another will never yield a convincing result. The key to a successful face swap lies in the meticulous blending of the new face with the existing image, ensuring that colors, tones, and edges are harmonious. Photoshop offers several powerful tools for this purpose.
Utilizing Layer Masks and Brushes
One of the most fundamental and effective methods for blending involves using layer masks. This non-destructive approach allows you to selectively reveal or conceal parts of a layer, giving you granular control over the transition.
- Duplicate the Background Layer: Before proceeding with destructive edits, it's prudent to create a backup of your original "Body" image. Select the background layer (or the layer containing the original body) and duplicate it using
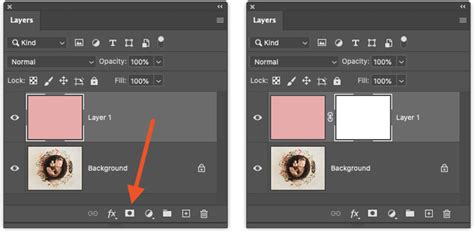
Ctrl+J(Windows) orCommand+J(macOS), or by going to the Layers panel menu and selectingDuplicate Layer.... Name this duplicated layer something like "Body - Backup." Then, toggle off the visibility of the original background layer by clicking the eye icon next to it. - Add a Layer Mask: With the "Face" layer selected, click on the "Add layer mask" icon at the bottom of the Layers panel (it looks like a rectangle with a circle inside). A white mask thumbnail will appear next to the face layer's thumbnail.
- Select the Brush Tool: Choose the Brush Tool from the Toolbar. Ensure that your foreground color is set to black.
- Paint on the Mask: With the layer mask selected (click on the white mask thumbnail to ensure it's active), begin painting over the areas of the new face that you want to conceal, effectively revealing the original face underneath. Use a soft-edged brush (adjust hardness in the brush settings) for a gradual transition. If you accidentally erase too much, simply switch your foreground color to white and paint back the areas you wish to restore.
Photoshop Layer Masks Explained in 2 Minutes
- Refine Edges: Pay close attention to the edges where the new face meets the original neck and hairline. Use a smaller brush and adjust opacity as needed to create a natural blend. The goal is to make it appear as though the new face is a natural part of the original head.
Advanced Blending with Auto-Blend Layers
For a more automated and often quicker blending process, Photoshop's Auto-Blend Layers feature can be exceptionally useful, especially when dealing with similar lighting and composition.
- Prepare for Auto-Blend: Ensure you have your "Body" layer and your "Face" layer in place. You might want to make an initial selection around the face on the "Face" layer.
- Load Selection: With the "Face" layer selected, go to
Select > Load Selection. In the dialog box, ensure the Channel is set to "Face transparency" and that "Invert" is unchecked. Click OK. - Contract Selection (Optional but Recommended): To create a slight overlap and prevent "double edges," go to
Select > Modify > Contract. Enter a small value, such as 10 pixels, and click OK. - Delete from Body Layer: Now, select your "Body" layer. Press
BACKSPACE(orDELETEon macOS) to remove the area beneath the contracted selection. Deselect by pressingCtrl+D(Windows) orCommand+D(macOS). - Apply Auto-Blend: Make sure both the "Face" and "Body" layers are visible and selected in the Layers panel (hold
SHIFTto select multiple layers). Go toEdit > Auto-Blend Layers.... In the dialog box, choose "Panorama" and check the boxes for "Seamless Tones and Colors" and "Content-Aware Fill Transparent Areas." Click OK. Photoshop will then attempt to automatically blend the two layers, matching tones and colors.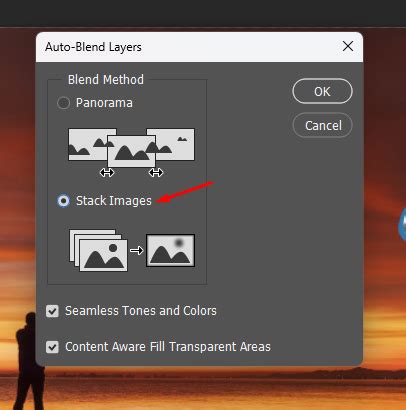
- Review and Touch-up: After Auto-Blend, you will have a new, merged layer. Examine the result closely. You may need to use the Eraser Tool with a soft brush on this merged layer to carefully erase any remaining artifacts or areas where the original hair or features should be visible. Toggle the visibility of your original "Body - Backup" layer on and off to help guide these touch-ups.
Addressing Complexities: Hair, Skin Tones, and Lighting
Even with the best techniques, certain aspects of a face swap can present challenges, such as mismatched skin tones, differing lighting conditions, or intricate details like hair. Photoshop offers specific tools to tackle these issues.
Matching Skin Tones and Lighting
- The "Match Color" Feature: For significant discrepancies in skin tones or lighting, the "Match Color" feature can be a lifesaver. Select the "Face" layer. Go to
Image > Adjustments > Match Color.... In the dialog box, under "Image Statistics," select your "Body" image as the source. You can then adjust sliders for Luminance, Color Intensity, and Fade to make the skin tones and lighting of the new face more consistent with the original image. Experiment with these settings until you achieve a natural blend.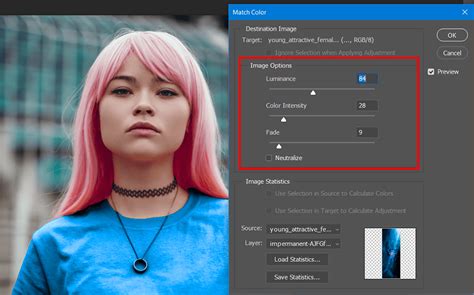
- Manual Adjustments: Sometimes, manual adjustments using adjustment layers are more effective. You can add Curves, Levels, or Hue/Saturation adjustment layers clipped to your "Face" layer to fine-tune its color and brightness to match the "Body" image.
Handling Hair and Edges
Dealing with hair can be particularly tricky due to its fine, wispy nature.
- Select and Mask Workspace: For more precise edge control, especially around hair, utilize Photoshop's
Select and Maskworkspace. After making an initial selection of the face, go toSelect > Select and Mask.... Within this workspace, you can refine the selection, particularly using the "Refine Edge Brush Tool" to intelligently select hair strands. - Content-Aware Fill for Artifacts: If the Auto-Blend feature leaves behind unwanted artifacts or background elements, the Content-Aware Fill tool (
Edit > Content-Aware Fill...) can be used to intelligently remove them.
Creative Applications and Advanced Possibilities
The Photoshop face swap is far more than a utility for correcting errors; it's a gateway to boundless creativity.
Beyond Simple Swaps
- Meme Creation and Humor: Face swaps are a staple of internet humor. Swapping faces onto animals, historical figures, or even inanimate objects can lead to hilarious and shareable content.
- Artistic Expression: Combine face swaps with other digital art techniques to create surreal portraits, tell unique visual stories, or develop entirely new artistic styles.
- Personalized Content: Create custom greeting cards, quirky invitations, or a series of photos that tell a family narrative with a whimsical twist.
Professional and Commercial Use
In the professional sphere, face swapping can inject new life into various creative projects:
- Advertising Campaigns: Innovatively present products or concepts by featuring faces in unexpected contexts, ensuring your message cuts through the digital noise.
- E-commerce Photography: For e-commerce brands, face swaps can enhance product photography by allowing for greater variety in models without the need for extensive reshoots. This can help consumers connect with products by seeing them displayed on a wider range of appearances.
- Social Media Content: Generate engaging and novel content for social media platforms that captures attention and encourages interaction.
Troubleshooting Common Face Swap Issues
Despite following the steps, you might encounter common hurdles. Here are solutions to typical problems:
- "Face Doesn't Sit Right": This often indicates issues with perspective or scale. Revisit the
Edit > Transformtools (Scale, Rotate, Warp) to ensure the face's orientation and proportions are correctly aligned with the underlying head structure. The Warp tool, in particular, offers advanced control for subtly distorting the face to better match the contours of the original head. - "Double Ears" or Overlapping Hair: These are common artifacts. The layer mask and careful brushing, or the Refine Edge brush in the Select and Mask workspace, are your primary tools for resolving these issues. The Eraser tool with a soft brush on the final merged layer can also be used to precisely remove unwanted elements and reveal the original image beneath.
- Resolution Mismatch: Always strive to use images with comparable resolution. Swapping a high-resolution face onto a low-resolution body (or vice-versa) will inevitably lead to quality degradation and make the edit look unnatural.
Conclusion: Mastering the Art of the Face Swap
Embarking on your Photoshop face swap journey is an exploration into a powerful facet of digital image manipulation. It requires patience, attention to detail, and a willingness to experiment with different tools and techniques. By understanding the foundational principles of image selection, precise alignment, and sophisticated blending methods, you can transform a less-than-perfect photograph into a masterpiece. The ability to swap faces seamlessly in Photoshop is not just about technical proficiency; it's about unlocking a vast potential for creativity, storytelling, and problem-solving in your photographic endeavors. So, dive in, practice these techniques, and discover the extraordinary possibilities that await.