When working with digital images, particularly line drawings or clipart, you often encounter the need to alter specific colors. A common scenario involves a greyscale line drawing on a white background, where the goal is to change all the white pixels, including those within the drawing itself, to a new, specific color. This tutorial explores effective methods for achieving this in Adobe Photoshop, moving beyond simple color substitution to more nuanced and versatile techniques. We will delve into the "Replace Color" command, explore alternative layering strategies, and discuss how to achieve precise color transformations suitable for various skill levels, from beginners to advanced users.
Understanding the "Replace Color" Command
The "Replace Color" command in Photoshop is a powerful tool designed to modify specific color ranges within an image. It allows users to select a color and then adjust its hue, saturation, and lightness, or replace it entirely with a new color. This method is particularly useful when you need to selectively target and alter existing colors without affecting the rest of the image.
To initiate this process, one typically navigates through the Photoshop menu. The command can be accessed via "Enhance" > "Adjust Color" > "Replace Color…" in some versions, while in others it might be found under the "Image" > "Adjustments" menu. Upon opening the "Replace Color" dialog box, you are presented with several options to define the color you wish to modify.
Within the "Selection" section of the dialog box, you can choose between "Selection" or "Image" options. The "Image" option allows for direct selection from the image itself. Crucially, ensure the "Color Picker Tool" button is selected. This tool enables you to click directly on the color within your image that you want to replace. For instance, if your image has a white background and white areas within the drawing, you would click on one of these white pixels.
To refine your color selection, Photoshop provides eyedropper tools. The primary eyedropper tool, which is selected by default, picks the initial color. You can then use the "Add to Sample" eyedropper to include similar shades or additional colors to your selection, or the "Subtract from Sample" eyedropper to remove colors that have been inadvertently included. This iterative process is key to accurately targeting the desired white pixels.
The "Fuzziness" slider plays a vital role in fine-tuning the selection. Increasing the fuzziness expands the range of colors that are considered similar to the color you initially selected. This is especially helpful for capturing subtle variations in tone or anti-aliased edges that might otherwise be missed. A lower fuzziness value will result in a more precise selection of only the exact color clicked, while a higher value will encompass a broader spectrum of closely related hues.
Once your color selection is satisfactory, you move to the "Replacement" section of the dialog box. Here, you can manipulate the "Hue" and "Saturation" sliders to change the color to your desired RGB value. The "Hue" slider shifts the base color, while the "Saturation" slider controls the intensity or purity of that color. The "Lightness" slider allows for adjustments to the overall brightness or darkness of the replaced color. By carefully adjusting these sliders, you can achieve a wide array of new colors, effectively transforming the original white areas into your chosen hue, saturation, and lightness.
It's worth noting that while the "Replace Color" command is powerful, it can sometimes be challenging to achieve perfect results, especially with complex images or subtle color variations. The effectiveness of this command depends heavily on the initial image quality and the precision of your color selection.
Alternative Approach: Layering and Blending Modes
A highly effective and often more flexible method for changing all white pixels in a greyscale line drawing to a specific color involves using layers and blending modes. This technique offers greater control and non-destructive editing capabilities, making it a preferred choice for many professional workflows. Instead of directly "replacing" a selected color range, this approach adds a new layer beneath your artwork and then manipulates the blending mode of the artwork layer.
The core idea is to place a layer filled with your desired target color directly below your greyscale clipart. The clipart layer is then set to a blending mode that allows the underlying color to show through in specific ways. For this particular task, the "Multiply" blending mode is exceptionally well-suited.
Creating and Filling the Color Layer
There are several ways to create and fill a layer with a specific color in Photoshop. The most recommended and modern method is to use a "Solid Color" Fill Layer.
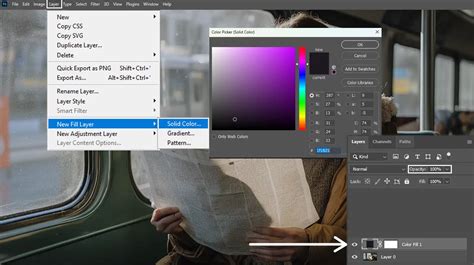
- Create a Solid Color Fill Layer: Go to
Layer>New Fill Layer>Solid Color.... This will immediately open the Color Picker dialog. - Select Your Color: Using the Color Picker, input your specific RGB values or choose your desired color visually. Once you've selected your color, click "OK."
- Position the Layer: This new fill layer will automatically appear at the top of your layer stack. To ensure it sits below your greyscale clipart, drag this layer down in the Layers panel so it is positioned directly underneath the clipart layer.
Alternatively, you can create a new, empty layer and fill it with either your foreground or background color.
- Create a New Layer: Go to
Layer>New>Layer...or use the keyboard shortcut (e.g.,Shift+Ctrl+NorShift+Cmd+Non Mac). - Set Foreground/Background Color: Before filling, ensure your desired target color is set as either your foreground or background color in the Photoshop toolbar.
- Fill the Layer:
- If your color is set as the foreground color, go to
Edit>Fill...and choose "Foreground Color" from the Contents dropdown. - If your color is set as the background color, go to
Edit>Fill...and choose "Background Color." - Alternatively, you can use keyboard shortcuts:
Alt+Backspace(Option+Delete on Mac) to fill with the foreground color, andCtrl+Backspace(Command+Delete on Mac) to fill with the background color.
- If your color is set as the foreground color, go to
- Position the Layer: As with the Solid Color Fill Layer, drag this newly filled layer in the Layers panel to be directly beneath your clipart layer.
Applying the "Multiply" Blending Mode
Once your color layer is in place beneath the clipart, you need to adjust the blending mode of the clipart layer itself.
- Select the Clipart Layer: In the Layers panel, click on the layer containing your greyscale line drawing.
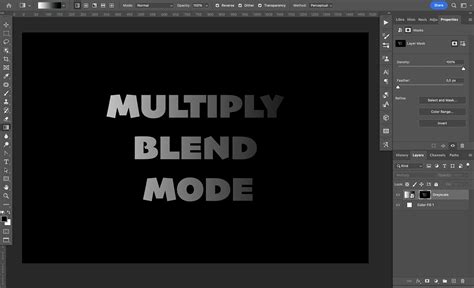
- Change Blending Mode: At the top of the Layers panel, there is a dropdown menu that typically reads "Normal." Click on this dropdown and select "Multiply."
How "Multiply" Works in This Context
The "Multiply" blending mode works by multiplying the color information of the active layer with the color information of the layer(s) beneath it. Essentially, it darkens the image based on the underlying colors. In the case of a greyscale image on a white background, the white areas of the clipart are effectively transparent when using "Multiply" mode. This means that the color from the Solid Color fill layer beneath will show through anywhere the clipart is white. The black lines of the drawing, being the darkest pixels, will retain their darkness and appear on top of the new color.
This method is incredibly effective for coloring line drawings because it preserves the line work while seamlessly filling all the "white" spaces with your chosen color. It's also non-destructive, meaning you can easily go back and change the Solid Color fill layer at any time without redoing any work. You can also adjust the opacity of the color layer or the clipart layer to subtly alter the final appearance.
How to Use Layer Modes in Digital Art // Multiply, Overlay, etc.
Fine-Tuning and Advanced Considerations
While both "Replace Color" and the layering/blending mode approach can achieve the desired outcome, several factors can influence the success of your color replacement, and advanced techniques can further refine the results.
Dealing with Non-Pure White Pixels
Often, images, especially those copied from web browsers or other applications, may not have perfectly pure white pixels (RGB 255, 255, 255). They might contain subtle shades of grey, anti-aliasing artifacts, or even faint colors from the original source.
- With "Replace Color": The "Fuzziness" slider is your primary tool here. Experiment with increasing the fuzziness to capture these near-white pixels. You may need to use the "Add to Sample" eyedropper to build a comprehensive selection that includes all the variations of "white" you want to change.
- With Layering/Blending Modes: The "Multiply" mode is generally forgiving. However, if very light grey areas within your drawing are also affected in an undesirable way, you might need to clean up the original clipart layer first. This could involve using the "Levels" or "Curves" adjustment to push those light greys towards pure white, or using a threshold adjustment to convert the entire image to pure black and white before applying the coloring method.
Achieving Specific RGB Values
When a precise RGB value is required, both methods offer ways to achieve this:
- "Replace Color": After selecting your target color range, use the "Hue," "Saturation," and "Lightness" sliders in the "Replacement" section. While these sliders offer a visual adjustment, they don't directly display RGB values. For exact RGB control, you might replace the color with a placeholder, then use a "Hue/Saturation" adjustment layer (
Layer>New Adjustment Layer>Hue/Saturation...) clipped to your clipart layer. Within the Hue/Saturation dialog, you can often see and input specific color values, or use the eyedropper tool to sample the color you've already applied. - Solid Color Fill Layer: This is the most direct method for achieving a specific RGB value. When you create the Solid Color fill layer, the Color Picker allows you to directly input the R, G, and B values. This ensures absolute precision.
Non-Destructive Editing and Flexibility
The layering and blending mode approach is inherently non-destructive. This means:
- Easy Revisions: You can change the underlying color layer at any time by double-clicking the fill layer's thumbnail in the Layers panel.
- Opacity Control: You can adjust the opacity of the fill layer to make the color less intense or the opacity of the clipart layer to make the lines more transparent.
- Further Adjustments: You can add further adjustment layers (like Hue/Saturation, Curves, or Levels) above the clipart layer and clip them to it to fine-tune the appearance of the line drawing itself without affecting the background color.
Understanding "Select > Color Range"
The mention of "Select > Color Range" is relevant as it's a precursor or alternative to the "Replace Color" command, and is often used in conjunction with other Photoshop tools.
- "Select > Color Range": This command allows you to create a selection based on color. You would use the eyedropper tool within this dialog to sample the white areas of your image. Similar to "Replace Color," it has a "Fuzziness" slider.
- Using the Selection: Once you have a selection from "Color Range," you can then:
- Use it to mask a Solid Color fill layer.
- Use it to create a layer mask for a new color layer.
- Apply an adjustment directly to the selected pixels (though this is destructive).
- Use it within the "Replace Color" command itself to define the area where color replacement should occur.
For the specific task of changing all white pixels, using "Color Range" to create a selection and then applying that selection as a mask to a Solid Color fill layer is a very robust and non-destructive method.
Considerations for Different Image Types
The effectiveness of these methods can vary depending on the source of your image.
- Vector Art (converted to Raster): If your greyscale clipart originated as vector art (like from Adobe Illustrator) and was then rasterized into Photoshop, the lines will typically be very clean and sharp. Both "Replace Color" and the blending mode method will work well. The layering approach is often preferred for its flexibility.
- Scanned Images: Scanned line drawings might have paper texture, subtle ink variations, or noise. In such cases, cleaning up the image first using "Dust & Scratches" filters, "Noise Reduction," or manual cloning might be necessary before attempting color replacement. The "Multiply" blending mode is still excellent for coloring these, as it tends to blend well with imperfect originals.
- Web-Copied Images: Images copied directly from web browsers can sometimes have unexpected color profiles or be compressed in ways that affect pure white areas. Testing both methods and perhaps doing a preliminary "Levels" or "Curves" adjustment to ensure a clean white background is often beneficial.
In summary, while Photoshop's "Replace Color" command offers a direct way to alter existing colors, the combination of a Solid Color fill layer and the "Multiply" blending mode on the clipart layer provides a more versatile, non-destructive, and often superior solution for changing all white pixels in a greyscale line drawing to a specific target color. This method ensures precise color application, allows for easy future modifications, and is adaptable to a wide range of image types and desired outcomes.