Photoshop's image rotation capabilities are fundamental tools that empower users to refine compositions, correct orientation issues, and unlock creative possibilities. Whether you're a beginner seeking to straighten a tilted photograph or an advanced designer manipulating complex layouts, understanding the nuances of rotation is crucial for achieving professional-quality results. This article delves into the various methods of rotating images and layers within Photoshop, exploring techniques that range from simple, fixed-angle adjustments to intricate, custom transformations.
Understanding the Fundamentals of Layer-Based Editing
Layers are the cornerstone of nearly all operations in Photoshop. Each edit, adjustment, or element you add to an image exists on its own layer, overlaid atop the original. This non-destructive workflow allows for unparalleled flexibility, enabling you to modify or remove edits without permanently altering the underlying image data. When it comes to rotating, this layer-centric approach is paramount. You can choose to rotate the entire canvas, affecting all visible layers simultaneously, or precisely rotate individual layers to achieve specific compositional goals.
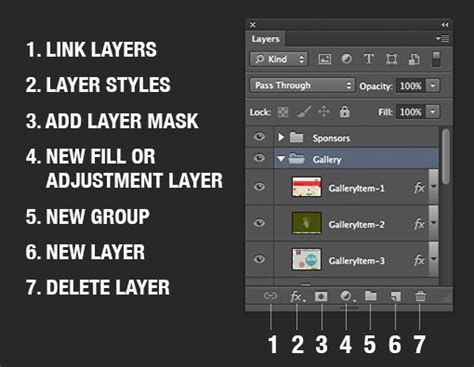
The ability to box edits into separate layers is key. This means that when you decide to rotate a specific element, say, to create a mirror effect or to align it with other components of your design, you can isolate that element on its own layer. This isolation prevents unintended changes to other parts of your image. For instance, if you're creating a symmetrical design, boxing elements into layers allows you to rotate one side independently to match the other.
Rotating the Entire Image Canvas
For adjustments that need to affect the entire image uniformly, Photoshop offers the "Rotate Canvas" function. This is particularly useful for correcting the overall orientation of a photograph that was taken at an unintended angle.
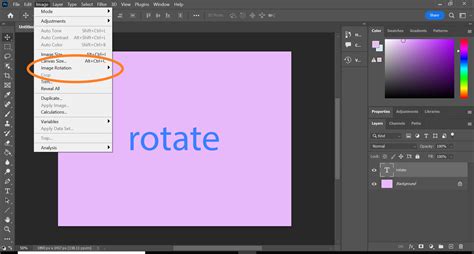
To access these options, navigate to the top menu bar and select Image > Image Rotation. Here, you will find several predefined options:
- 90 Degrees Clockwise/Counterclockwise: These are quick fixes for images that are significantly misaligned, such as those shot in portrait mode when landscape was intended, or vice versa.
- 180 Degrees: This option flips the entire image upside down, useful for achieving a mirror-like effect or for specific artistic purposes.
- Arbitrary: This is where you gain precise control. Selecting "Arbitrary" opens a dialog box where you can input any custom degree value for rotation. This is invaluable for fine-tuning slightly tilted horizons or when a specific, non-standard angle is required for artistic impact.
When you choose to rotate the canvas, all layers within your document are rotated as a single unit. This ensures that the relative positions of all elements remain consistent, preserving the integrity of your overall composition.
Transforming Individual Layers
Often, rotating the entire canvas is not the desired outcome. You might need to rotate a specific object, text element, or part of an image without affecting anything else in your composition. This is where the Free Transform tool comes into play, offering a more granular level of control.
To rotate an individual layer:
- Select the Layer: In the Layers panel, click on the layer you wish to transform.
- Activate Free Transform: Press Ctrl + T (Windows) or Cmd + T (Mac). Alternatively, you can go to Edit > Free Transform.
- Rotate the Layer: Once the transform bounding box appears around your layer, you can rotate it in a few ways:
- Click and Drag Corners: Move your cursor outside any of the corner handles of the bounding box. Your cursor will change into a curved, double-headed arrow. Click and drag to rotate the layer.
- Numerical Input: In the contextual taskbar that appears at the top of the screen when Free Transform is active, you can directly input a specific degree value into the rotation field. This ensures absolute precision.
- Pivot Point: Notice the small circle within the bounding box - this is the pivot point. By default, it's located at the center of the layer. You can drag this pivot point to another location on your layer, and the rotation will then occur around this new anchor point, enabling asymmetrical or off-center effects.
When "Show Transform Controls" is enabled (found under Edit > Preferences > Tools or sometimes in the Options bar for specific tools), you can visually see the pivot point and easily manipulate it.
Smart Objects: Preserving Quality Through Transformation
A crucial technique for maintaining image quality during rotation and other transformations is to convert your layer into a Smart Object. To do this, right-click on the layer in the Layers panel and select "Convert to Smart Object."
Smart Objects allow for non-destructive transformations. This means that when you rotate, resize, or skew a Smart Object, Photoshop preserves the original pixel data. You can re-transform it multiple times without any loss of quality or introduction of artifacts, which is particularly vital for high-resolution graphics, logos, or complex composites where repeated edits are anticipated.
Creative Applications of Image Rotation
Beyond simple orientation correction, rotation in Photoshop is a powerful tool for artistic expression and compositional enhancement.
Correcting Misaligned Photos
One of the most common uses of rotation is to fix tilted horizons in landscape photography or skewed architectural lines. A slightly off-kilter horizon can detract from an otherwise excellent photograph. Using the Arbitrary rotation option or the Straighten Tool within the Crop tool, you can precisely align these elements.
To use the Straighten Tool:
- Select the Crop Tool from the toolbar.
- In the Options bar at the top, find and click the Straighten Tool icon (it often looks like a spirit level).
- Click and drag a line along an element in your image that should be straight (e.g., the horizon, a building edge).
- Upon releasing the mouse button, Photoshop will automatically rotate the image to make that line horizontal or vertical.
How to STRAIGHTEN YOUR PHOTOS // Lightroom & Photoshop Tutorial
Dynamic Composition and Artistic Effects
Intentional rotation can inject dynamism, tension, or a unique perspective into an image.
- Tilting: A slight tilt in a cityscape or portrait can create a sense of motion or unease, guiding the viewer's eye in an unconventional way.
- Asymmetrical Designs: By rotating individual elements around a custom pivot point, designers can create asymmetrical layouts that feel balanced and visually engaging. Inspiration can be found in art collections that utilize dynamic angles to convey emotion or narrative.
- Mirroring and Symmetry: Flipping an image or specific layers horizontally or vertically can be used to create symmetrical compositions, reflections, or to achieve a desired visual balance.
Artists often draw inspiration from diverse visual collections, examining how elements are positioned and rotated to create impact. For instance, observing how objects are arranged in a Chris Hytha luxury collection might reveal innovative ways to use rotation within a larger composition to tell a story.
Layer Organization for Smooth Rotations
Proper preparation of layers is paramount for seamless and high-quality rotations, especially in complex projects.
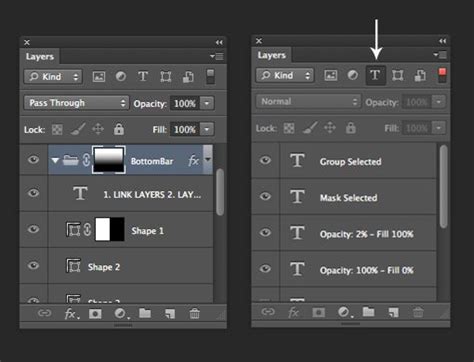
- Naming and Grouping: Clearly name each layer (e.g., "Background," "Subject," "Text") and group related layers. This organization prevents confusion when selecting multiple layers for transformation or when working with individual elements.
- Locking Unchanged Layers: To avoid accidental modifications, lock layers that should remain static. This ensures that only the intended layers are affected by rotation.
- Visibility: Use the eye icon next to each layer in the Layers panel to toggle visibility. This allows you to focus on the specific layers you are currently rotating without distraction from other elements.
Advanced Rotation Techniques and Considerations
For experienced users, Photoshop offers further control and creative avenues through its advanced features.
The Ruler Tool for Precision
A favored method among many professionals for straightening images is the Ruler Tool. This tool, nested under the Eyedropper tool in the toolbar, offers a more forgiving approach than the Straighten Tool.
- Select the Ruler Tool.
- Click and drag a line along an element that should be straight.
- Instead of automatically rotating, Photoshop displays a readout of the angle. To apply the correction, go to Image > Image Rotation > Arbitrary, and the angle measured by the Ruler Tool will be pre-filled.
- The advantage here is that you can reposition your measured line multiple times before committing to the rotation, allowing for greater accuracy.
However, unlike the Straighten Tool, using the Ruler Tool to measure an angle does not automatically crop the image. After applying the rotation, you will likely need to use the Crop Tool to trim any resulting blank areas or to refine the composition.
Combining Rotation with Other Transformations
Photoshop excels at allowing users to combine multiple transformations. While in Free Transform mode (Ctrl/Cmd + T), you can not only rotate but also scale, skew, distort, and adjust perspective. This enables complex manipulations, such as creating 3D-like effects or integrating elements into different perspectives.
Understanding Anchor Points and Transformation Centers
The pivot point, or anchor point, of a transformation is critical. By default, it's the center of the layer. However, you can click and drag this point to any location - even outside the layer itself - to change the axis of rotation. This is invaluable for creating circular patterns, rotating elements around a specific point in a design, or achieving sophisticated asymmetrical compositions. For example, understanding how anchor points are used in collections like the Christianity gallery collection can offer insights into creating visually compelling arrangements through strategic rotation.
Preventing Quality Loss
While Photoshop employs sophisticated resampling algorithms to maintain image quality during transformations, excessive rotation, especially on heavily compressed JPEGs, can still lead to some degradation. Converting layers to Smart Objects before transforming is the best defense against this. Additionally, always work with the highest resolution images possible. Examining detailed collections, such as the Cavalier King Charles Spaniels collection, can highlight how proper management of rotated images preserves intricate details and textures.
Conclusion: A Versatile Tool for Precision and Creativity
Mastering image rotation in Photoshop is more than just a technical skill; it's a gateway to enhanced compositional control and creative expression. From the straightforward task of correcting a crooked horizon to the intricate manipulation of layers for avant-garde designs, Photoshop's rotation tools provide the flexibility and precision required. By understanding the difference between rotating the canvas and transforming individual layers, leveraging Smart Objects for non-destructive editing, and exploring advanced techniques like custom pivot points, users can elevate their image manipulation workflow, ensuring that every rotation serves both the aesthetic and technical goals of their project. The ability to precisely align, creatively distort, or dynamically reorient elements ensures that your visual storytelling is always sharp, compelling, and perfectly composed.